8 unusual do-it-yourself Valentine's Day gifts: master classes
8 simple gift workshops for the DayValentine's Day (February 14) - to make them very easy with your own hands. And such gifts for the Day of the Lovers are perfect as a couple and a girl, or just friends or colleagues!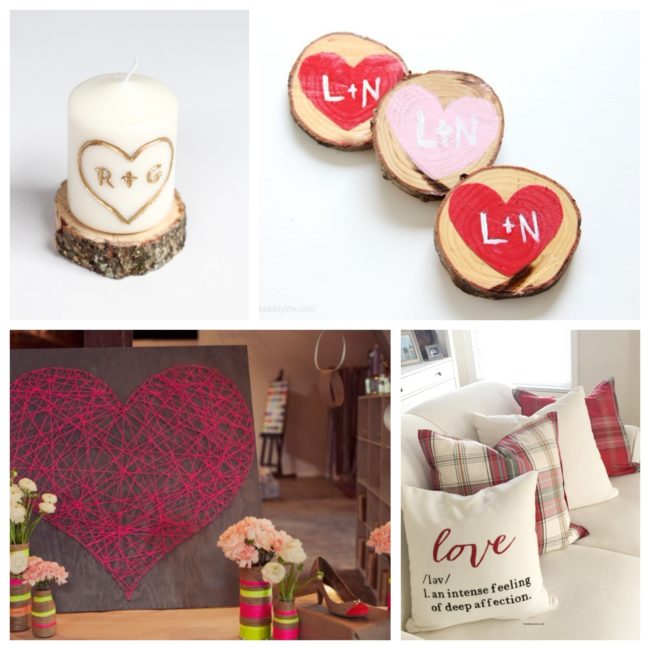 Romantic and original gifts for February 14, which do not want to throw away - they are all practical and will delight the whole year! The content of the article:
1. Cup Valentine's Day
It does not require any drawing skills, just one simple stencil. Necessary materials:
- Mug with a curved handle that resembles a half heart
- Markers for drawing on ceramics (here red and gold)
- Contact paper
- Scissors
 Step by Step Instruction: Step 1: Make a Heart Stencil
 Place the cut out heart on the contact paper and circle. Then cut the heart along the intended line. The color of the contact paper does not matter.
 Fold the heart out of contact paper in half,to attach it to the mug. Place the center folded line of the heart around the edge of the handle, and then attach the rest of the heart to the circle, as shown in the photo. If you fail to stick exactly the first time, re-paste.
  Step 3: Apply the pattern. Use a red marker on ceramics to make a dotted line along the edge of the heart on the circle. When making points, hold the marker straight so that they come out round. Do not go on contact paper.
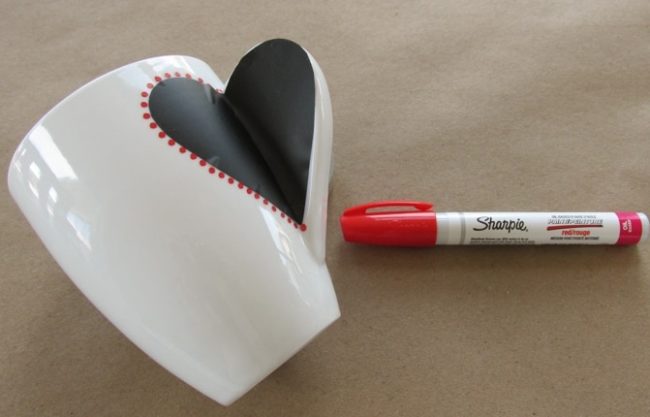 Let the paint dry for 10 minutes, then carefully remove the heart from the contact paper (save it for the next cup). Add points to the handle of the mug.
  In the same way, decorate the mug on the other side of the handle:
  You can also add another heart in the center of the cup:
  Finally, write on the “I love you” mug:
  Step 4: Strengthen the paint. Let the mug dry for at least 20 minutes, then place in a cold oven. Heat the oven to 350 degrees and hold the mug there for 20 minutes. Turn off the oven and allow the mug to cool completely. After that, repeat the process again. Mug is ready! Tips:
- Do not worry about mistakes when coloring, they can be removed with the help of vodka or alcohol.
- Drawing markers are not safe for contact with food. Use them on the outer surfaces of mugs that do not come in contact with drinks or food.
And here is another similar variant with gold paint: 
 In the same way you can decorate not only mugs, but also other dishes or trays:
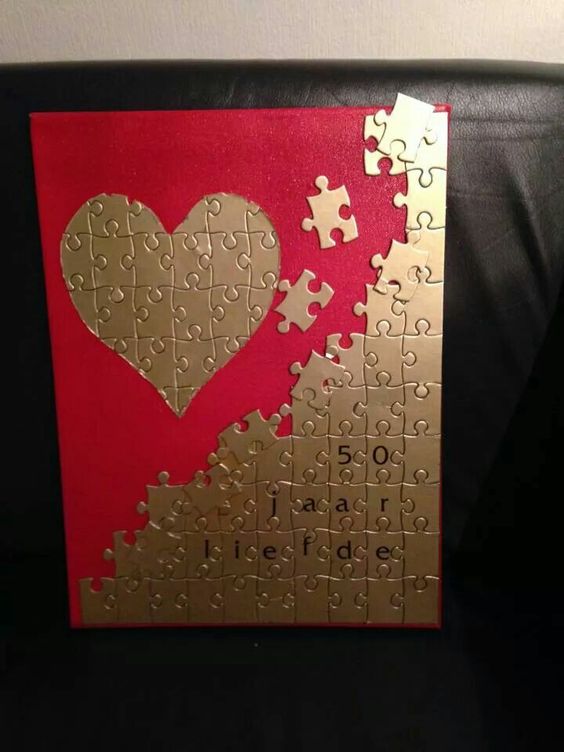
2. Picture from puzzles
If you have old puzzles and are no longer needed by anyone - then why not turn them into a beautiful picture and give them for Valentine's Day! 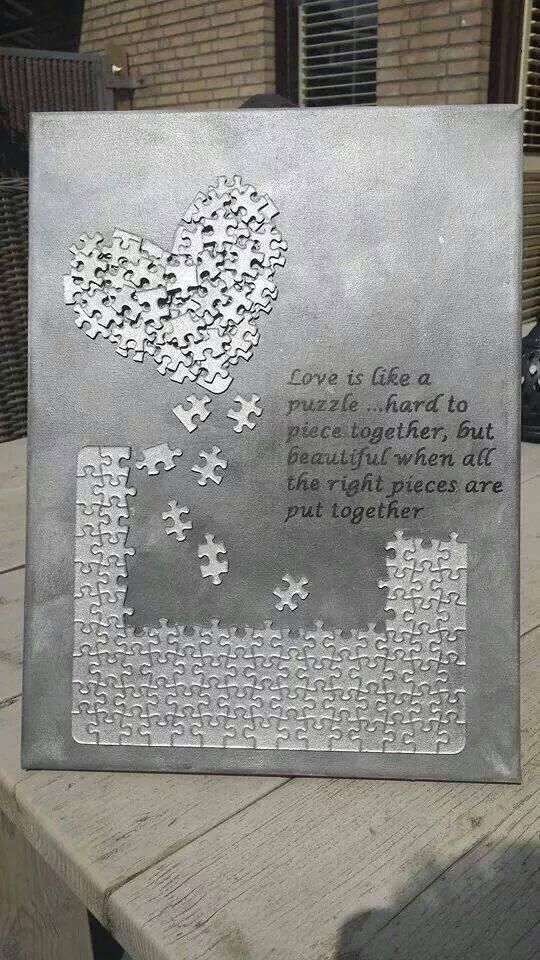

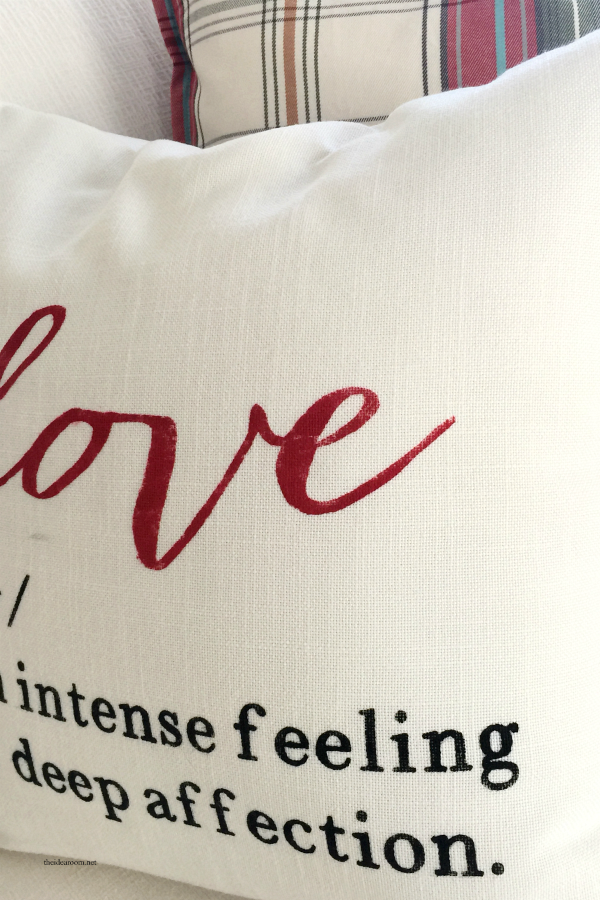
2. Pillow "Love"
A pillow with a hand-made lettering is a great Valentine's Day gift! The inscription can be made any!  Necessary materials:
- Pillow
- Freezing paper
- Paint for fabric
- Brush
- Scissors or stationery knife
Step 1: Making the Stencil
Step 2: Apply the pattern. Put the finished stencil on the pillow, slightly wetting it before it, so that it is pressed tightly against the fabric. After that, apply the paint to the fabric over the stencil and let it dry. Personal pillow is ready! 
 Here is the result:
  Here's another option for a Valentine's day family present -
3. The heart of thread
Such a Valentine just will not want to throw out after the holidays - the heart can be hung on the wall and enjoy the gift the whole Year!  Necessary materials:
- Wooden square
- Threads (here are pink neon threads, you can take threads for knitting, they should not be too thin)
- Nails
- Hammer
- Spray paint for wood
- White paper (to draw a heart)
Step by Step Instruction: Step 1: Paint the tree Spray paint for the tree to give it the desired color. It used a brown tint, and the pink heart looks amazing on it! Step 2: Drawing the Heart After the paint has dried, attach a piece of paper to the wooden square and draw a heart on it. 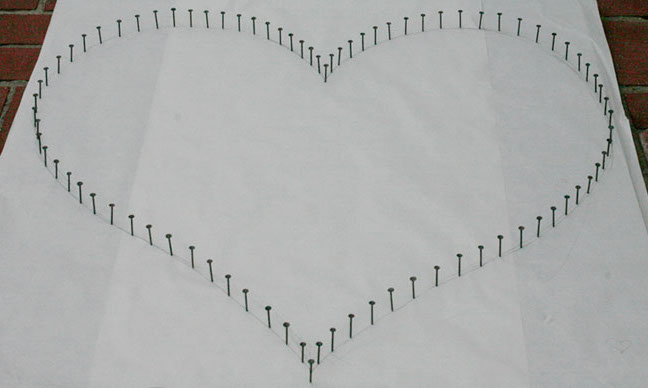 Step 3: We drive carnations
Step 4: We stretch the thread Now the most interesting part! First, tie a knot around one of the nails hammered into the tree, and then turn on your creative impulse and fill the heart with threads. ATTENTION: There is no right or wrong way - keep pulling the thread until you like the heart that you have created.  The cost of this project is quite small, and the result looks exciting! Here are some more ideas.

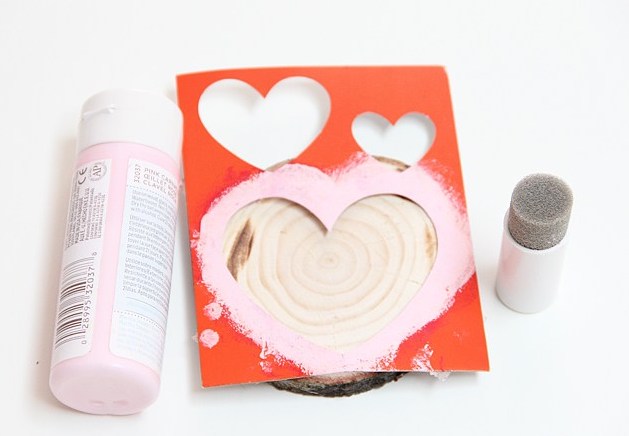
4. Original Valentines
Valentines on cuts of a tree - very original and creative! They can be used as a stand or just hang on the wall!  Necessary materials:
- Wooden log (suitable size in section, approximately 10-12 cm)
- Saw
- Sandpaper
- Varnish for wood
- Stencil of the heart (or your ability to draw it by hand)
- Paint - two colors (one for the heart, one for the initials)
- Brush
Step by Step Instruction: Step 1: Making wooden circles It is necessary to cut a wooden log into circles about 2 cm thick. If you try to make thinner circles without the necessary skills, then they can break apart, as happened first here:  Step 2: Adjust the circles To make the stands look more neat, after making the circles, polish them with an emery paper, leveling the surface. After that apply one coat of varnish for wood. Step 3: Draw the picture
- After the varnish has dried, place a heart stencil on the wooden circle and apply paint. If you can draw without a stencil, draw it yourself.
- Let the paint dry and write over the heart of the initials of a pair of lovers:
Let the paint dry again and apply another coat of wood varnish to seal.  These are the perfect little gift coasters.Valentine's Day, but they are also wonderfully suitable for wedding decor or celebration of its anniversary (it turns out a wonderful addition if the celebration is organized in a rustic style)!
5. Candle with a heart
It is very easy to make such a nominal candle with your own hands and it will perfectly fit as a gift for Valentine's Day! Detailed master class - in the article "" 
6. Candlesticks with a heart
Candlesticks are a practical gift that you don’t want to throw away even after the holidays. In addition, they can be made very easily from cans, bottles, wood - detailed lessons on 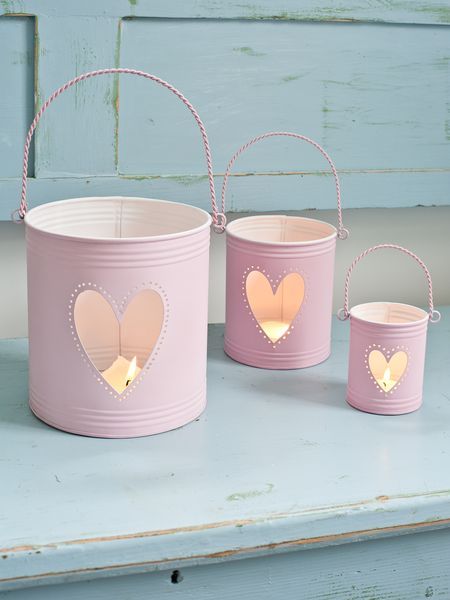
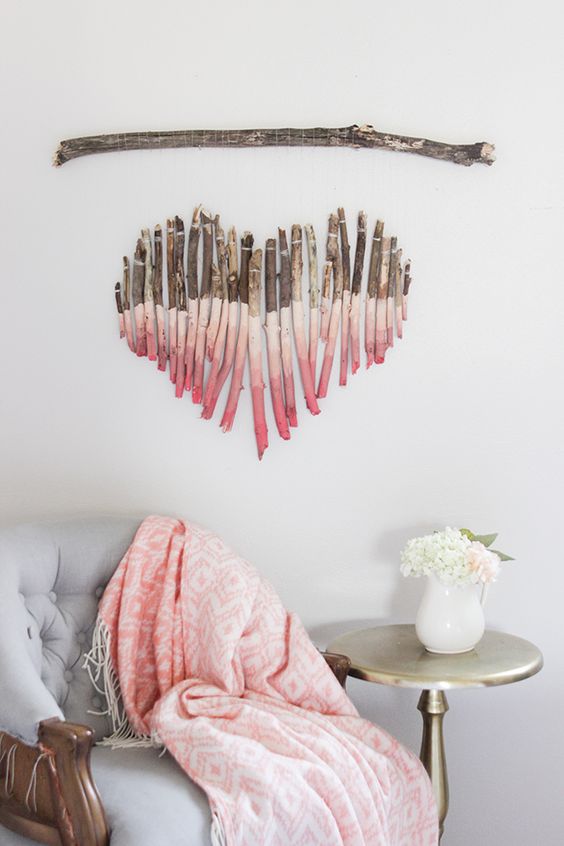
7. Heart of twigs
A panel made of branches on the wall in the shape of a heart - such a gift for Valentine's Day will remind all year about a loved one. For the manufacture of need:
9. Panel on the wall of the heart
Such a panel is very easy to make; you will need:
- Threads of two colors, you can dissolve the old sweater
- Straight wooden stick.
How to:

8. Key
- according to the link detailed master! This is a great practical gift for the home. Which every day will remind her of you. If there is no force and possibility, then you can make the original tag on the key. 
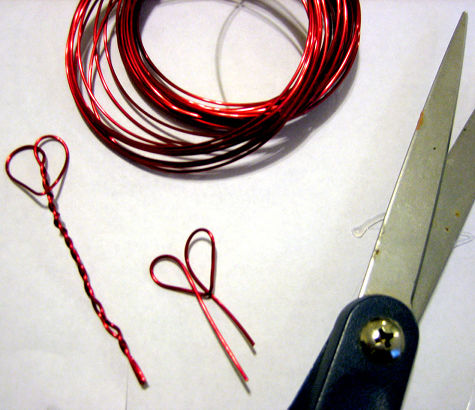
9. Light bulb with hearts
This light bulb looks very interesting, and on itsmaking will take only an hour of your time. By the same principle, you can make light bulbs with other fillings, for example, plant a miniature plant in the middle, or fill it with colored beads. 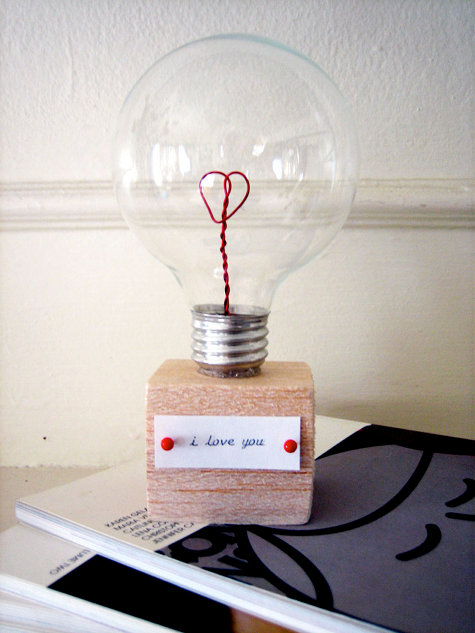 Necessary materials:
Step by Step Instruction: Step 1: Getting the Inside of the Light Bulb 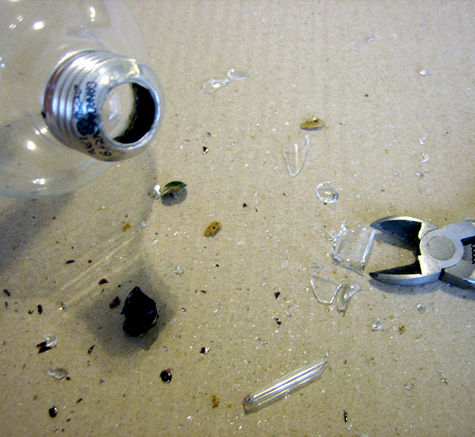
To remove cleaning agent residues, you canfill the flask with a small amount of salt and shake it, this should clear the powder from the walls. Now the light bulb is ready to make something new out of it. Put it aside for the time being so as not to break it while you prepare the parts for filling. Step 2: Making wire figurines Cut 25 cm of wire to make a heart. Fold the wire in half, twist the bottom of the wire together at the bottom, and wrap it from above to form a heart.
- The width of the heart should be about 1.5 cm so that it easily passes through the base of the light bulb.
If you want two or more wire hearts in the middle of a light bulb, then repeat this step several times. Step 3: Fasten the wire to the tree
TIP: If the wooden bar is not too hard, insert the ends of the wire hearts in the center of the bar. If this does not work out, first make a small hole in the bar using a hammer and a nail, and then remove the nail and insert the wire into the hole. For reliability, you can secure them with hot glue. Step 4: Fasten the light bulb
- Now pass the wire hearts into the flask and stick the light bulb to the wooden bar.
- After that, make the inscription “I love you” on a small leaf and attach it to the bar with two office pins with beautiful heads. Done!
Comments
Related posts:
 Super crafts for Valentine's Day. Valentines with their own hands.
 Cat Amigurumi in the form of a heart to Valentine's Day with their own hands - master classes with descriptions and photos.
 The master class will teach you how to make gifts for Valentine's Day - crochet beautiful hearts.
 Making Valentine's Day Gifts
 Valentines, coloring, crafts on their own for Valentine's Day.