New Year's hand-made articles, Santa Claus with his own hands, how to make Santa Claus, crafts with children, ideas and detailed lessons.
Before the New Year holidays, there are very fewtime. In all kindergartens and the school they begin to make all kinds of crafts relating to the New Year theme. Mom and Dad are engaged in creativity with their children at home. Very often children are given a task to make an original Christmas toy or decoration. Often, parents do not have special skills, but do not get upset. This article will be an excellent assistant. See the master classes on creating Santa Claus, presented below, and you will be able to make a fairly original and unusual New Year craft yourself, while the money will remain intact, and your child - happy. Santa Claus made of paper. Applications for the youngest Waiting for New Year's holidays is a wonderful occasion to do creativity and involve our children in this activity. The first master class is devoted to making crafts that our kids can do with the help of their parents. This fascinating process will help your child develop his perseverance, fine motor skills, fantasy and spend time fascinatingly and interestingly. On the eve of the New Year holidays, you can make a lot of bright and interesting applications. Invite your child to make an application with you in the form of Santa Claus. 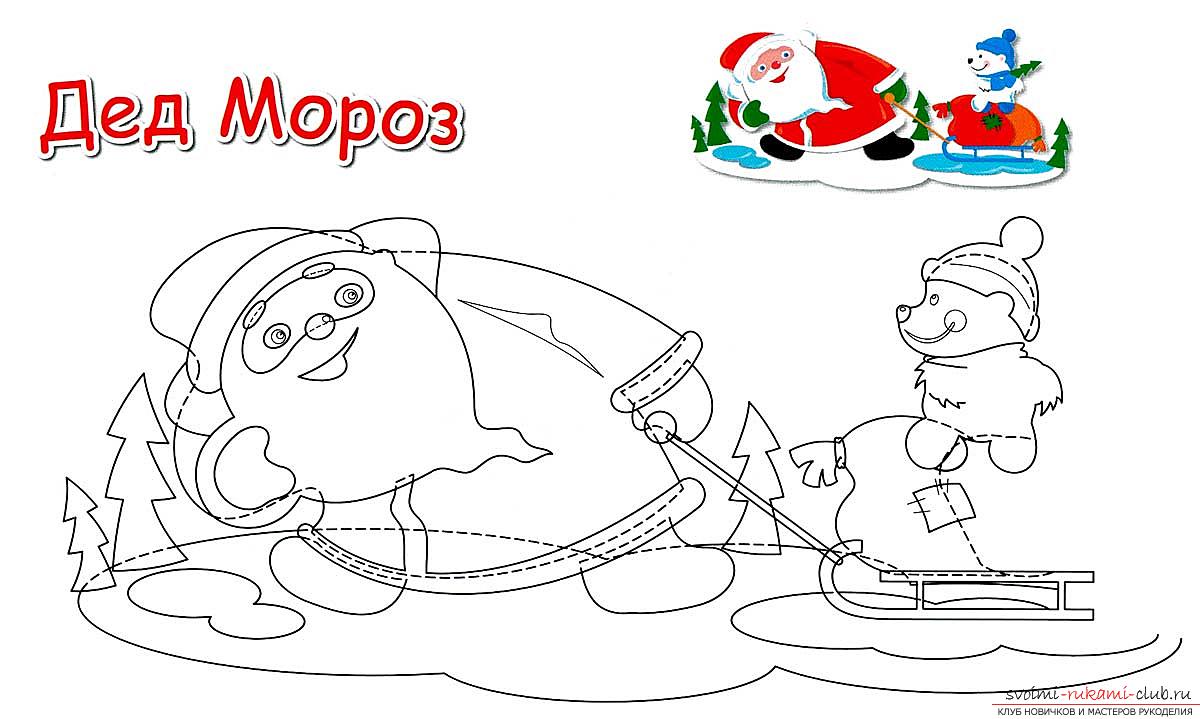 The model of Grandfather Frost, presented below,designed to decorate walls, windows, doors, you can paste it on thick paper or cardboard, and it will become a wonderful postcard. Decoration of a snowy lawn On a snowy lawn, the first thing to do is to glue all the ice puddles, then cut out the figures of the Christmas trees and paste them on paper, then look into the design of Santa Claus. After him, glue the bear with the Christmas tree, the sled with gifts, the rope from the sleds is last of all attached. Glue Santa Claus In advance, separately cut out all the parts of Santa Claus and paste them on a chart printed on paper. First, glue the red fur coat, then glue all the white details (collar, beard, coat fringe). Over the beard, the face, mouth, nose, white parts of the eyes, and also the eyebrows are glued. Use a felt-tip pen to represent the iris of the eyes and the pupil. Using a blue felt-tip pen, draw the shadows on the eyebrows, beard and hat. Next, glue the gloves. The mitten that holds the sled should be glued under the edge of the sleeve, and the other - over the white edge, as in the image. Valenki also glued to the lower edge of the fur coat. In addition, using dark red paper, you can draw a shadow between the left sleeve and the right side of the fur coat. Sacks with gifts on sleds. First, glue an orange bag, on top of it - red, cut out a patch from the green paper and two ties, glue them. Use a felt-tip pen to draw the threads on the patch. In the end on the bottom of the bags you need to glue the cut out sled. Glue the bear cub Now, on top of the bags with gifts, you need to paste the bear's body. On top of it, glue a hat, scarf, gloves, felt boots, a nose and an ear. In addition, draw a finger-tip on the eyes, mouth, and also the lower part of the foot. Use the pink pencil to paint the cheeks. As for the Christmas tree, it must initially be pasted on the back of the bear's calf in the shoulder area. With a blue felt-tip pen, paint the shadows on the scarf and hat.
 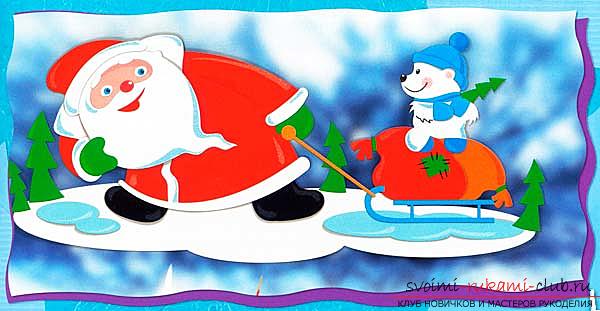 Now take care of the overall design of the picture. To do this, use the colored pencils to designate the shadow and light areas, giving the picture an additional volume. Leave the application to dry, and then you can glue it to the window or door with a small piece of adhesive tape. Santa Claus from the fabric of this Santa Claus can be made in the form of a toy, and it can also be used as a thermocover. To make a similar Santa Claus from cloth you will need flaps of red shade, for the base and lining prepare the coarse calico, for the design of the face - a small piece of flax, for filling the sintepon is suitable, in addition to the decor you will need trimmed white artificial fur.
  First, take out two body parts and four hand pieces on the fabric that you prepared for the base. In addition, it will take 2 cm for the allowances. Next, the handle should indicate the location of the face.
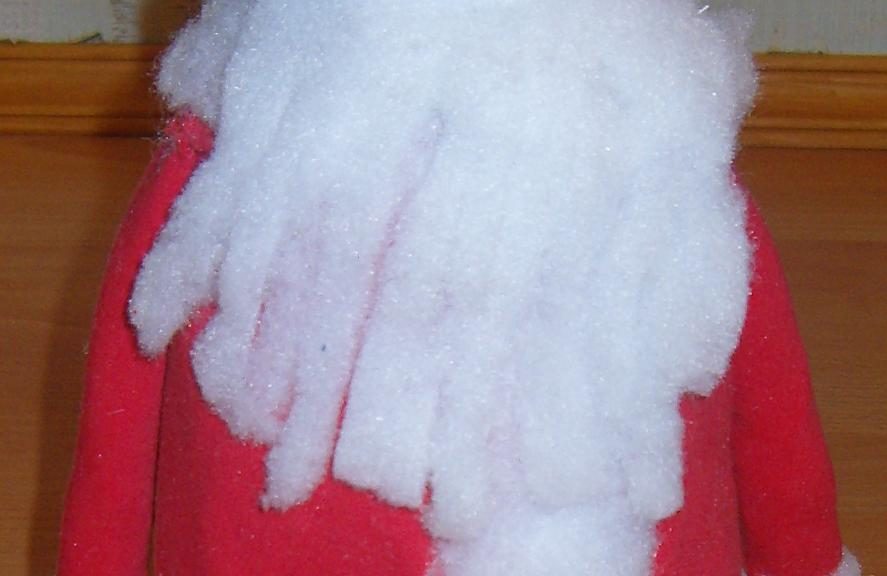
  Now gather from the flaps a red fur coat, sheis performed in the technique of "crazy". To the bottom of the base with a blunt angle upwards, you need to pin one triangle. After that, select a strip of another fabric, but also a red shade, and sew it to one side of the triangle. Place the flaps face to face, sew, bend and flatten them. The third strip should close the second side of the triangle and the cut of the strip sewn to it. You also need to place the strip face down, flush, unscrew and flatten it. Thus, cover the entire surface, giving it the appearance of a red fur coat. This is the back end. As for the front part of the product, there will be a linen flap that will serve as a face. It can be immediately included in the general product even during assembly, or you can sew at the end when Santa Claus is fully ready. Begin to assemble the hands. You should learn a kind of "sandwich" from the lining, sintepon and patchwork, which are collected on the main fabric. First, grind all the details, and then quilt them. Next, you need to trim all the details, leaving the allowances on the seams for about 1 cm. After that, fold two details of the trunk face to face, sew them, edge the edges with zigzag and turn them to the front side. If it is a toy, then you need to make an additional detail that will serve as a bottom. Torso should be stuffed with a sintepon and sew a bottom to it, using a secret seam. If you plan to make a cover, then these actions do not need to be done. Do the same with the details of the hands, leaving holes not pierced, through them you need to turn out the details and fill with the sintepon. After that, you can sew them with a hidden seam. Next to the person it is necessary to sew an application in the form of a nose and cheeks. In this procedure, place a small amount of sintepon under the bottom to give details of a larger volume. Beard, mustache, and eyebrows can be made in two ways: pile details of wool, using the method of dry felting, and you can perform them from the remains of fur. You have left to carve a fur collar (fur must be different from the one from which the beard is made), a fur strip for the hat and the bottom of the fur coat. Fasten your hands, embroider your eyes. Sweet Father Frost their own hands We must always remember that we create our own mood. Therefore, to make the atmosphere more festive, make sweet Santa Clauses, which can become an ornament of any table and festive dishes. This recipe is simple enough to prepare, and does not require any coloring. All you need is strawberries, whipped cream, as well as chocolate or chocolate powder, which is used for baking.
  To begin with, cut off that part of the berry, wherethere were leaves, this must be done in order to keep the figure in an upright position. Then cut off the tip, which in the future will be used as a cap. Next, using a spoon or a pastry bag, put a little whipped cream on the main part of the strawberry, cover with a cap (cut off the tip of the strawberry). On top of it you also need to put a small drop of cream - it will serve as a pompon. Execute the eyes of chocolate powder, and make two buttons using the toothpick for convenience. You can complicate your task by adding an additional ingredient in the form of pineapple.
 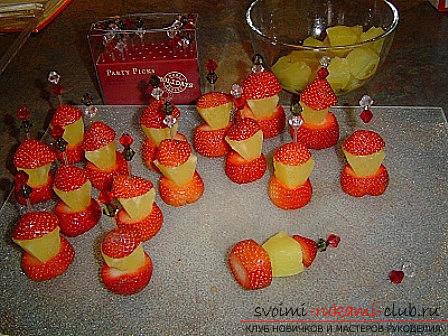 To perform such a Father Frost repeat withstrawberries the same actions, but in this version between them you need to insert a piece of pineapple and fasten everything with skewers or toothpicks. Decorate the head in the form of pineapple lush head of hair, made of cream.
 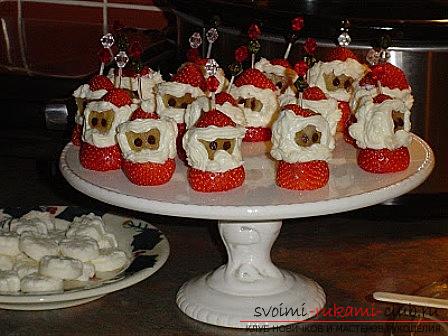 To place the eyes of chocolate, cut intoPineapple small holes and insert eyes with tweezers. New Year's candlestick with Santa Claus A fabulous winter candlestick can easily be made with your own hands. At the same time, in addition to Santa Claus, you can place any image with a New Year theme on it.
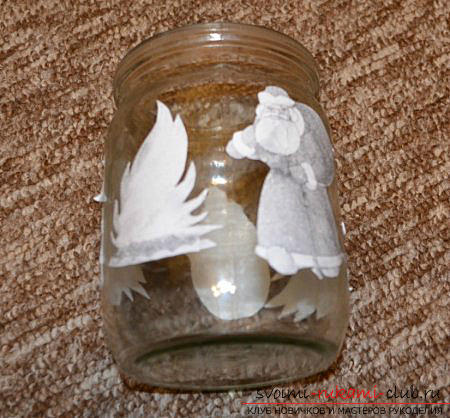
 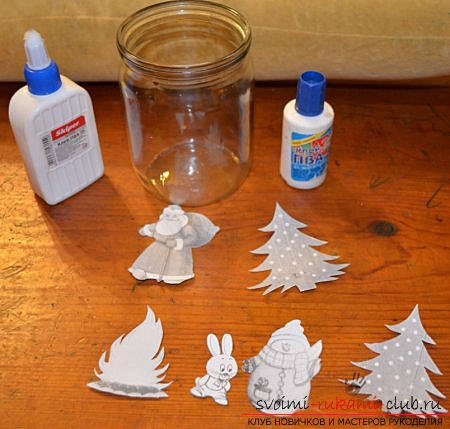 Take a half-liter jar and paste it on it.various applications Santa Claus, Snow Maiden, zaek, herringbone, etc., for this work use glue PVA. In this case, be sure to paste the application of the fire, which warms all the characters.
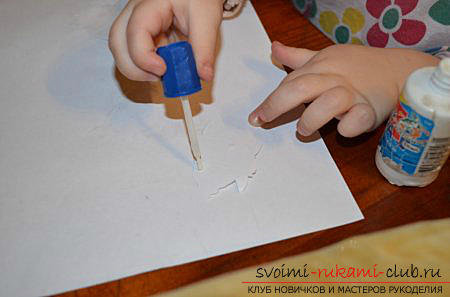
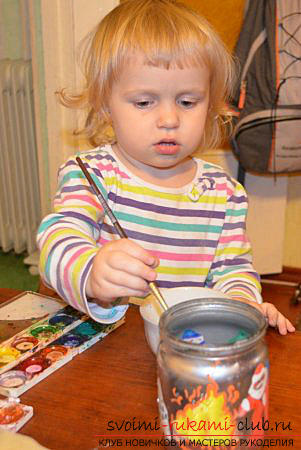
 Leave to dry the jar, then apply toher spray paint is silvery. Let it dry. Next, you need to mold all applications, it is best to do this by wetting the jar with water. After that, let it dry again, then decorate all the figures using acrylic paints.
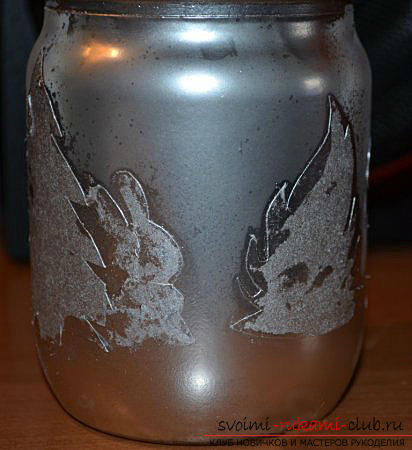
 Allow the can to dry, coat the product with varnish,again, dry and make an additional decor of the candlestick. You can make drifts from gypsum and place them on top, also make a casting for the candle from gypsum. Allow your candlestick to dry completely.
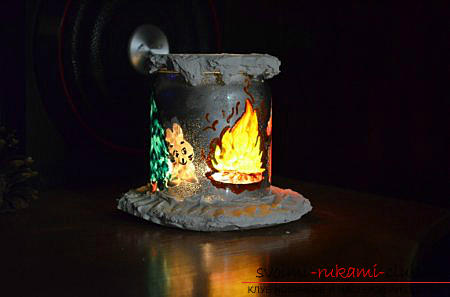
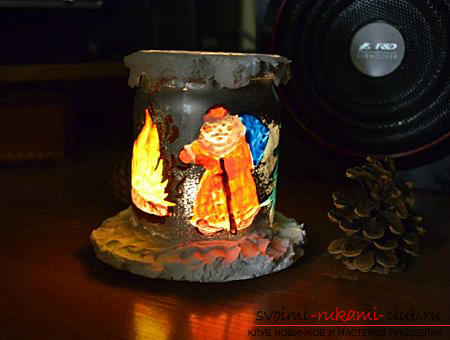 Now you need to place insidecandle-pill and a New Year's fairy tale will come to life. The flame will flash, and Santa Claus will play with new colors. Sweet New Year's gift. Santa Claus with Candy This master class provides a description of the manufacture of an unusual craft in the form of Santa Claus with candy. It can be made for souvenirs in kindergarten, or used in those cases if you meet guests with children at home. Such skewers can become a bright and original decoration of the festive table. Therefore, read the instructions and get down to business. Do not forget to call your children, they will also be very interested in participating in the process.
  For work, prepare cardboard, wrapping paper(you can replace the ordinary), wadded disk, decorative elements in the form of ribbons, felt, etc., wooden skewers, glue and sweets. The first thing to do is to cut out a triangle from a cardboard box. Also cut out from the wrapping paper such a detail, which is depicted in the photo. It will be needed in order to wrap a cardboard triangle.
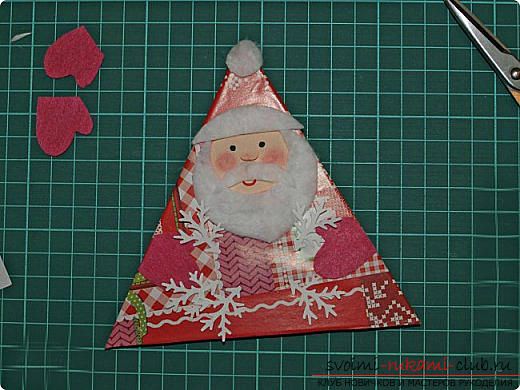
  Now, make a face. To do this, cut out the circle, gently bend it and make a nose in the shape of a semicircle, cutting it with scissors. Tint the face around the edges and draw the cheeks using a cotton swab and blush.
 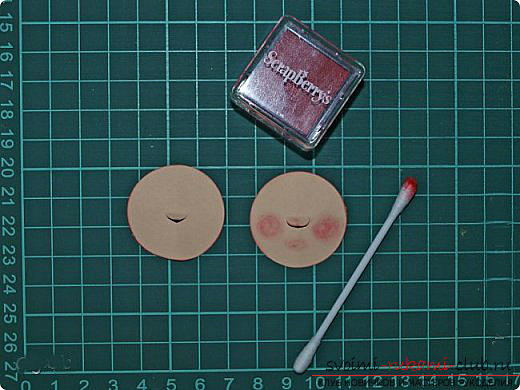 Glue the wrapping paper to one side of the triangle. In this work, a two-sided adhesive tape was used for these purposes. Stick the face on top.
 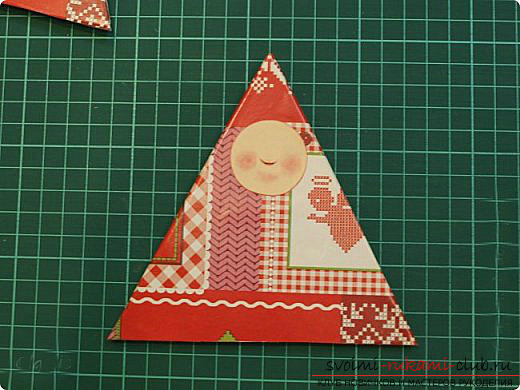 Next, halve the cotton swab and cut out the necessary details: beard, mustache, edge of the cap and pompon for it. They need to be glued and dorisovat eyes and mouth.
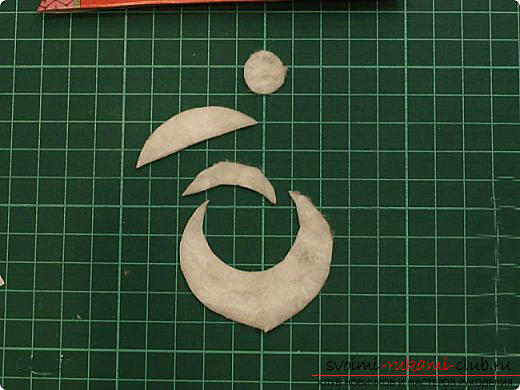
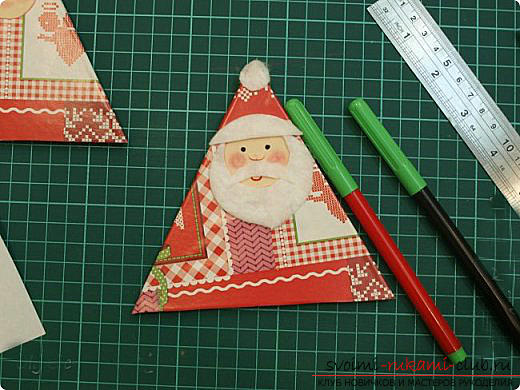 From the felt cut mittens, glue them and decorate the place where the candy will be located.
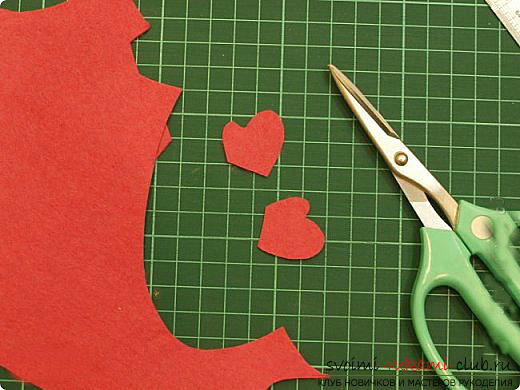
 On the back of the triangle, glue the wooden skewer and seal it on top of the paper. In this procedure, the glue crystal was used.
 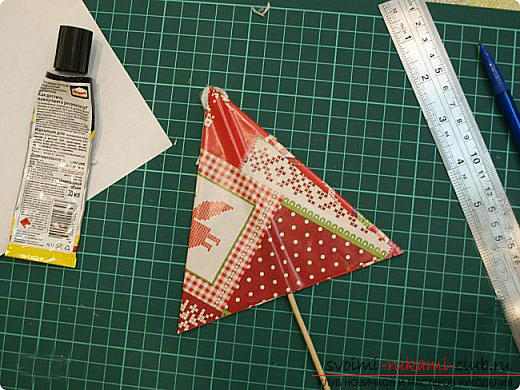 Additionally, on the stick at the base of the triangle, you can tie a bow from a satin ribbon. Fix it with glue, making a small droplet - so the bow will not move out.
 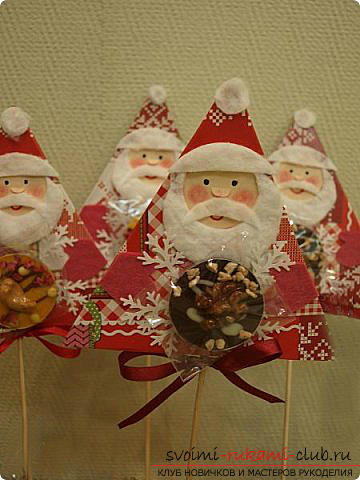 And as a result of work, give Santa Claus in the hands of a candy, attaching it with a double-sided scotch. Now your souvenir is ready.
 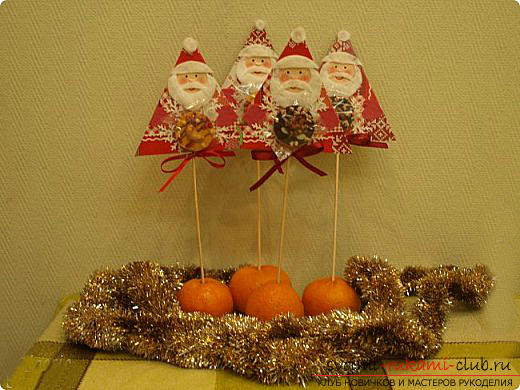 Santa Claus from the plastic bottle of such a GrandfatherFrost can be made in just a few hours, while not having spent significant cash. You will need one plastic bottle, a piece of synthepone (70x50 cm will be enough), the same piece of red cloth, a small piece of white fabric, as well as all kinds of materials and tools that are always needed when hand sewing.
 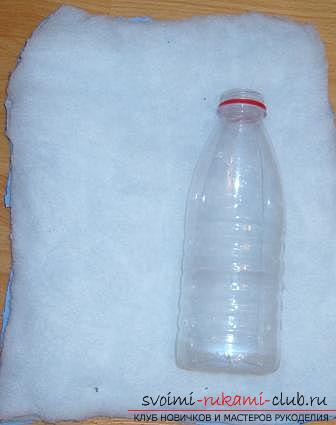 First, take the bottle, place it on theSynthepone and wrap them with plastic containers. In order not to spend extra money, you can look for a sintepon at home, in any case you will have an old, unnecessary baby coat. If it still does not, do not despair, you do not have to buy it. Wrap the bottle with several layers of fabric - the product will not spoil it. The bottle will serve as a toy body, and the sintepon needs to be cut slightly above the neck - it will make a head from it.
  Wrap the bottle and sew the edges together. You can not pay too much attention to the quality of the seams, they still will not be seen. The top of the sintepon will become the head of Grandfather Frost, so sew up the top, and place the neck well with a rope.
 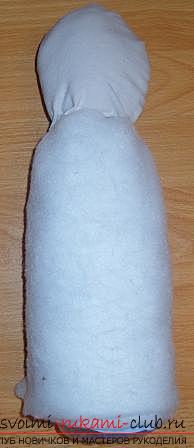 To the head of the toy was not sinteponovoy,tighten it with a white cloth. Do not worry if you have wrinkles, the main thing is that they do not fall on your face. Distribute them from behind. In the future, they disguise themselves.
  Now, make clothes. Cut out two triangles of red cloth, sew them, at the top, sew a pompon made of white sintepon, from it, draw the head of the hat.
 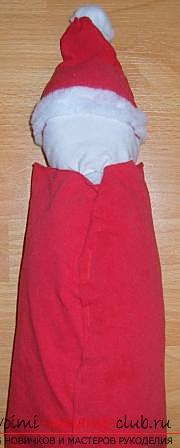 Next you need to make a fur coat. Pick up a fabric of red or blue color and wrap it with a workpiece. Sew the edges together, it's best to make the seam in the center, because then it will not be visible anyway - we will close it with a sintepon. Make fur for a fur coat, cutting the sintepon into strips. Sew a collar from it, a bottom of a fur coat, and also sew a strip in front.
 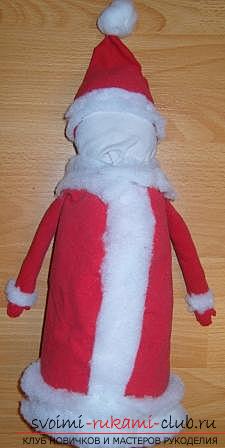 Make the hands of the fabric strips, fill themany material to impart volume. Do not forget to do gloves, sleeves should also be with white edges. Sew your hands under the collar, so you avoid unnecessary visual seams.
 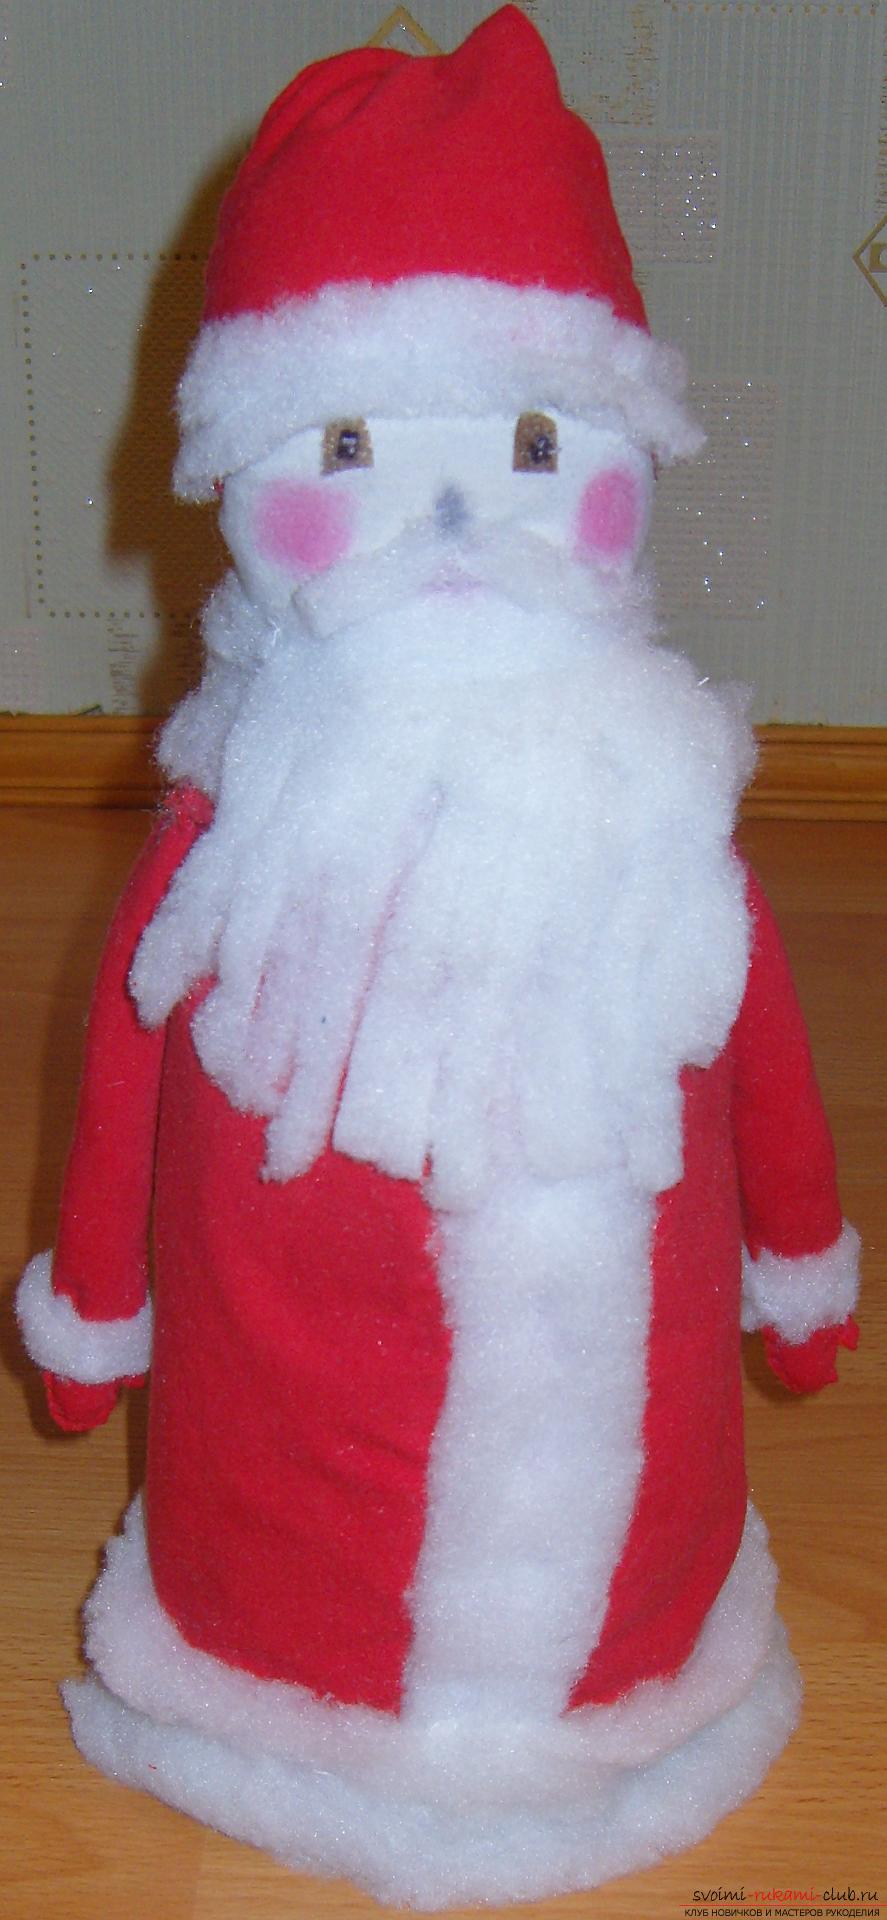 Now, using the same sintepon, executea beard and a mustache. Eyes can be made from buttons, beads, or you can just draw them. Give cheeks a blush, for this purpose the blush is best suited. In addition, draw a mouth and nose. Santa Claus from a plastic bottle is ready. Toys and crafts in the form of Santa Claus are an excellent decoration of any interior. As you could see, it can be made from anything. So prepare all the necessary materials, call for help of your child and get busy making genuine New Year's masterpieces. You'll see, your Santa Claus, made by yourself, will look unique, bright and beautiful, besides the flight of your imagination is not at all limited. I wish you success in your work and happy New Year holidays!
Comments
Related posts:
 How to make a Santa Claus costume. Simple tips for working with your own hands and photos.
 New Year's hand-craft: Santa Claus's boot for the 2015 contest, New Year's hand-made articles
 How to make unusual crafts with children on the Victory Day with their own hands.
 New Year gifts, New Year's crafts, souvenirs with their own hands, how to make a gift for the New Year, ideas for New Year gifts with their own hands.
 Crafts by own hands: Father Frost's tent at the 2015 contest, interesting crafts for the new year with their own hands