Christmas tree with their own hands, a Christmas tree of paper, a Christmas tree of cloth, how to make a New Year tree, advice, recommendations, step-by-step photos.
The New Year is not far off and in today's article weWe continue to acquaint you with different techniques of performing New Year trees. Craft a Christmas tree of paper This version of the New Year tree can be made for everyone literally in 5-10 minutes. Bring your child to work, the process will enthrall you. 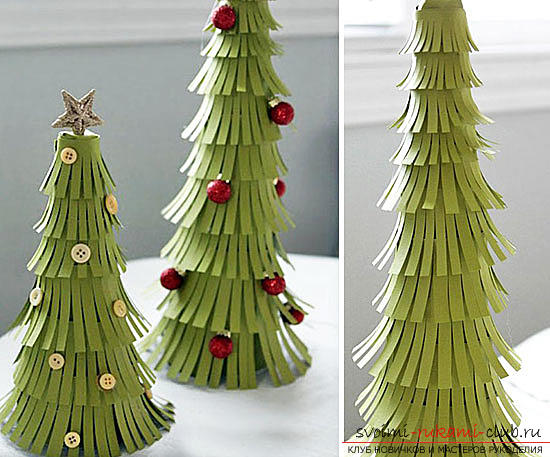 Prepare a paper base in the formCone, if desired, you can find a ready-made foam base, an extended candle, colored paper (it does not need to be green), glue, scissors, and other decorative elements. From thick paper or cardboard, make a cone-shaped base, the size will depend solely on your wishes. Select a suitable color for the ornamental herringbone, cut rectangles of equal width from it.
  As you understand yourself, the length and width of coloredStrips will depend only on the size of the substrate. In this case, the length with each row will become smaller. And if you select the width of the rectangles yourself, then the length of the sheets should be enough to wrap the base. In this case, a small stock should remain, because it is always better to cut off excess than to make a new paper tape. Then cut each of the paper strips so that the fringe turns out. Cut approximately ¾ of the entire width of the tape. Gaps should be approximately the same. If there are minor deviations - it's not terrible, they will be invisible on the finished product.
 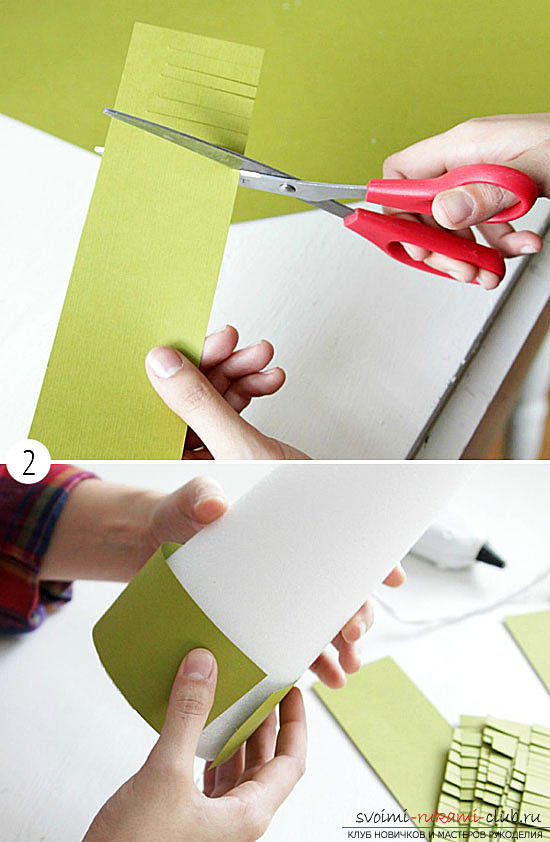 At the next stage, you need a candle to work. You need to use it to twist each rectangle in this way, as shown in photo # 3. As you know, a candle can be replaced by another oblong object of cylindrical shape.
  And now we have come to the most responsiblemoment - you need to collect all the pieces of jewelry together. Start the process of wrapping paper rectangles around the bottom from the bottom. Fasten the parts with glue (great if you have an adhesive gun).
  Pay special attention to the design of the top. Before fixing the last paper rectangle, cover the top of the base with a circle made of the same paper, and bend the tips to the base. To make everything look more organic, you can make the top in the form of an asterisk or something like that. You have left to decorate the Christmas tree with decorative elements in the form of buttons, beads, etc. Just put them on the glue and your Christmas decoration is ready. Christmas tree. Office version A fairly creative and interesting version of the New Year's tree for the office can be observed below. It is made of stickers, on which you can write holiday wishes, dreams and goals for the next year.
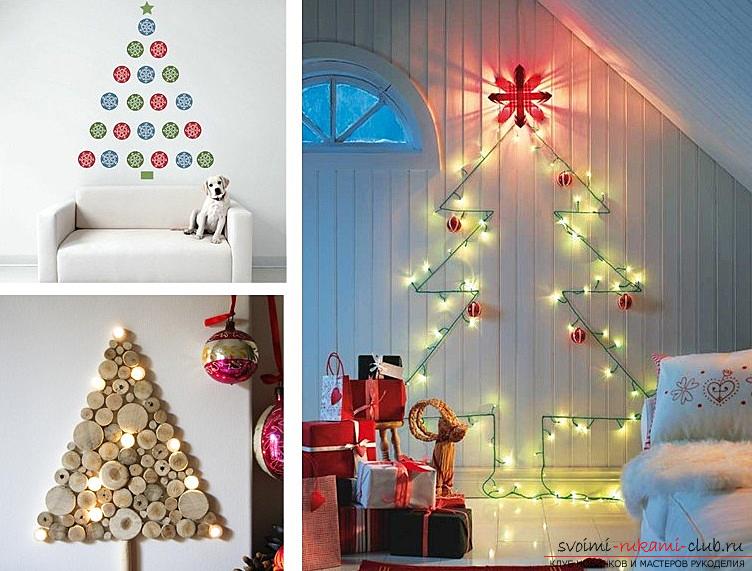
 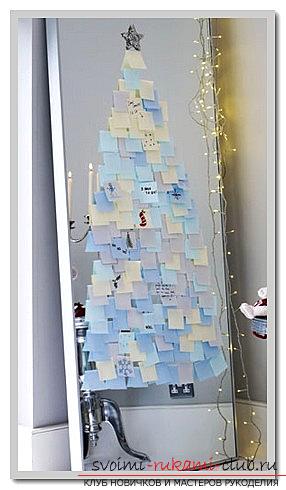 New Year's beauty from a pallet Anotheran alternative to the New Year tree is an unusual decoration made from a pallet. Such pallets are quite common and very versatile material, from which you can make many interesting hand-made articles for your home. Try to make an unusual Christmas tree on a pallet. To do this, you just need to create on its surface a silhouette of a green beauty of garlands, Christmas balls and other festive decorations.
 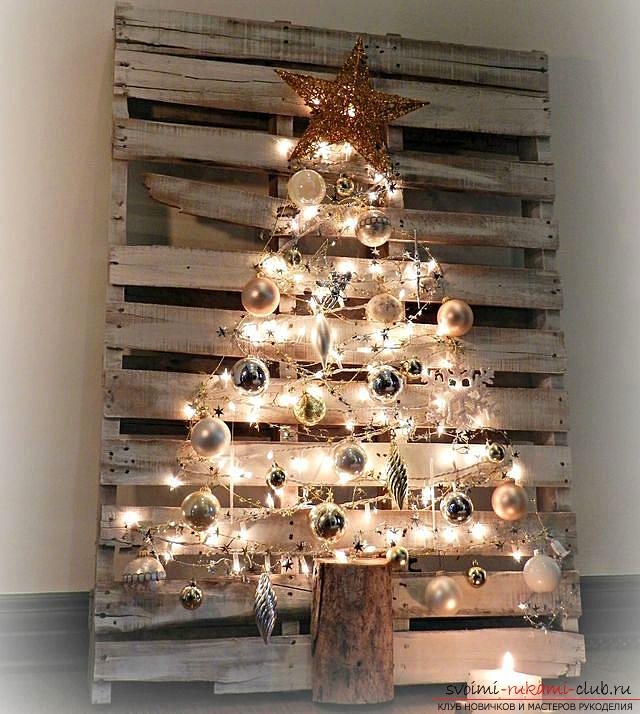 For the second, no less successful optionmaking a Christmas tree from a pallet, you will need a saw. Just cut a piece of herringbone from the pallet and paint it in the desired color. Supplement this Christmas tree can be stencils or decorate it with balls, garlands and tinsel.
 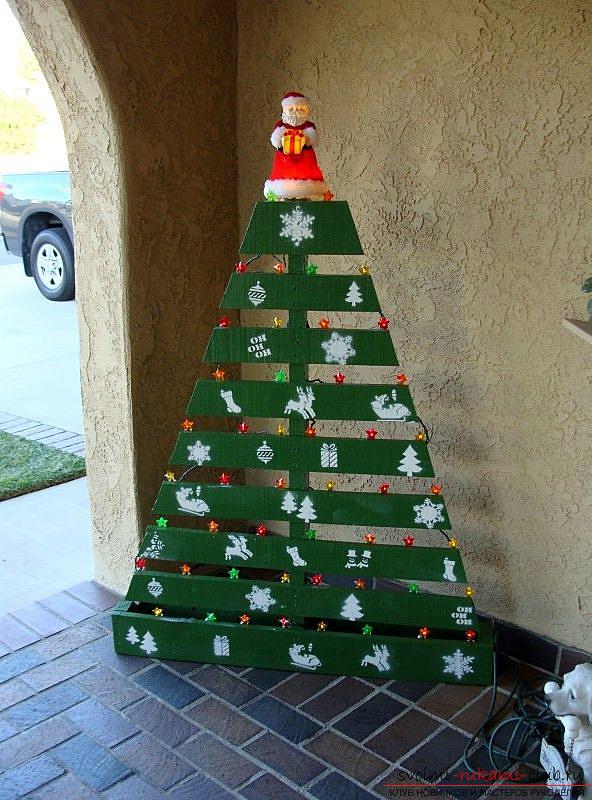 Moreover, if you cut out a Christmas tree from a pallet,then its remains can also be used as a New Year's decor. Lean the tray against the wall and fill the interior with Christmas decorations as shown in the photo. Agree, the result is very impressive.
  Effective herringbone from fabric
 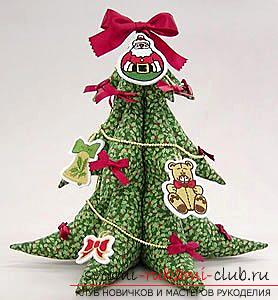 To make such a beautiful Christmas decoration, use the pattern below.
  You need to make 6 such parts, fold them togetherpair face inward and stitch. Leave a hole in the base (about 10 cm), which is useful for eversion of parts and their packing. Before turning all the parts on the front side, cut the corners as close as possible to the line, and near the concavities make small incisions. So you can easily turn out all the Christmas trees, which later will get the right shape without any stretch fabric. Now, when all three Christmas trees are ready, put them on top of each other and stitch with a double seam in the place where the trunk should be. Take into account the moment that the allowances at the bottom also need to be tucked, thereby making them imperceptible.
 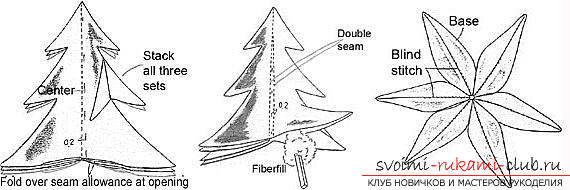 Now you can do stuffing a soft toy. Stuff the stuffing material in small pieces and gently fill the parts. In addition, use a pencil, so you will ease your work and will be able to fill even the most inaccessible places. When this work is done, sew the base manually using a secret seam. Now your Christmas tree is completely ready. It remains to decorate, but here already act in accordance with their ideas about the ideal Christmas tree.
  Such a Christmas tree can be used to create unusual paintings, which can later become pleasant New Year's souvenirs for loved ones.
  Lush Christmas tree of paper
  To do this, prepare a multicoloredpaper, a pair of wooden skewers, glue (you can use glue pencil or the moment), thin wire, awl and scissors. First, cut out the rectangles from the colored paper. They will need 14 pieces. Make 7 pairs of such parts with dimensions: 22 × 6, 25 × 9, 26 × 12, 26 × 13,5, 28 × 16, 28 × 18, and 28 × 12 cm. For the manufacture of the trunk, an additional sheet of 11, 5 × 11.5cm.
 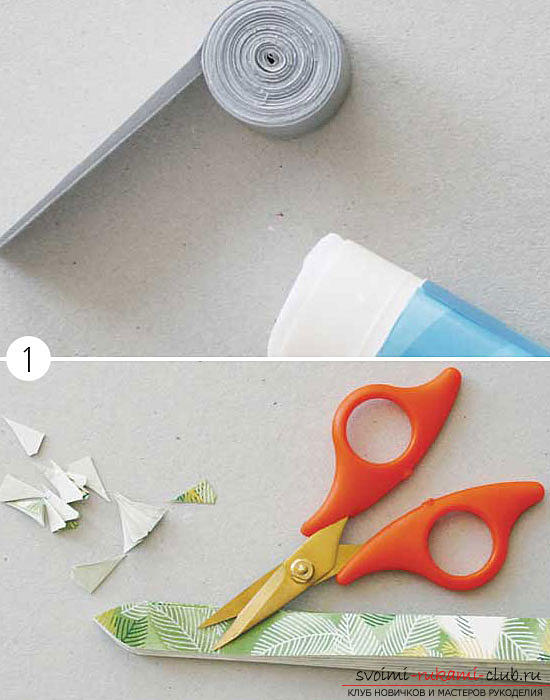 Now we need to start making the base. Cut the album sheet into a set of rectangles, the width of which is 2 cm, wind the resulting blanks as illustrated in photo 1, while twisting them into a fairly dense tube. For fixation use glue. Spread the tip and glue it to the bottom. The next stage will be the creation of paper accordions from color parts, which we prepared earlier. Take the largest rectangle, put it face down with the short side to yourself and begin to twist the accordion, with a side of 1.5 cm. The tip that remains will be simply cut off.
 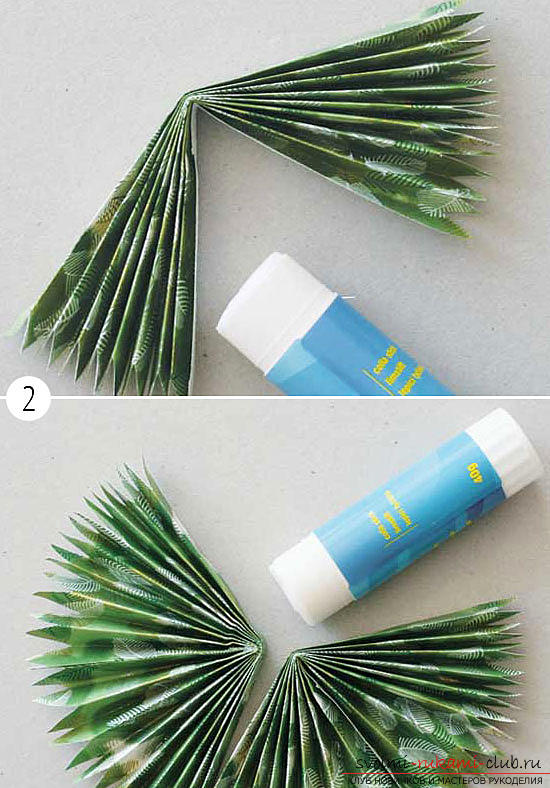 In the same way, as in the first illustration,Cut the side edges, giving them a triangular shape. The resulting accordion needs to be folded in half. Glue together its internal sides. An example of this work can be seen in the second illustration. Similar actions should be repeated with the second part of the same size. Then connect them together. To do this, use wire. Pass it one edge through the center of the first part, and the second - through the center of the second. Twist the tips of the wire together so that the two parts are firmly connected to each other.
 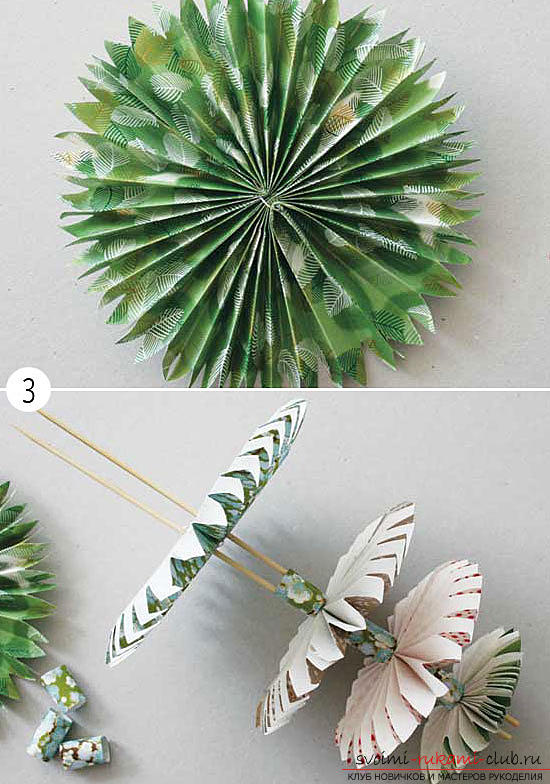 Do the same steps with the rest of the details,so you will get 6 layers for the New Year's Beauty. Now, take up a sheet designed for the trunk. It should be glued in a tube, the diameter of which will be one and a half cm. Cut it into separate parts: 3 pcs. 2 cm each, 2 pcs. at 1.5 cm, and one more detail should be equal to 2.5 cm. Now we come to the final stage - the Christmas tree needs to be assembled. Take the two skewers that were prepared at the beginning. String on them all the details (in the holes that came out after working with the wire), from the smaller ones to the largest ones. However, do not touch the smallest detail yet. Fill the layers between the layers. Wear them according to the size of the parts. Leave a tube (1.5 cm) to decorate the top.
 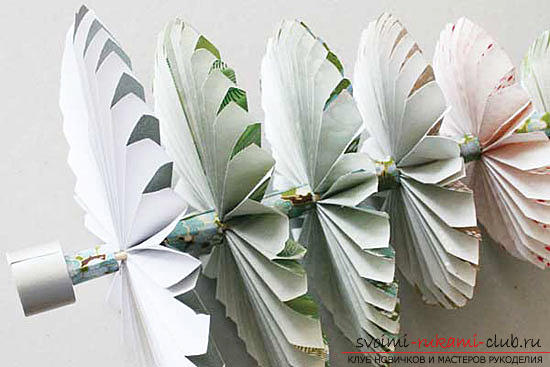 Using an awl, perform two holes in thebasis. When all the blanks are worn on skewers, drip some glue into each of the holes and insert wooden sticks into them. At the end of the work, put on the last tube, and after it - the smallest detail, fixing it with glue. Now our paper Christmas tree with our own hands is completely ready. Christmas tree of cones with own hands
 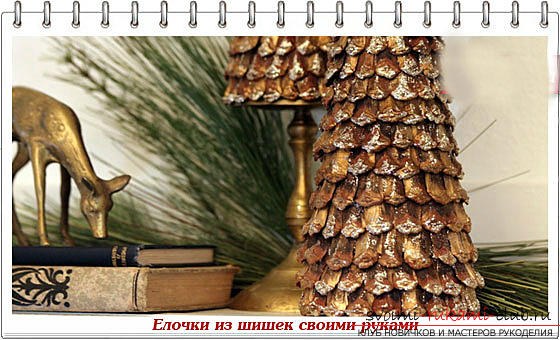 To make such a Christmas tree you need to preparebasis. As always, for such purposes, a ready-made foam-based base or made of cardboard is suitable. If you make a foundation for yourself, choose the size at your own discretion, the main thing is that it sticks fairly flatly on a flat surface. In addition, it can be pasted with a brown cloth. On it, the cones are much stronger.
 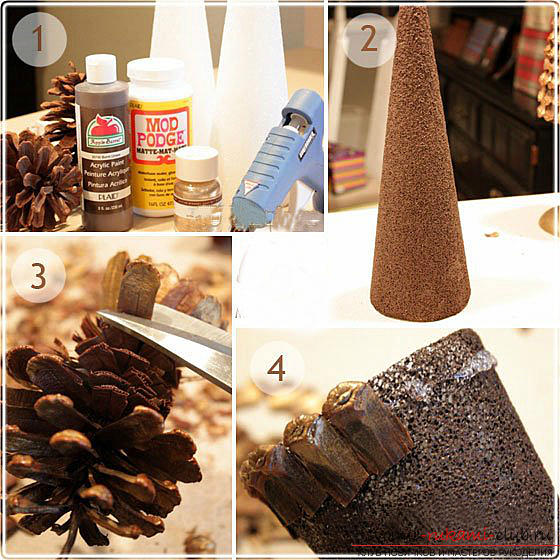 All cones need to be disassembled into small scales. Use the knife, it will be much easier. When you have a large enough number of scales, start from the bottom of the glue to glue them to the base. Scales need to be located a larger part down.
  The final point will be the painting of the finished tree with aerosol. It is best to do these manipulations in the open air (yard, balcony), it is better there and dry the finished product. At the end of the work, at your discretion, you can decorate the New Year tree or leave it in this form. Fragrant coffee tree
 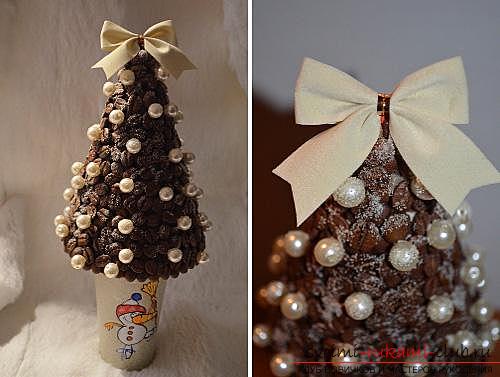 In order to make such a fragrantprepare a large amount of coffee beans, paper base, brown threads, glue (preferably transparent), a brush, an additional base that we will use as a stand, spray paint of golden or silver color, transparent nail polish with semolina ( optional), as well as additional decor in the form of beads, etc.
  To begin with, you should carefully coat the substrateglue and wrap it with brown threads. The thicker the cone is, the better. Now proceed to gluing coffee beans. Begin at the bottom of the product. Spread the base with threads of glue and glue coffee beans. Note that the glue must be applied gradually so that it does not dry. Try to place the coffee beans as tightly as possible to each other. When the first layer of grains will be glued, start gluing the second, while trying to place the grains in the gaps of the first row, so that no open spaces remain.
 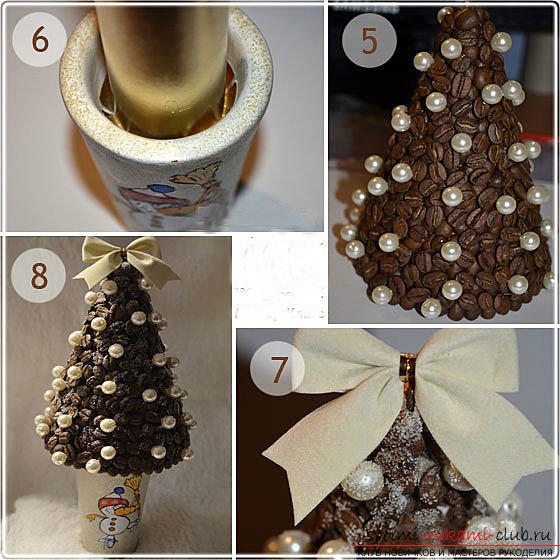 Now decorate the herringbone with all sorts ofbows and beads. For this purpose, use transparent glue. Additionally, you can decorate the herringbone with a mango that is glued to the transparent base for the nails. Simply spread a herringbone into a scatter with a colorless varnish and sprinkle these places with semolina. You can also build a trunk for the tree. To do this, from the cardboard, make a pipe corresponding to the base diameter. Paint it and allow to dry. After this, make cuts on the trunk, apply glue on them, and also on the inner surface of the base of the tree and glue the parts to each other. You can put it in any prominent place, so that it gives you and your guests joy and New Year's mood. Edible Christmas tree In the form of a Christmas tree, you can decorate any culinary masterpiece, whether it's sweet pastry or salad. You can create a variety of New Year beauties from sweets, vegetables, fruits, pizza, potatoes and much more. In this case, use all your imagination to the fullest. And the photos below will inspire you.
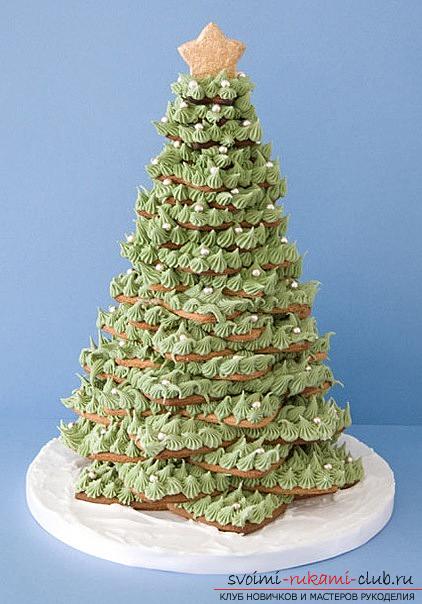
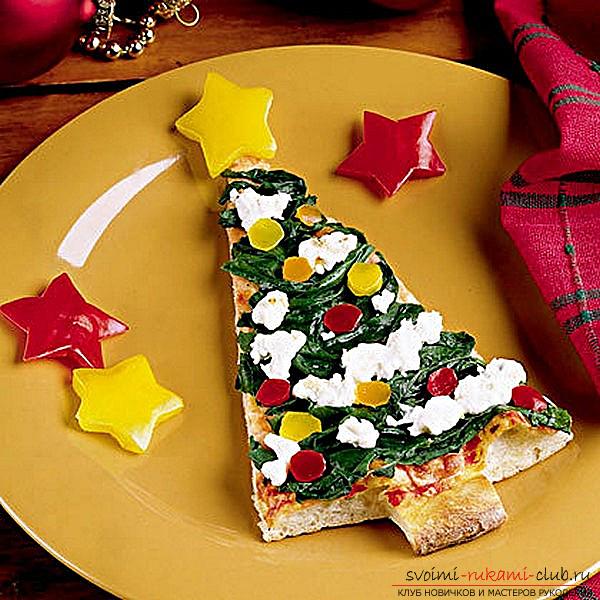
 Simple Christmas tree of felt
 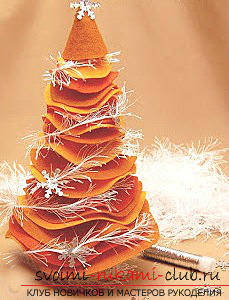 Quite simple in performance and a bright Christmas treewill serve as an excellent decoration for your home during the New Year holidays. Make a cone of thick paper, prepare a felt (preferably several colors, so your Christmas tree will become brighter), glue (you can replace it with a double tape), and scissors.
 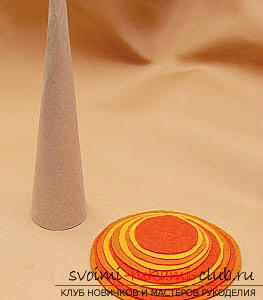 Cut out a lot of circles from the fabric of differentdiameter, as shown in the photo. Prepare cardboard templates so it will be easier to cut circles. Glue the tinsel to the bottom of the workpiece and cut in the shape of a cross at the center of each circle. Do not cut too large, felt mugs should sit tightly on the base.
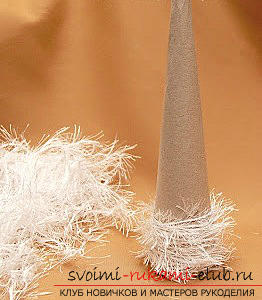
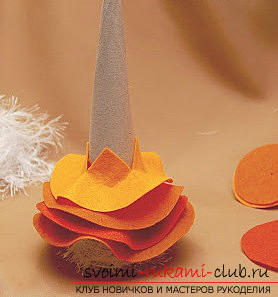 Now put all the circles on theascending. If they are made of different colors of fabric, do not forget to alternate between them. Take into account the fact that you should wear circles not only on the cone base, but also on the tips of the previous circle. In the end, you need to decorate the top of the tinsel and our cute Christmas tree of felt is ready. Glowing Christmas tree Bright Christmas tree will be an excellent addition to the New Year's decor of your entire home. Prepare a floral net (it will be better if you pick up a few shades), a sheet of cardboard for the cone base, polyethylene, pins, garlands, scissors, glue, floristic wire, and optional decorative items if desired.
 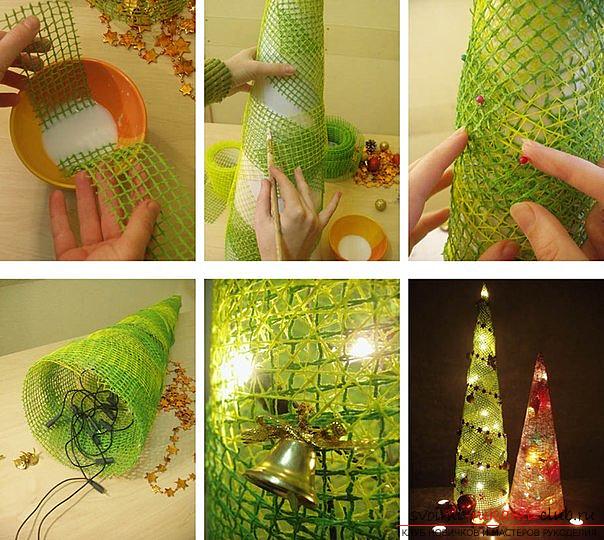 First you need to wrap a cardboard conecellophane. Make a solution consisting of glue (preferably PVA) and not very much water. Cut the floral grid into separate oblong rectangles that need to be lowered into the finished mixture. Now glue all the pieces on the base, wrapped in film. Place the grid in different directions, alternating its colors. All edges of the rectangles should also be glued with glue, so that they are fixed as firmly as possible on the base. Secure all the pieces with pins and wait for the adhesive to dry completely. After the structure has completely dried, follow the second layer in the same way. After the glue has completely dried, remove the structure from the substrate. Thanks to the cellophane layer, this procedure can be done quickly and easily. Inside place the garland, attaching it to the base of the grid with floristic wire. Decorate the Christmas tree in accordance with your preferences, and it will serve as a bright accent in your New Year's interior. Christmas tree on the wall An excellent solution for decorating a small apartment will be a Christmas tree made on the wall, it can reach absolutely any size. Elements of which will be your herringbone,can be glued with double-sided tape, you can also attach them with clerical buttons. Such an original design of the house can be done absolutely from any improvised materials: tinsel, Christmas tree branches, photographs, stickers. Just add Christmas decorations to these items and your unusual Christmas tree is ready. Also, such a wall herringbone can be laid out of a garland. In this case, your room will play with new colors. As you could see for yourself, there are many options. Use all your skills, imagination and skills to fill the house with an incredibly festive atmosphere and such unusual New Year's decorations in the form of bright Christmas trees that you made yourself.
Comments
Related posts:
 New Year's crafts, Christmas decorations made of paper, a Christmas tree of paper with your own hands, various variations of creating flashlights from paper, tips and recommendations for work.
 New Year tree with their own hands, a Christmas tree made of fabric, how to make a New Year tree with their own hands, a Christmas tree made of candy, master classes for making Christmas trees.
 Beautiful Christmas tree of paper with your own hands in origami technique, easy to make
 How to weave from beads and wire a New Year's, snow-covered or decorated Christmas tree with our own hands, step-by-step photos and a detailed description
 Flowers with their own hands, how to make a flower from paper with their own hands, flowers from corrugated paper, tips, recommendations, step by step execution instruction.