
New Year toys with their own hands, how to independently make a toy for the New Year, New Year's crafts with their own hands, how to make Santa Claus how to make a Christmas ball with his own hands.
A bright Christmas tree is the guarantee of truefestive mood, and not just for kids. Adults, too, with unconcealed trembling, refer to decorating the interior on the eve of the holiday. Everyone expects fulfillment of cherished desires on the most magical night of the year. They say that it is the decoration of the Christmas tree that helps to fulfill the most cherished desire, especially if the toys are made by themselves. So let's bring our desires to life by making New Year's ornaments, presented below in detailed master classes. Star Grandfather Frost This Santa Claus can really be called a star, because this festive decoration is made of fabrics in green and red tones, which symbolize the Christmas holidays. If you make a lot of these Santa Clauses in different colors, the New Year tree will become even brighter, more beautiful and elegant. 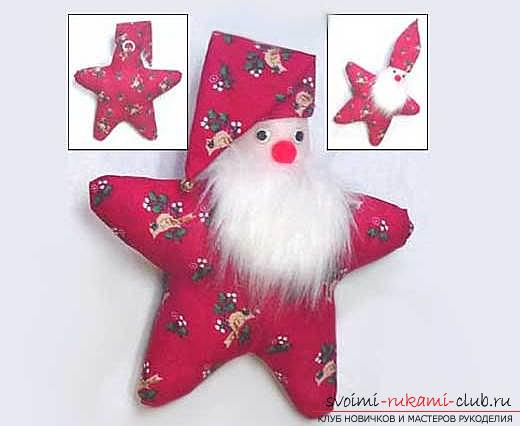 Sewing a similar toy is easy enough, itsthe manufacture will not cause any difficulties even for those who do not have special skills in sewing. This is indicated by the pattern, which is presented below. Although it can be improved to make the work even easier. Making it easier is easy enough. A star can be cut right away with a five-pointed star.
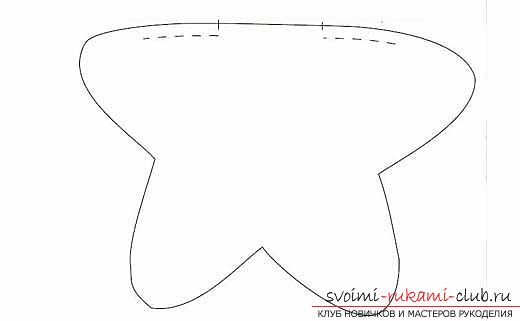
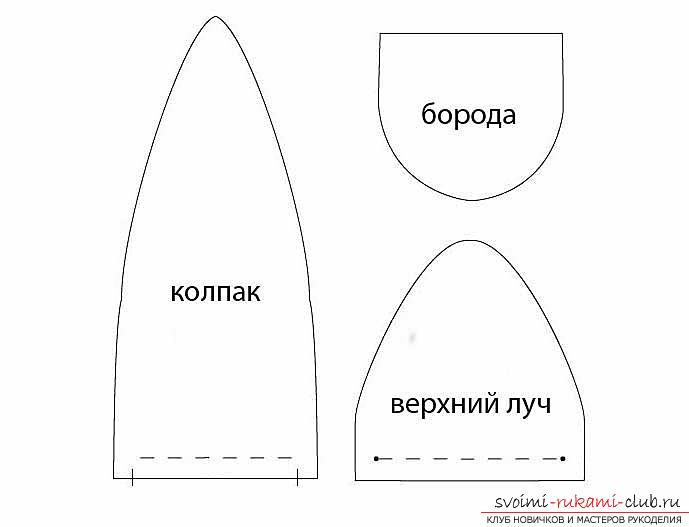 The first thing to do is to make two pieces of the wholefive-pointed star. After that, sew the two parts face to face, leaving a small hole. And that the finished star does not frown, make small incisions in all the convex and concave ends of the product. Turn out the toy, fill it with sintepon or other material for stuffing. Your task is to tightly stuff Santa Claus, but there should not be any lumps. Distribute the padding material as evenly as possible. To carefully fill the rays, use a pencil or other wooden stick, so it will work much easier. When completing work on the asterisk, sew a hole for packing with a hidden seam. Now, make the hood. Cut out the two details, make them as long as possible, so the cap will be bent more amusing. For the face of the toy, cut a small oval or circle of a beige fabric. Nashishte it (you can paste it) on the top ray of the asterisk. The other four rays will be the feet and hands of Santa Claus. Now you need to stick your nose. It is best for him to use half the pea, previously dyed it red. In this example, Santa Claus's eyes are purchased, but you can use buttons or beads. Glue the beard, it can be made from thread, cotton pad or a piece of fur. Make a loop on the back of the toy. Now star Santa Claus is ready, he can become not only an ornament for a Christmas tree, hang it anywhere, place it on a shelf or a window sill. New Year's toys with their own hands: a flower ball New Year toys, made by own hands, are good not only for their cheapness. First of all, it is an ideal opportunity to realize all your fantasies and creative impulses into life, and the variations can be completely different. Create, and your Christmas tree will be the only one and not like anyone else. One of the original ornaments that you can make with your own hands is a ball decorated with flowers. And you can make such a product absolutely in any variation, using another cloth or ribbons, beads, sparkles, etc.
 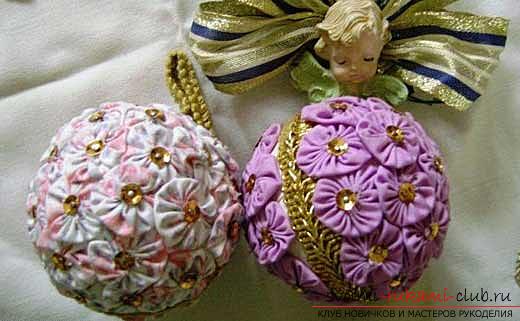 Prepare a beautiful fabric, a base ball (preferably if it is made of polystyrene), you will also need decorative hairpins.
 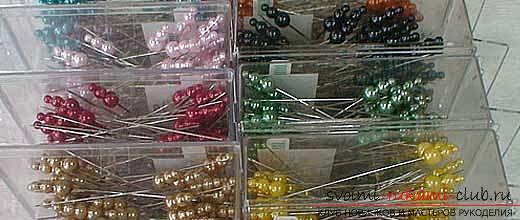 To begin with, cut out not very large circles of the same size from the fabric. For a basis you can take a big coin, on it and cut out details.
  Collect the edges of the circles and firmly fix them with a needle with a thread.
 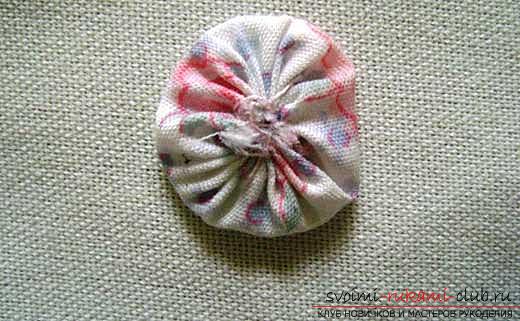 Now you need the decorative pins. Puncture them in the center of each of the resulting details. In this way, many colors must be produced.
 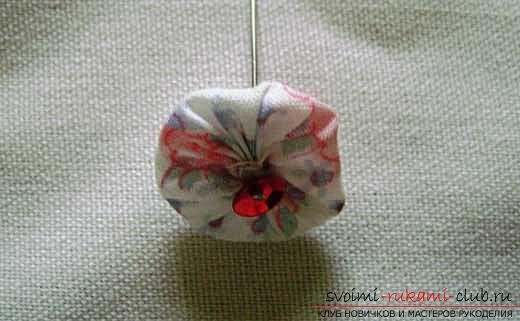 When they are ready, take the ball and start fixing on it decorative flowers, just piercing the base with pins.
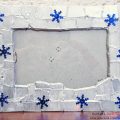
  The last step is the manufacture of the eyelet. To do this, you can use all kinds of colored threads, ribbons, etc. They can be prepared in advance, when the balls are not yet ready. As you can see, it's not difficult to make such an original decoration for a Christmas tree. It looks bright and smart. Decorate your Christmas tree with similar balls, and it will look just gorgeous. Decoration in the form of a star on the Christmas tree A Christmas toy in the form of a star is very traditional. Adornments of this kind are huge and one of the brightest is presented below in the master class.
 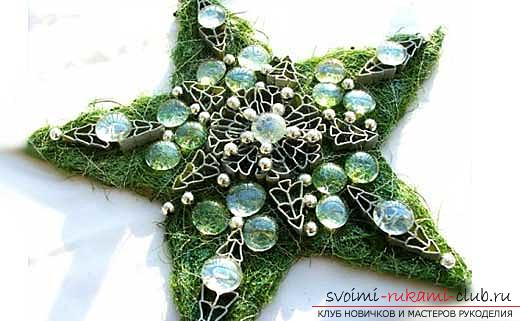 To make such an ornament yourself,you need a bit of cardboard, wire, prepare also sisal and other decorative elements. Cut a star from cardboard (size choose yourself). Then wrap it with sisal, fasten the product with a thin wire or threads of similar color. For stronger fixation, plant sisal on the glue. Make additional decorations from wire in the form of fir-trees, etc. Now we can say that the star is almost ready. It remains to decorate it with additional elements in the form of beads, sparkles and fir-trees made of wire. Note that the elements need to be glued not at an ordinary moment or super-glue, it is best to use a thermo-gun. To date, the sale is a huge selection of sisal of any color. Therefore, for your New Year tree you can make a star in the most unexpected color.
  By the way, you can take this idea to the note andUse it not as an ornament of a Christmas tree, but as an original interior decor. Make a lot of these Christmas trees and hang them on a window or ceiling. In addition, you can slightly modify the Christmas tree decoration. Do not make it solid, perform a hollow inside. In this case, the star can become a candle stand, a frame for a bottle of champagne, etc. Brilliant snowflakes A lot of various ornaments can be made from cardboard tubes, which are located inside rolls of toilet paper or paper towels. Of course, you can use ordinary cardboard, sticking rings together, however, it's too long. Using ready-made cardboard tubes, you get rid of additional actions. In a short time you can make not just New Year's toys, but whole garlands.
 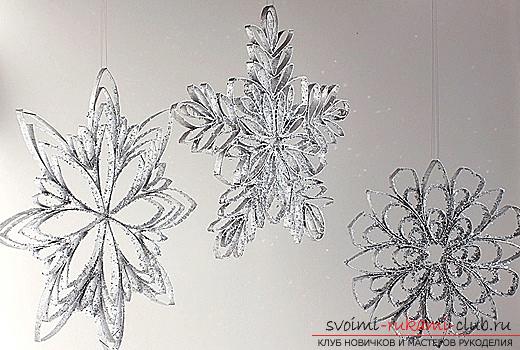 To work you will need not too manymaterials. The number of cardboard tubes will depend on the number of toys that you plan to perform. In addition, prepare scissors, glue, clothes pegs, white paint, as well as glitters used for needlework (glitter). And when all the necessary materials and tools are ready, you can start working. First you need to cut the cardboard tubes into individual rings about 2 cm wide. They need to be lightly pressed with your fingers on both sides so that you get some kind of figurines, similar to petals.
 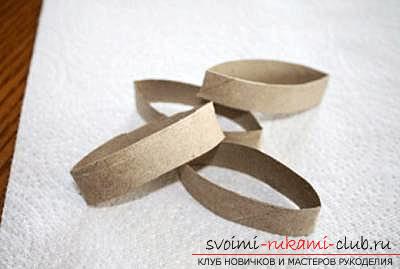 Start to grease cardboard petals with glue at the base and fasten them with clothespins as shown in the picture.
 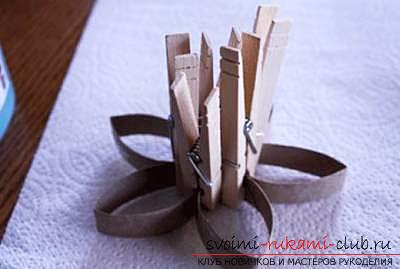 Thus, form a flower and leave itdry. After the product has dried, paint it with paint. When making snowflakes, you can use absolutely any color. If you plan to make many such ornaments, you can make them colorful. In this version, a white paint was used. Properly color the cardboard toy, it is most convenient to use paint in cans. Dry the paint does not need to wait, sprinkle it with glitters. Do this as carefully as possible so that no empty gaps remain. Before doing these actions, spread the paper so as not to stain the surface. Moreover, non-glued sparkles will crumble onto paper, in the future they can be applied repeatedly.
 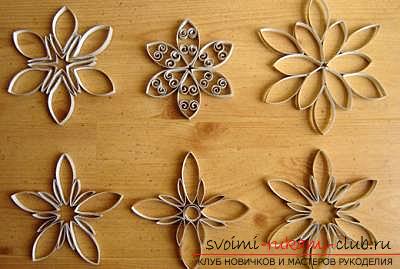 Glitters can be purchased at any store forcreativity and needlework. They can be sold both in jars, and in polyethylene bags. The sizes of such spangles can be absolutely different: a small crumb that creates the effect of a rough surface, or it can be very large glitter that creates a glistening flake effect on the surface. Similarly, you can create snowflakes of various shapes and sizes. To do this, you need to use additional rings that are inserted inside the petals, between them or at the edges. Toys will be more delicate and elegant. New Year's handicrafts on a fast hand: a laughing snowman and Santa Claus You can perform a large number of Christmas decorations from flower pots. Using this material, use a variety of shapes and their combination with each other. From flower pots you can make absolutely different toys. It can be Santa Clauses, Santa Clauses, Snow Maidens, Christmas trees, etc. Look how nice these snowmen look. At work, effort, as well as materials, a minimum is required.
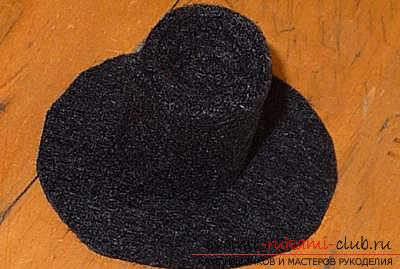
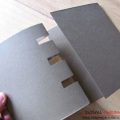
 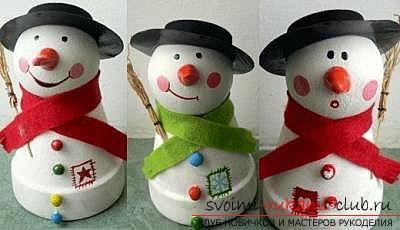 Prepare a flower pot, a ball madefrom plastic, wood or polystyrene, bright and soft fabric for a scarf, dense fabric for a hat, a few twigs from which we will make a broom for a snowman. In addition, prepare half-beads, half the peas, you can make buttons yourself using a salted dough or polymer clay. Paint the pot and ball with white paint and fix the head on the base. You can use glue for this. If there is a drainage hole in the pot, just poke your head on the stick and insert it into the hole. The nose for a snowman is easiest to make from a salted dough, the recipes of which can be found on the Internet. Then, make hat. To do this, take a very dense fabric and cut out of it two parts: a circle and a rectangle. How to make it from these two parts, you can see in the photo, which are presented below. A ready hat is glued to the head with glue.
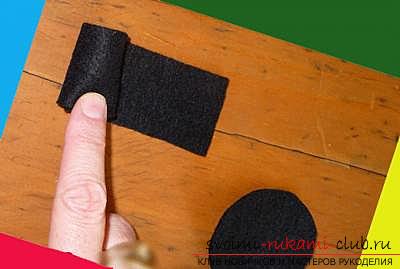
 As for the scarf, here everything is extremelyjust. Make fringe by making cuts on the sides. If you want, you can tie a scarf for a future snowman. In order to make a broom, prepare a wooden skewer and a few twigs.
 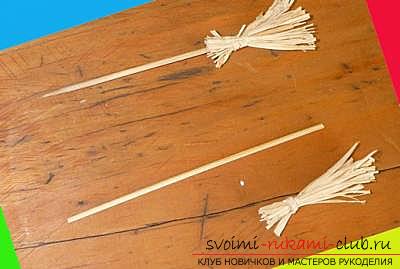 Glue the buttons to the bottom. In general, throughout the work can use hot glue or torque. In the end, you need to paint all the details of the snowman, using acrylic paints. Draw him eyes, nose, mouth. The main thing is to decorate the snowman so that he smiles and fills the atmosphere of your house with New Year's mood.
 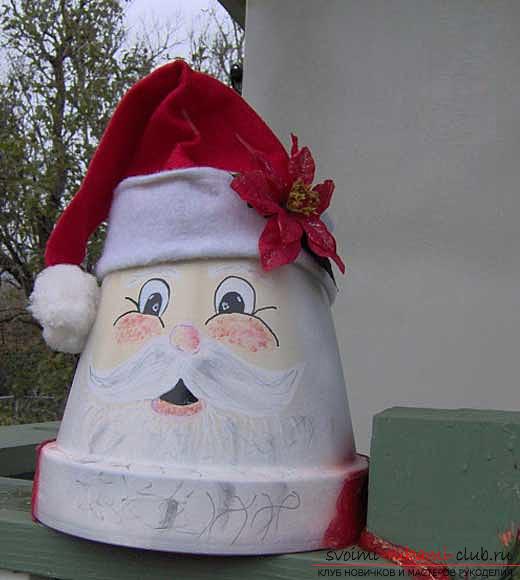 If you want to do this way, GrandfatherFrost, the sequence of actions will be the same. Paint the pot in white, draw a little face, and sew a red cap on your head. Your merry Santa Claus is ready. New Year's deer, made of a plastic bottle Deer are a very common symbol of the New Year, they are harnessed to the Santa Claus sledge, and they are considered his main assistants. It is not so difficult to make such a New Year's toy, but it looks very stylish and beautiful. Such a deer will be the main decoration of your yard, it can be placed near the entrance, the gate or in a flower bed strewn with snow. If you live in an apartment, put it in the hallway or near the tree, there it will look no worse.
  To make such a toy is very simple, from materialsyou need to prepare one large plastic bottle, which by volume will be at least 6-10 liters, additionally find four sticks of the same length, they will serve as legs. Also you will need one old boot - from it we will make a muzzle, picturesque branches from which beautiful horns can turn out, as well as a pine cone - for the tail and a bright fabric - for the nose. Having prepared all of the above, you can start working. First, paint the old shoe with white paint. After it has dried, make a hole in the sole as close to the heel as possible. Next, make a hole in the bottle (slightly below the cork). Find a stick of suitable thickness, insert one edge into the bottle, the other into the hole on the sole of the shoe. Now the deer's head is attached to the trunk. On the opposite side of the bottle in the abdominal area, four additional leg openings must be made. Insert the inside of the stick, to fix them while not worth it, because the "legs" are tucked into the top wall of the bottle. Attach the cone-tail to the body. In this case, it will be most convenient to use a wire for fastening. Now, make the nose. Twist a small amount of sintepon into a ball and wrap it with a bright cloth. It is most convenient to attach it to the deer by wire. For these purposes, make two holes in the toe area of the boot. For the eyes, choose two expressive buttons of black color. Next, prepare a bunch of twigs, which will simulate the horns. Tie them, distributing the more branched pieces to the sides, and insert a bouquet from the branches into the top of the shoe. Paint the deer, wait until the paint has dried and tackle its outfit. Hide the place of attachment of the head and trunk, decorating the neck with a bright scarf. On the torso you can dress an old sweater or wrap it with any bright cloth. Stretch the fabric with the legs as well, to create the impression that the deer are in socks-golfs. You can hang toys on horns. Such a sculpture turns out to be quite nice, and it is a great pity to disassemble it after the New Year holidays. You can simply remove New Year's toys from horns, and wrap your neck with a light scarf, and boldly send your deer in the spring to graze on the backyard. A brilliant angel on a Christmas tree. Such brilliant angels will be an excellent decoration for your New Year tree. Such figures are already symbolic in themselves, moreover these brilliant angels reflect the lights on the tree, which makes it brighter and more beautiful.
  Run your own hands a brilliant angel you canin just half an hour, with too many materials and forces you will not need. If you want, you can make a lot of these toys, from which then you will get a bright garland. To work you will need a tight cardboard, the smallest Christmas balls, tinsel, as well as tools for work. As for the main material, you need to pick up a bright shiny paper (preferably metallized, like a foil). Such paper can be found in shops for needlework or in floristic shops, because it is often used to decorate flower bouquets. First, cut out the body of the angel from the cardboard andits wings. With the trunk everything is clear - it will be a cone. Wings can fulfill absolutely any shape and size. Consider only that the overall silhouette should look beautiful and harmonious. Attach cardboard blanks to decorative paper and cut out the details of the angel. For the wings, cut out two blanks so that they look beautiful on both sides. Gently glue together the cardboard with paper, using a thermo-gun, and decorate the figure with tinsel and rain. That the angel could be hung on the Christmas tree, use a golden thread and tie her neck or wings of the toy. Now your New Year's angel is ready.
Comments
Related posts:
 New Year's hand-made articles, Santa Claus with his own hands, how to make Santa Claus, crafts with children, ideas and detailed lessons.
 Crafts by own hands: Father Frost's tent at the 2015 contest, interesting crafts for the new year with their own hands
 New Year's hand-craft: Santa Claus's boot for the 2015 contest, New Year's hand-made articles
 New Year 2016, New Year's crafts with their own hands, presents for the new year with their own hands, New Year's toys with their own hands.
 New Year gifts, New Year's crafts, souvenirs with their own hands, how to make a gift for the New Year, ideas for New Year gifts with their own hands.