
The shape of the cap for a newborn baby is not at all complicated, like sewing a product
Pattern for a newborn baby's capit will be useful to every mother who wants to provide her baby with hand-made things. To open and sew this child's necessary headgear is not at all difficult. It takes a minimum of time and effort, which you yourself can easily see. This task will be in force even for beginner needlewomen. As soon as a woman becomes pregnant, she starts a pleasant bother, namely - a selection of necessary clothes for the baby. Chepchik is an integral part of the wardrobe of the newborn. It is not necessary to buy it at the store. With a little effort, you can sew more than one cap for your baby. The headpiece can be both the most ordinary, and elegant, with ryushikami and other decor. We picked up several universal patterns for the bonnets that will fit, both boys and girls. Especially, they will suit mothers who want to create clothes for their baby with their own hands, but do not sew at a professional level. 
 Naturally, only a child bornabsolutely not required such a bright model, which you can see in the photo. Most often, the bonnets are made from calico, as it is hypoallergenic, hygienic and very convenient material. I do not recommend using synthetic fabrics, they can cause irritation on the baby's skin. The unconditional advantage of this cap model is that it is subject to even novice needlewomen. Not only does it not bring any discomfort to the child, it is easily washed and ironed. For the pattern of this model used such measurements: length from the forehead to the spine - 20 cm, semicircle of the head - 18 cm.
 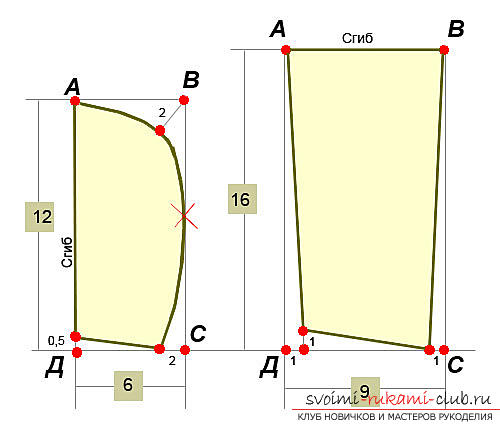 So, first we need to draw a figurerectangular shape, we call it ABCG. Parties AH and BV - 12 cm. There is a formula with which you will be much easier to understand. We take the measure of the semicircle of the head, divide it by 2 and add 3 cm. It is suitable for absolutely all sizes. The sides of AB and SH are 6 cm. We again measure the semicircle of the head, divide by 4 and add 1.5 cm. The angle of the rectangle ABC must be divided by 2. Starting from the B, it is necessary to retreat 2 cm. Divide the BV by 2. Starting from m. In, on the side of the VG, retreat another 2 cm. From A, draw the line to the middle of the BV segment - this will be the sewing line. Draw the bottom line from the T to the side of the segment AG and retreat 0.5 cm. This point should be connected to point 2, the lower mark. AH and BV - 16 cm. AB and VG - width of the front part. The semicircle of the head is divided by 2 and we get 9 cm. From T to the VG, retreat 1 cm to the right. Then repeat the same action only not to the right, but upwards. Point A connect with point 1. From B to the left towards SH, retreat another 1 cm. Point B with the bottom point 1 connect. And the lower point 1, in turn, is connected with the sewing line. We proceed, directly, to work. To begin with, all the details of the pattern must be transferred to the fabric. After that you can study their pattern. All allowances are already in our drawing, they are not necessarily measured again, which will save your personal time. Since the fabric is light, it is not always possible to accurately draw details, but there is a way out. You can pin these very details to the fabric and cut it out along the contour. There is another nuance, which is worth paying attention to. While sewing clothes for newborns, whatever it is, stitch the seams on the front side. In children, the skin is very tender, so this kind of seams can cause irritation. The second option is tailoring. For work you will need: any fabric you like; riban; scissors; sewing machine; pins; pattern.
  Ribana is a kind of knitted fabric,which stretches well, consists of cotton. It is very soft and pleasant. Most often, children's clothing is sewn from this fabric. In such clothes it is not cold in the winter and it is not hot in the summer. She perfectly passes air, accordingly, the skin constantly breathes. Before you start work, wash and iron the linen so that in the future the finished product does not go to the village. Now you need to transfer the pattern to the fabric. If all the allowances are taken into account in the drawing, then it is not necessary to make them during the pattern. Then you need to fold the fabric of the wrong side of the face, apply a pattern and cut it out along the contours. Fold the underside of the face and stitch all the side pieces to the main one. In this case, the seams will be inside. If the fabric you choose is not soft enough to the touch, then the seams should look at the face. After all the seams are swept, proceed to pattern the ribbon from the ribbon. Its length will be about 5 cm. After the strip is ready, fold it into 2 parts and pritachayte to the cap. Now you can stop all the allowances. Take care of the pattern of a long ribbon of ribbon. In the future it will serve as a string. The length should be approximately 60-70 cm, and the width of about 5 cm. Align this tape with the middle of the bonnet, secure with a pin. Ties must be cut in three millimeters from the fold. Now just in case, you need to stitch all the sections of the strings a few times, cut and tie in a knot. Chepchik can be considered ready! It remains only ironing all the seams of the product.
Comments
Related posts:
 Pattern for the envelope for the newborn.
 Winter envelope for a newborn knitted knitting needles (outline)
 Manishka knitting needles for a child: nuances in knitting
 We choose knitting needles based on the thickness of the thread and the product
 Bouquets of satin ribbons with their own hands and other products