Patterns of skirts for girls with their own hands. Quickly and cheaply make a quality outfit for your daughter. Simple instructions and photos
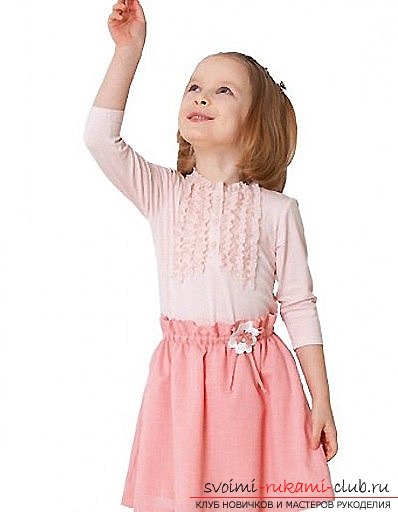
Most moms, especially those who love a catneedlework, very often and many sew clothes for their children. And it's not with the simple. To make their own children's clothes need not so much time and money. And ready-made clothing gives your child all the love that you have in your heart. Also, any clothes made by yourself, whether it's a skirt, shirt or sarafan, will certainly be quality and unique. And this is an important factor.  Working on a skirt for a girl is easy enough andpleasant. Just a few evenings and an excellent outfit is already ready. Your attention is a simple instruction for sewing a light simple skirt for the summer. It is advisable to choose a cotton poplin as a material. It easily rubs off, does not cause irritation in the child. You are free to choose other fabrics, the main thing is that it is well draped. In addition to this fabric, you will also need a strong elastic band, which should make the shape of our skirt. In general, the most elementary and simple skirt for a girl can be sewn in just an hour, if you have some experience and skills, respectively. The pattern of the skirt does not require complicated designs and constructions. All you need is to remove two simple measures: the coverage of the hips and the length of the skirt from the waist. Despite all the simplicity, the skirt looks very charming and cute. You can play with flowers and choose the one that best suits your child. As an ornament, you can carefully sew an elegant white flower, from the side at the waist.
  After removing the measurements, we can proceed to createdrawing of our cute skirt. The provided skirt is covered in the shape of a rectangle. Pattern should be leveled on a fabric in one layer. We make one single seam - this is the middle seam on the back. If you can not make one such stitch, or you want to experiment, then make two neat sutures on the sides. The drawn rectangle should have a width that is equal to the girth of the hips, the measurements of which we made earlier, multiplied by two. The length of such a rectangle is your measure, increased by 4 centimeters. This is done on the stock, when the top of your skirt will be handled. The length of the manufactured skirt you can install as you please, it can be either longer or shorter. The advantage of self-made skirt is that it is you who decide what it will eventually be. After that, cut out the skirt in one layer, after adding on all sides one centimeter, and on the bottom - 2.5 centimeters. In addition, cut 2 oblique strips of fabric. They will be used as strings. The width of each strip is three centimeters, and the length is 20 centimeters. Go to the stitching of the elements. In the beginning, sweep with a stitch on the back of our skirt. Gently process and smooth the allowances. According to the marking, make a slotted loop from the front side of the dress to then put the elastic band there. Again, process the allowances by turning them inside out, tuck them up and adjust. Do not forget to indent 2.5 centimeters. Spend another line 1.5 centimeters high to get a rubber band. A very important point. The cut loop should be exactly in the center of the formed kulisk. Turn and adjust the bottom. Stripes for the strings, which we previously cut out, fold in half, stitch along the long side, and after the vyvrenite. Prepare the rubber band by cutting off the required length. To do this, try the belt on the waist, pulling it slightly. At one end of the elastic band, attach the sewn string. It's time to stick the rubber band into the kulisk, adjusting its length in the process. Take care not to see the elastic from the loop. At the other end of the elastic band, also attach the string, and the loose ends should be tied carefully into the nodules. Now you can and try on your skirt. If necessary, adjust the length of the gum. If everything sits well, thread the ends of the strings in the upper holes of the flower, which will decorate our skirt. To make a flower, take a conventional pair of compasses, anddraw a circle with a radius of 3 centimeters. Draw inside 8 round neat petals. As a material, you can choose leather or leatherette. With a puncher, make 4 small holes to create a shape of a flower with the help of a string of crosses. That's all a light and beautiful summer skirt for a girl ready!
Comments
Related posts:
 Patterns of women's jackets with their own hands. Easily and cheaply sew a quality outfit for yourself. Simple instructions and photos
 We make an excellent outfit with our own hands. A pattern of a stylish swing dress that will make you the most beautiful and irresistible. Photos and instructions
 We make an excellent outfit with our own hands. Pattern of universal dress bat that will make you the most beautiful and irresistible. Photos and instructions
 We sew a magnificent dress for the girl with our own hands, using step-by-step instructions with photos and diagrams
 A gift to your aunt cooked with your own hands. Photos and simple recommendations.