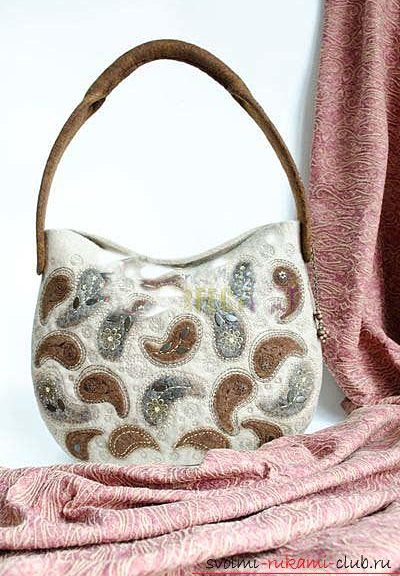
A detailed master-class on felting a stylish bag made of wool with a photo and step-by-step instruction
Master class on felting a stylish bag of woolAcquaintance with this article will give you the opportunity to master the art of working with felt, and as a result, replenish your wardrobe with a stylish and original bag. And this bag is made with your own hands, which gives it even greater uniqueness. For the manufacture of felted bags you will need: three hundred grams of beige wool and a hundred grams of brown wool, soap, a fairly dense film to create a template, water, a pimple-blister (bubble type), a mesh or a grinding machine, pointed scissors, a rolling pin.  So, let's get started. First you need to build a pattern, taking into account our ideas about the shape and features of the future bag, add four centimeters along the length of the entire perimeter and make the transfer of our drawing onto the base of the dense film (you can use the substrate for the laminate).
 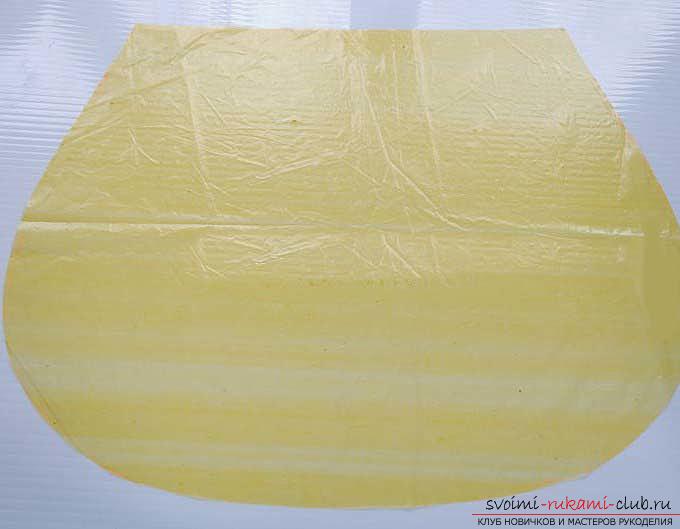 So we will produce our template. In our case, the height of the pattern is thirty-two centimeters, and its width is thirty-seven centimeters. Next, expand the film on the table, on top - our template, and then begin unfolding. Despite the fact that our work is done cardinally, and not with the help of a combed ribbon, the layout should be done according to the same principle: it is necessary to lay the pinched small pieces in layers (vertical in combination with horizontal ones) so that the uniformity of the calculation can be monitored.
 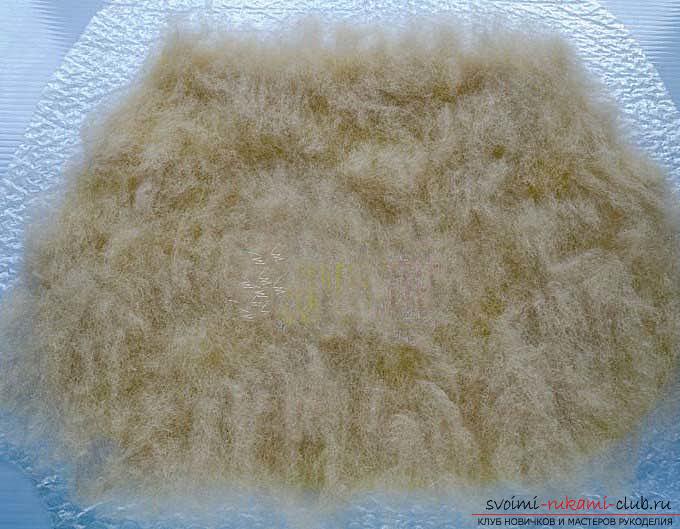 Then we lay the layer on the vertical. You should make the layout of the wool, leaving one centimeter outside the template vertically. After that, you need to lay out the layer horizontally. You should make the layout of the wool, leaving one centimeter outside the template horizontally. Layout of 2 layers completed. Then it is necessary to evenly spray the material with a soap solution.
 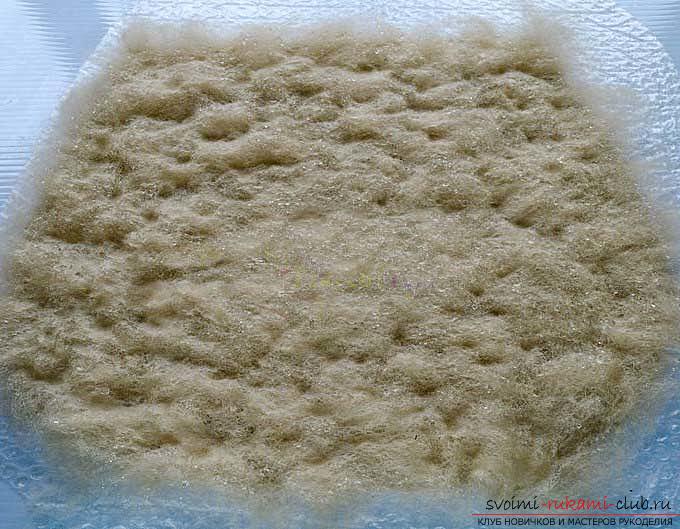 Cover with a foil, tightly pressing with your hands and trying to accurately distribute the water. You can try using a rolling pin. But you need to ensure that the hair does not budge.
  To ensure a strong grip of wool,use a grinder. To work it is necessary punctually, at all it is not necessary to drive up to all film. We do it this way: put the machine on one point on the film, count to ten, pick up the machine and rearrange it to another location. So it should be done by grabbing the entire surface of our bag.
 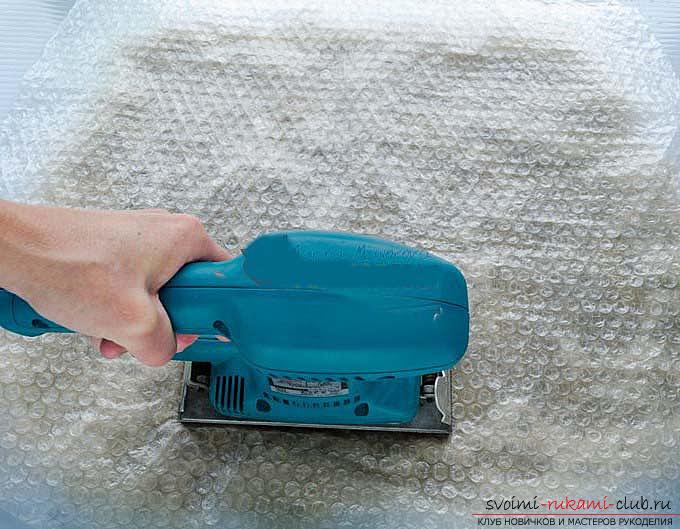 An analog of the machine can be a grid. At the same time, you need to remove the film, cover the layout with a grid, firmly press, soap and diligently rub around (from the extreme parts to the middle). It should be done as accurately as possible, increasing the pressure strength with time. This kind of surface has a workpiece surface. Note that the allowances have remained untreated. Carefully turn over the future product. Then wrap the template with the remaining allowances. Then it is necessary to tightly pull the wool to the template and carefully smoothen it out so that there are no seals and creases left.
 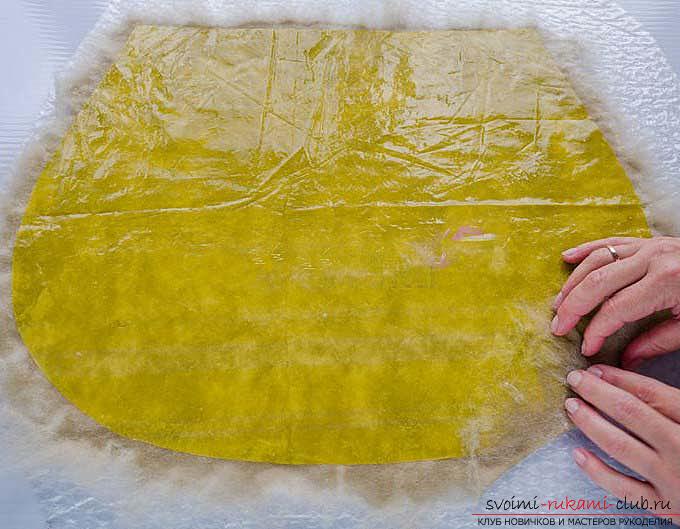 Next, proceed to unfold the wool on thisparts of our template. You need to decompose all the same 2 layers, but without any allowances. Then it is necessary to evenly spray the material with a soap solution. Cover with a foil, tightly pressing with your hands and trying to accurately distribute the water. You can try using a rolling pin. But you need to ensure that the hair does not budge. To ensure a strong grip of the wool, use a grinder. To work it is necessary punctually, at all it is not necessary to drive up to all film. We do this: put the machine on one point on the film, count to ten, pick up the machine and move it to another location. So it should be done by grabbing the entire surface of our bag. Or we work with the same setochki. Carefully turn over the future product. Then wrap the template with the remaining allowances. Then it is necessary to tightly pull the wool to the template and carefully smoothen it out so that there are no seals and creases left. Then continue creating the next 2 layers. Pay special attention to the fact that one side of the bag needs to be decomposed without allowances, and the second - with them. Each layer should look exactly, especially the final one. If you ask, and how many layers you need to lay out, there is no definite answer to this question. Therefore, we advise you to focus on the amount of wool you took to create the product, not the number of layers. After the layout of the bag, the bag looks like this:
 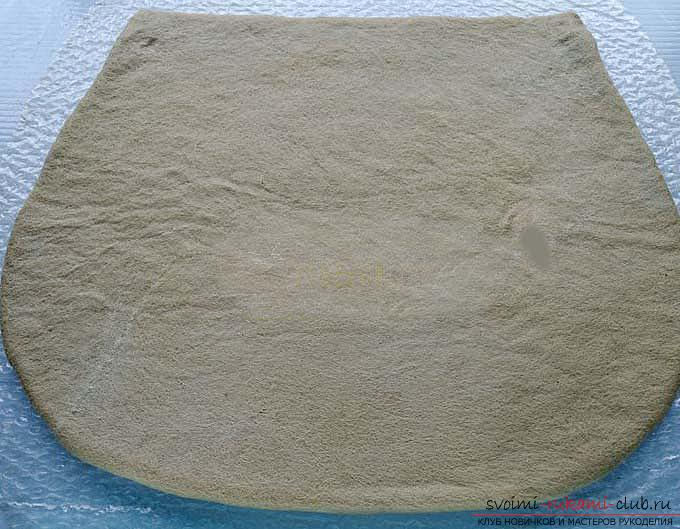 Next, cover the workpiece with a mesh and soak it in.residues of excessive moisture (try using a rag or a towel). Do this until the motive, while pressing does not stand out water. Then take a piece of soap and rub it gently over the surface of the future product. Wool must be rubbed with the help of movements in a circle. Pay special attention to the edges, in time to increase the force of pressure. To decorate our bags, you need to create scissors from the prefiled scrap individual pieces.
 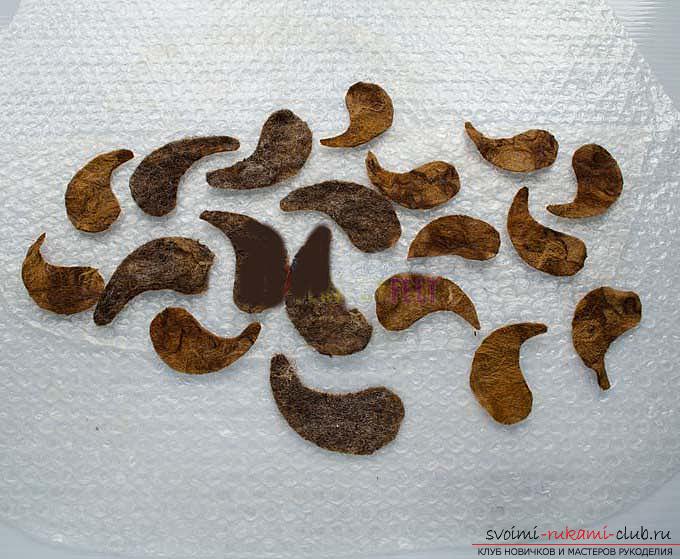 Then thoroughly wash the surface of the workpiece anddecompose the details of the decor, as your creative imagination wants. Cover the surface with a film and carefully work with a machine. As a result, the elements will connect as tightly as possible to the surface of the bag.
 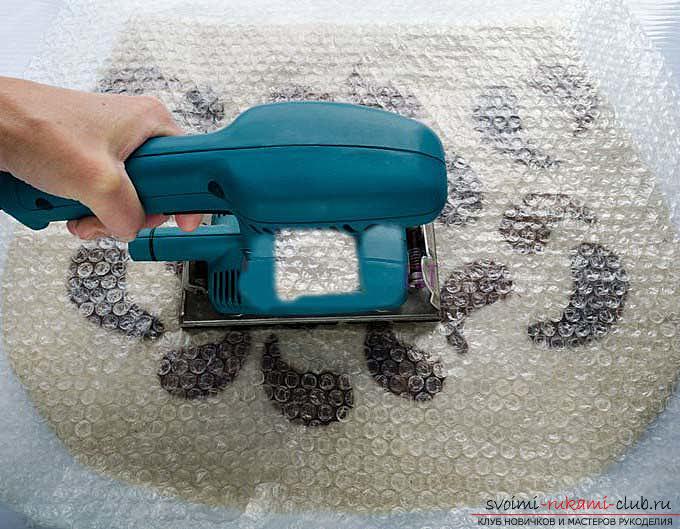 And after you have seen the strengthattaching the decor to the bag, you should go to the very process of felting. To do this, you need to roll the future bag in the form of a vertical roll and roll on the front and back side two hundred times each. And then roll horizontally in the same way. Now we see that the wool has become a little denser, which means that you can take out the template. Using scissors, carefully cut the workpiece, and then completely cut the cavity of our product. To fade the pattern. And continue to play the bag again. Carefully level the side parts of the bag, spread them out with your hands. Then you should proceed to felling the cut (the future "entrance" into the purse). One hand gently holds the workpiece, and with the second hand, clad in a glove, grind the two edges (horizontal movements). After that, already using a stronger pressure, rub the bag on both sides and edges. Next, you need to fail the product from the inside. Hand in the glove to grind the surface of our handbag in the interior of the product.
 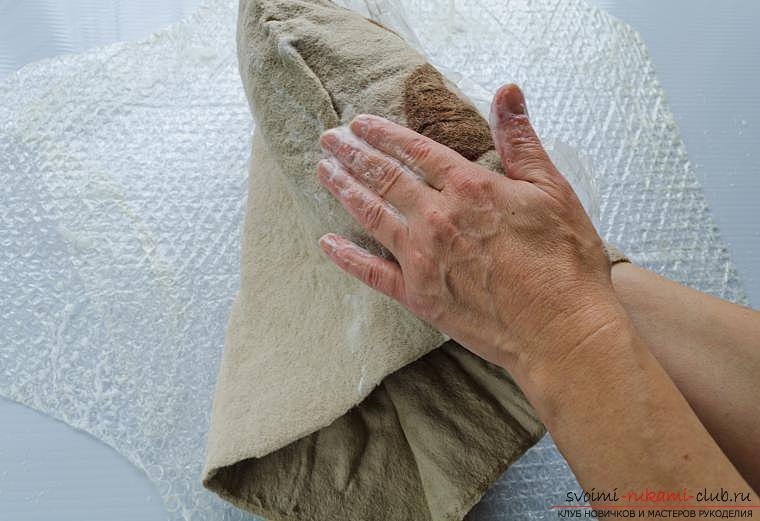 The next thing we do is roll onexpansion after each such movement. When you notice that the felt has already fallen off, has acquired an even and dense appearance, and the bag has become the size you need, then you can stop. Otherwise, it is worth repeating all the actions in a new way.
 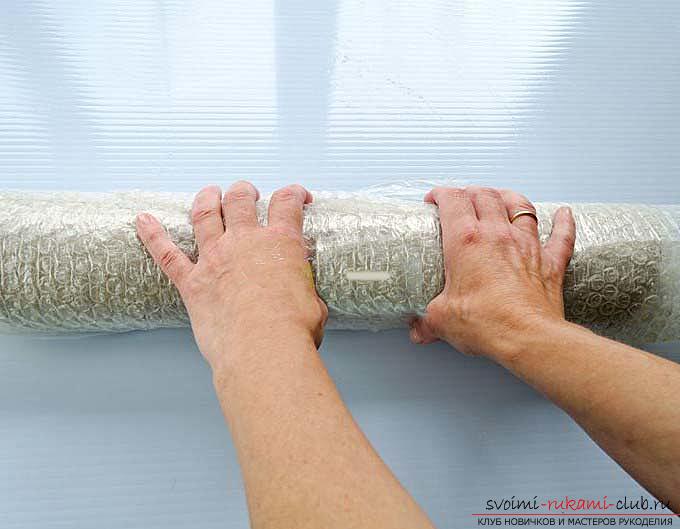 Rinse out the bag, straightening it and therebygive the right shape for you. Rinse with steam iron and allow to dry. While the bag dries, you can create a handle for it, insert the lock, decorate the lining. After the bag has dried out, it is necessary to decorate it definitively: to embroider with a string of silk of a shade of a leaf you like and to sew all sorts of decorative things. Insert the lock. Alternatively, attach a button to fasten it.
 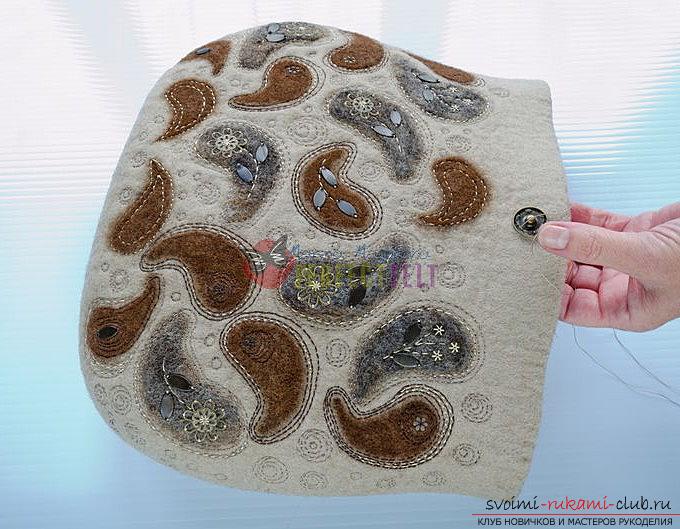 From the sides attach the handle, and to make it even stronger, you can expand the attachment points with beautiful patterns.
 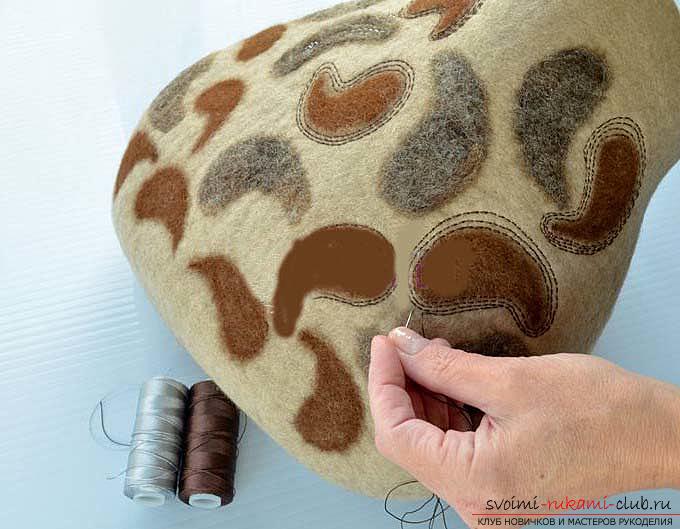 Sew the lining in the bag and it's ready.
 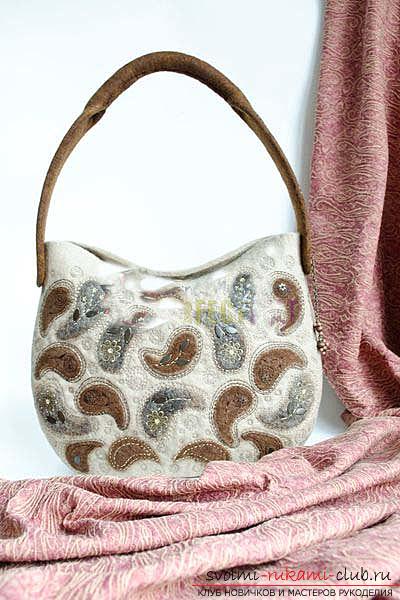 Wear it with pleasure.
Comments
Related posts:
 A detailed and interesting master class on felting the picture "loving cats" with a photo and step by step instruction.
 Interesting author's master class on felting hedgehog with photo and step by step instruction
 Master a detailed master class on felting Slippers "Polyanka" with photos and instructions
 Master-class on creation of an original rim for hair with step by step instruction
 Crochet dresses: master classes with step-by-step instruction, photos and charts