How to tie a crocheted autumn hat with your own hands for girls, detailed diagrams, photos and job description
In the world there are a lot of different hobbies. Someone collects stamps, someone draws or burns a tree. In this case, there are hobbies that bring not only moral satisfaction from the creation, but also a tangible benefit, for example, crochet. This kind of needlework has been many hundreds of years. When exactly it was born, and who first picked up the hook is unknown. Maybe the appearance of crochet hooks was influenced by seamen-fishermen of antiquity. They wove their nets with the help of bone hooks tying different knots, because they needed networks with different cells. And a very big influence on modern crochet crocheted lacemakers. Now, to get a beautiful lace, it's not necessary to sit for hours at a time with hundreds of little bobbins. Thanks to the knowledge, accumulated by generations of needlewomen, and modern technologies for creating various yarns and accessories, modern masters are knitting very beautiful and original things. They allow to show all the creative potential of the needlewoman. Bonded by their own hands, things will become not only the pride of knitters, they will be wonderful gifts that show concern and love. And as everyone knows, there is nothing stronger than the mother's love for her child. In this article, we propose to tie caps for little princesses. Such a headdress, tied by caring mothers, will surely warm their daughter in the cool autumn. First you need to determine the composition of the thread. To make the finished product "not biting" and at the same time warming up, choose threads that include acrylic and wool. This yarn perfectly holds the heat, it is nice to wear. Products made from mixed yarn are more durable in sock and care for such caps is much easier. They are not afraid of hot water, unlike pure wool threads. 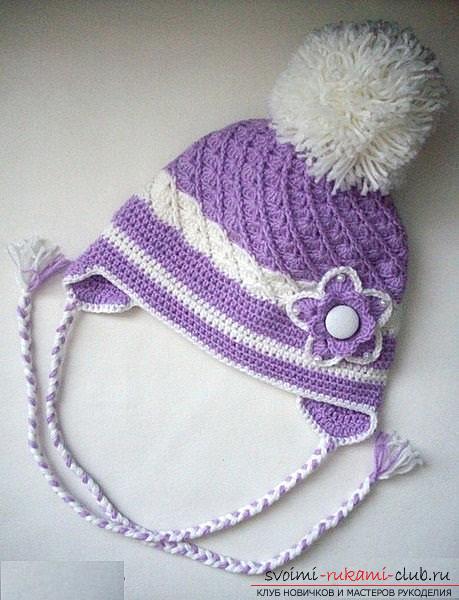 Materials for work:
- Yarn of two colors (you can choose any shades you like) wool 25%, acrylic 75% (130 m / 50 g);
- Hook No. 3;
- Beads for flower decoration.
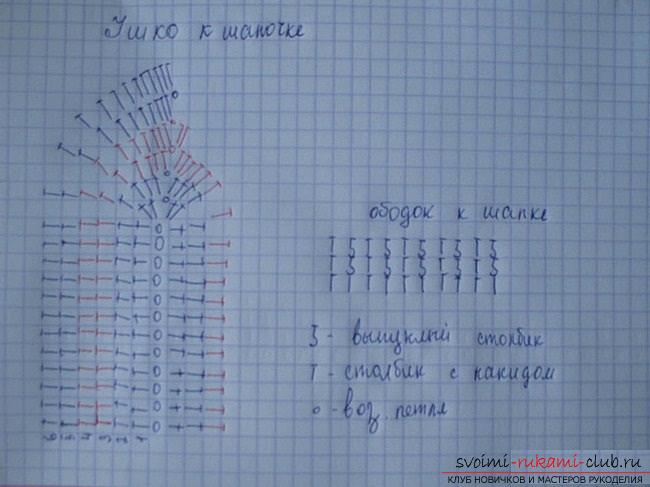
Before you start knitting you need to removemeasures. It will be enough for one universal - the girth of the head. Centimeter tape wraps the head over the forehead and the most convex part of the nape. Now you need to calculate the diameter of the bottom of the cap. To do this, take a measure and divide it into 3.14. From the result obtained, take 1 to make the cap fit better to the head. Now you can start knitting. It is best to start with an amigurumi ring or a sliding loop. This is necessary in order to avoid the appearance of a hole in the center of the cap, because the hat should warm. 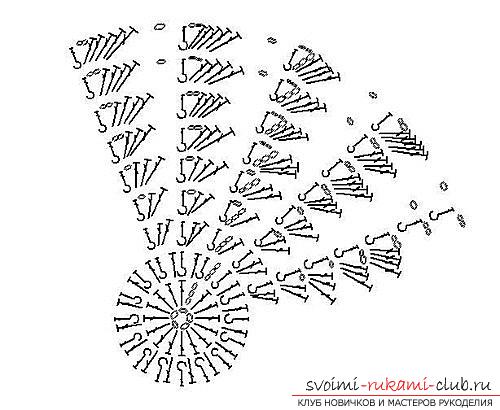 If you have not yet mastered these wonderfulreceptions, do not worry. Knit the ring from the air loops. A pretty bubo will perfectly close the hole in the bottom. So, the ring of the initial loops is. In the first round, bind 3 VPP. and 15 tbsp. with / n. This and all other circles end with a connecting post. In the second - 3 pp. and a relief column with a crochet, and then in each st. c / n the first round of tie 1 tbsp. с / н and 1 relief st. с / н The third circle. 3 ppp 1 rd st. s / n, in all the loops except the last, 2 tbsp. с / н and 1 р-й ст. with / n. In that loop where 3 VPP to add another 1 tbsp. with / n. The fourth circle is tied in the same way as the third circle, only one additional loop is knitted in each loop. after 2 tbsp. with / n. The fifth knit is similar to the fourth, but one loop is added to each loop. with / n. all 3 tbsp. с / н to tie in 1 st. The sixth circle. Instead of 1 st. is fastened to 2 cp. In the seventh round, another 1 tbsp. with / n. now the design consists of 4st. с / н, 2 в.п., 1 р-й ст. with / n. Knit further according to the scheme alternately adding in the circles of Art. с / н or в.п. until the time when the bottom of the cap reaches the desired diameter. There is a small trick for the hat to sit on the head of the baby, like a glove. When there are 3 to 4 circles left before reaching the desired diameter, it is necessary to alternate the rows with the additions of the loops and without the increments. So, you tied the bottom. Now you need to continue to knit without adding a loop to the desired depth of the cap. If you have the opportunity to try on the hat in the process of work a couple of times. So you can more accurately fit the size. The last few rows are tied with ordinary art. b / n. Make notes where the ears should be placed near the cap (in our case 1 eye = 12 loops) and link them as follows:
- 6 tbsp. b / n, 2 tbsp. б / н from one loop, 6 tbsp. b / n.
- 5 tbsp. b / n, 1 tbsp. с / н, 2 tbsp. s / n between 2 tbsp. b / n from one loop, 1 tbsp. s / n, 5 tbsp. b / n.
- 3 tbsp. b / n, 3 tbsp. с / н, 2 tbsp. s / n between the central 2 tbsp. с / н, 3 tbsp. с / н, 3 tbsp. b / n.
- 1 tbsp. b / n, 6 tbsp. с / н, 2 tbsp. s / n between the central 2 tbsp. с / н, 6 tbsp. с / н, 1 tbsp. b / n.
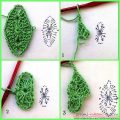
All the rows begin 1 stp. instead of 1 tbsp. b / n. When the ears are ready for them you need to attach the strings. You can braid a pigtail or make flagella at your choice. Decorating the hat will be a flower. Variants on the Internet and magazines on knitting there is simply a huge amount. Here is an example scheme, it can be modified, for example, to tie the second tier of petals in checkerboard order. 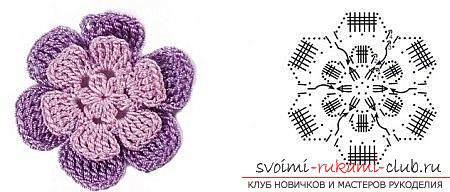 Decorate the flower can be different beads. You can do this in the event that your baby is already big enough and does not try to drag into her mouth and try the beads. Remained the most fluffy detail - bubo. To make it beautiful and fluffy you need a thick flat base about 10-12 cm wide. If you do not know how to make a pompom, do not get discouraged. It's much easier than it seems. For a basis you can take a little book. Along the book wrap a piece of thread and tie it to the bow. Wrap a book across about a third of the hitch (who will how many will). Carefully remove the wound and very tightly tie it with a thread of the winding. It remains to cut the resulting loops and spread the bubo. We attach the bubble to the cap and it's ready. The next cap is also decorated with a bubble and a flower, but it is connected in a completely different manner. In addition, the yarn used to create this cap has a beautiful silk luster.
 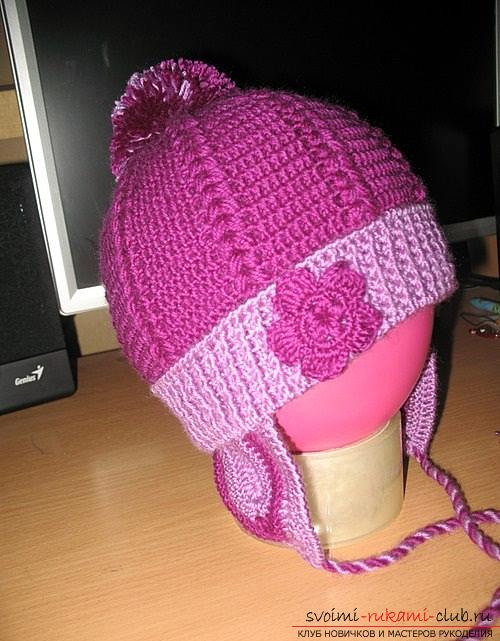 Materials for work:
- Yarn Vita Brilliant of two shades to your taste 45% wool, 55% acrylic (380 m / 100 g);
- Hook No. 2.5.
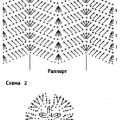
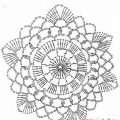
Getting started is the same as the first cap - ring. 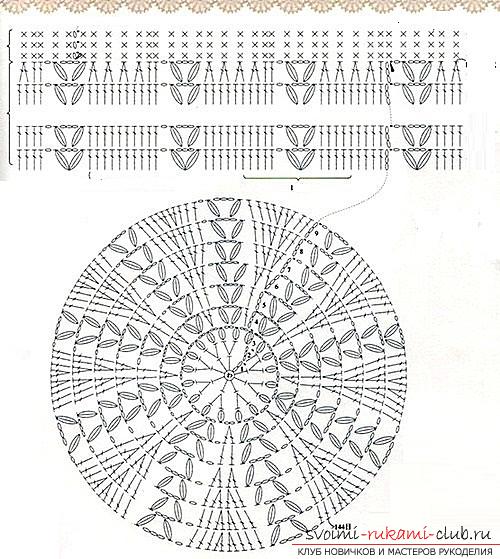 The first circle is tied from 2 cpp. and 8 polust. with / n. This and the following circles must be started with lifting loops and ending with a connecting post. The second circle. Increase the number of loops in 2 times. In the third circle in every half. c / n associate 3 tbsp. с / н from one base and with one vertex, between them to connect 2 в.п. The fourth circle knit in arches from 2 cp. third circle. Alternate (1 stp and 2 st.c / n) and (3 st.s./n with common base and top + 3pp + 3pc s / n with common base and apex). The fifth circle knit almost as well as the fourth, but 2 tbsp. c / n knit in 2 tbsp. s / n of the last circle, and (3 items of s / n with common base and vertex + 3 vp + 3 sts s / n with common base and vertex) in 3.v.p. between Art. with / n. The sixth circle. Knit like the fifth, but instead of 2 tbsp. c / n knit 4, 2 of each st. s / n fifth circle. All the subsequent rows knit similarly to the sixth circle adding each time 2 tbsp. with / n. follow the scheme. When the bottom becomes the right size, knit without adding loops. The variant of the work is shown in the diagram. The lower part of the cap is connected with the help of relief columns with / n. Here you can give vent to your imagination and make a rubber band 1x1, or 2x2 or execute slanting rows of the rth st. with / n. In general, do as you like. Now we need to connect the ears as follows:
- Dial 12 volts.
- Tie them in art. s / n, in the last 1 loop, 3 tbsp. с / н, 1 в.п., 3 tbsp. with / n.
- The next row to link Art. с / н, в в.п. link 1 tbsp. с / н, 1 в.п., 1 ст. with / n.
- To connect 4 more rows.
You can tie the ears separately, and then attachthem to the cap. Or try the following: tie the thread to the cap at the center of the distance marked for the ears. Next, knit on the layout or description, and fix the beginning and end of each row with 3 connecting posts to the edge of the cap and the beginning of the next row of the ear you will get farther from the central chain from the intersection. Now it remains only to tie the flower and make a bubble and ties. You can use the data from the previous cap to do this. We wish you even loops.
Comments
Related posts:
 How to tie a skirt for a girl 7 years old, using the "zigzag" pattern, detailed patterns, pattern and job description
 How to tie a summer plaid from the crochet motifs for children, a scheme and a description of the work, photos of finished products
 This master class with a diagram, photo and description will tell you how to crochet the Kitty hat for girls.
 How to tie a summer female blouse crochet, patterns, patterns, job description
 How to tie a hat, knitting hats with knitting needles, patterns and patterns for hats, patterns for knitted hats, detailed descriptions, diagrams, photo examples, recommendations.