How to knit crocheted shoes, step-by-step photos and description of knitting, patterns and images of several models, fishnet boots, a model with a pattern of "scales", beautiful boots with tie, decorated with pompoms
In our time, boots are an integral partwomen's wardrobe. For winter cold there are warm skin models, with fur and embossed soles. Autumn models save female legs from getting wet, but summer boots become just a beautiful and stylish accessory. When did the boots appear? According to archaeological data, the appearance of shoes dates from about 25 to 30 thousand years ago in North America. There are also a few samples found later in the territory of ancient Egypt, in Africa. In those days, shoes depended heavily on climatic conditions. In hot countries, Greeks, Romans and Egyptians of antiquity wore mostly sandals, while the northern peoples preferred warm leather shoes and boots. The Scythians preferred soft, narrow and high leather boots, which were filled with pants. They resembled a stocking and attached to the leg with special straps. Such products were decorated with embroidery and fur. At the time, the boots were worn by both women and men, while female models were short-topped, and made of red leather. This color was considered the most beautiful. Often they were embroidered with ornamental patterns. In Europe, boots are first mentioned in the XV century. They served predominantly as men's riding shoes. They were very long, higher thigh models. At the time of the French King Louis XIV, very popular were the boots, which had square socks, high heels and spurs. In the middle of the XVIII century, bright and sharp-nosed models became fashionable. By the XIX century, it was gradually replaced by the popularity of half-boots trimmed with fur. Like many other things, boots at the very beginning were an indicator of the social level and the level of the person's wealth. For example, in Russia only the upper classes flaunted in morocco boots, whereas ordinary people had legs and pistons on their feet. During the reign of Peter the Great, popularity of boots became much less, but by the end of the 19th and beginning of the 20th centuries almost all men of Russia wore boots. In the female version, there was a shortened bootleg and a rim with red morocco or cloth. The twentieth century was also marked by the creation of an asymmetrical insole that repeated the outlines of the foot, before that the shoes were not divided into the right and left boots. Now you can find a model for every taste, from a variety of materials, with heels, on a wedge or even soles. Like any accessory that affects the whole image, handmade boots will always be out of the competition. One of the varieties of such products will be crocheted boots. In this article, we will offer several variants of models of crocheted boots. They all have one thing in common - a ready-made sole. And further variants are possible. The first is to give a second life to the old shoes. Quite possibly you have a case without a pair of shoes, boots or even ballet, the top of which is spoiled. Perhaps it was stained, torn or just worn out, but this pair has a very convenient shoe. Then your new boots under no circumstances will rub the legs and become an excellent new, beautiful accessory in the wardrobe. The second option is a new outsole. There is also room for creative activity and imagination of needlewomen. For example, you can make a knitted part, and then take the boots to the shoe shop and instruct the specialist to attach the sole. Another option can be the purchase of comfortable slippers, perhaps even home, and turning them into beautiful boots. Usually such shoes have a comfortable, soft and very often rubberized sole. Boots on this basis will withstand the weather badly. The next step is to select the thread. Everything will depend on what season you will knit boots for. If you want to make dense boots for autumn or spring, use yarn from a mixture of wool and acrylic. The latter should be more, it is due to the artificial acrylic component that the product will be non-sticky, pleasant to wear and durable. For summer models choose cotton or mixed threads with the addition of the same acrylic, viscose. Light and breathable, these strings are perfect for warm weather, and the legs will be comfortable in them.
Boots crocheted
Option 1 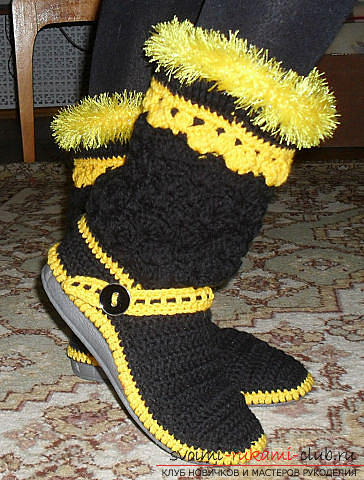 It will take:
- Yarn 80% acrylic, 20% wool (in this master class black and yellow, but you can, of course, choose other colors) 135 m / 50 g;
- Yarn "grass" of yellow color;
- Hook No. 3;
- Slippers with a comfortable sole without a back;
- Awl.
Knit will be a thread in two pieces. The cloth part of the spout should be cut off, leaving the tip itself. It is not thrown away, later it will come in handy. 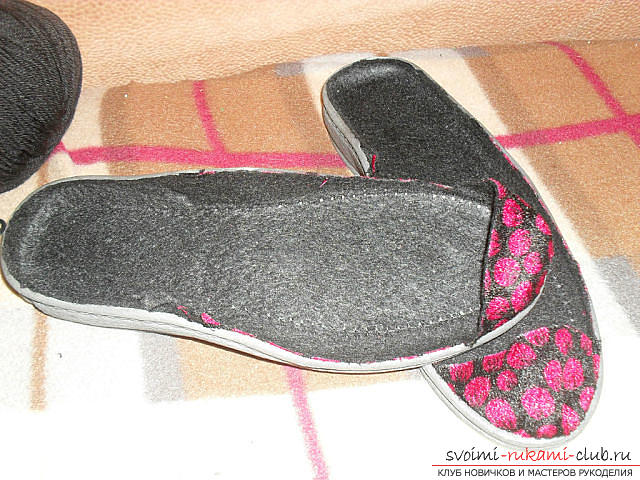 Now it is necessary to make a hole in theequal distance along the perimeter of the slipper. We pierce the awl with the side in such a way as to capture part of the rubberized sole and insole. Now it is necessary to make stitches of black yarn, as in the photo. We fasten the thread, but do not tear it off.
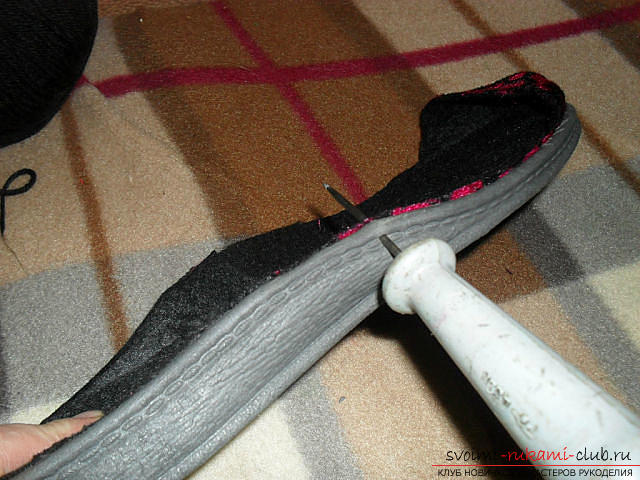
 We send 1 row of connecting posts. The number of loops in each stitch will depend on the width of the stitch and the thickness of the yarn.
 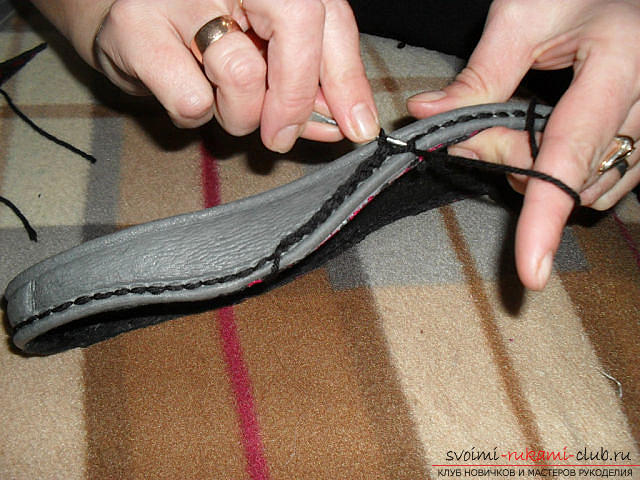 The next row we sew art. with / y thread of yellow color.
 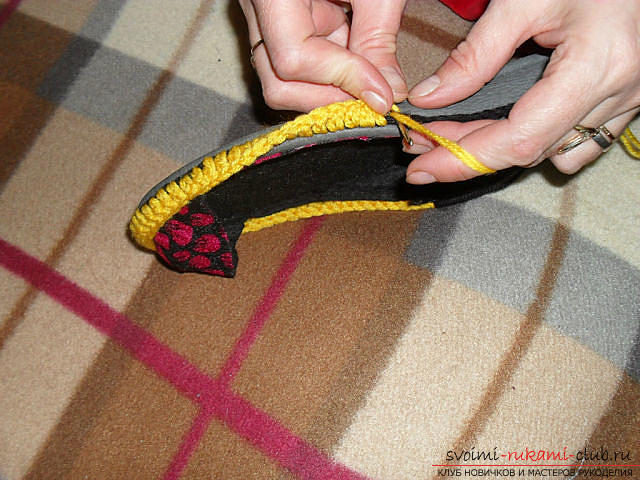 A number of art. б / н a thread of contrast (in this case black) color. These two rows closed the rubberized part of the sole, and we begin to knit the tip of the boot.
 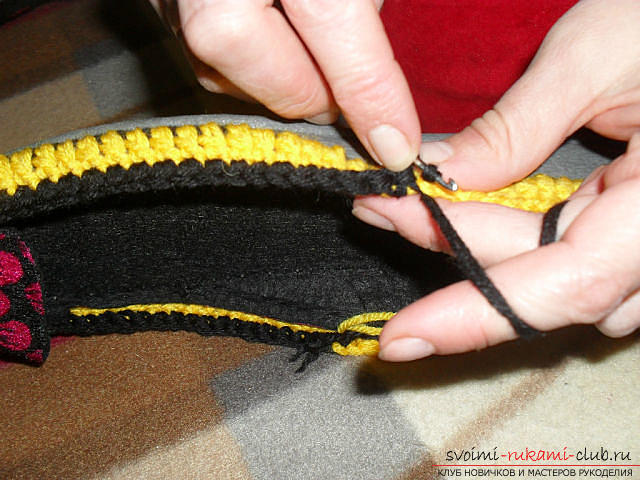 To do this, you need a cloth part, which was cut off earlier. On paper, you need to make a pattern of the spout, using the dimensions of the cut out part.
 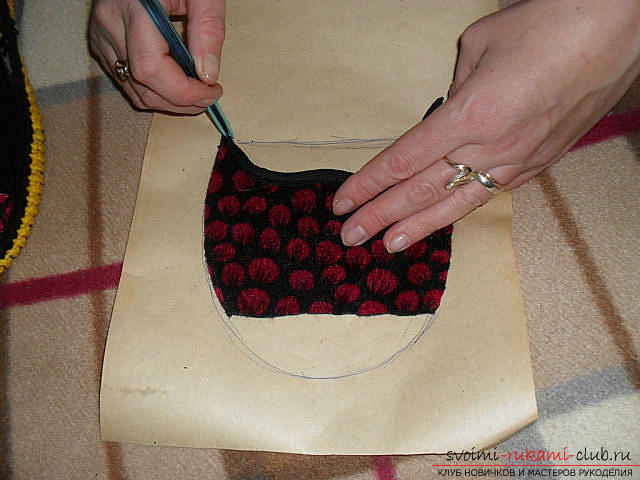 On them we perform the calculation of loops and knit the spout of Art. with / n.
 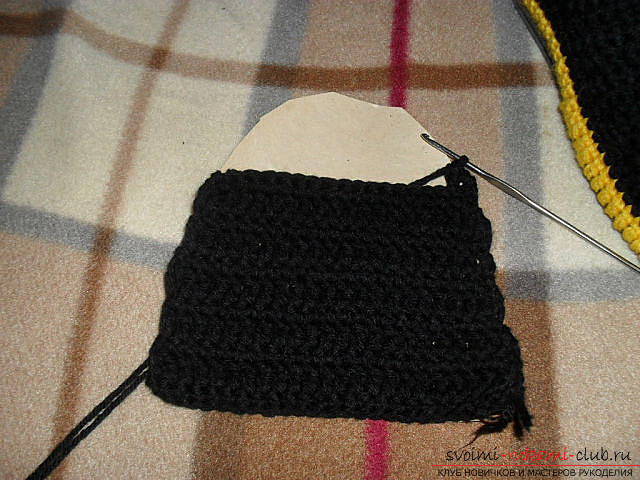 Advice! Record all your actions and completed calculations. This will help when knitting the second boot. Now you need to sew or bind the ss. spout to the harness. Try on the product, you may need to adjust the number of loops.
  The next step is knitting a heel. We carry out art. with / n. To the sides of the spout we attach with the help of ss. It will take approximately 2-3 rows.
 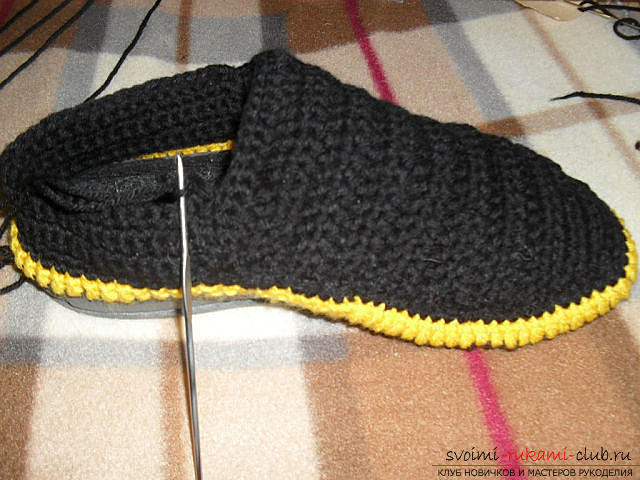 Next, we sew 2 rows of Art. b / n a yarn of yellow color and one more black yarn. The last row is banded around. This will be required for a convenient transition to knitting leg. The knitting of the heel is over.
 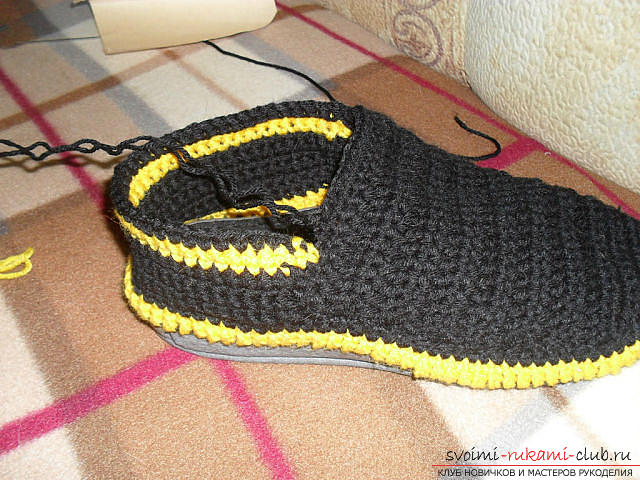 According to the scheme below, we knit the bootleg.
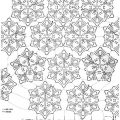
 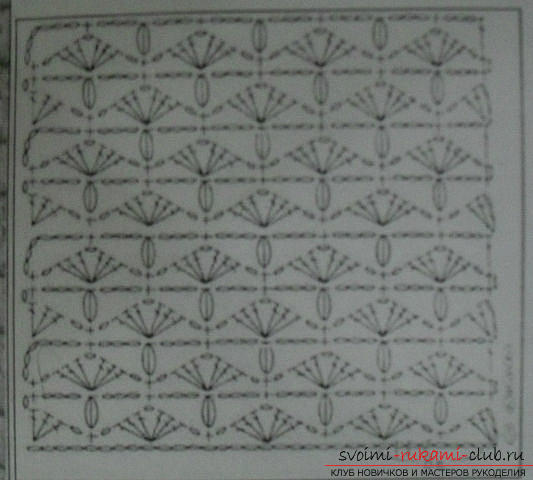 The first river. 3 percentage points 1 bp, 3 tbsp. c / n in the same stitch of the base, * 1 vp, 3 loops to pass, 1 tbsp. b / n, 1 sts, 3 loops to pass, in the 4th vyazhem (3 st.s / n, 1 st, 3 st.s / n) *, continue from *, finish the series 2 st . с / н in the first loop and 2 с.с. The second river. 1 stp, * 3 bp, now we are tying 3 tbsp. c / n with common base and apex in st. b / n of the first row, again 3 bp, 1 tbsp. b / n in 1 cp. between threes of art. s / n from one base *. We continue from *, we finish 1 с.с. All subsequent odd numbers are knitted, like the first, even - as the second. The pattern will go staggered, shifting every two rows.
 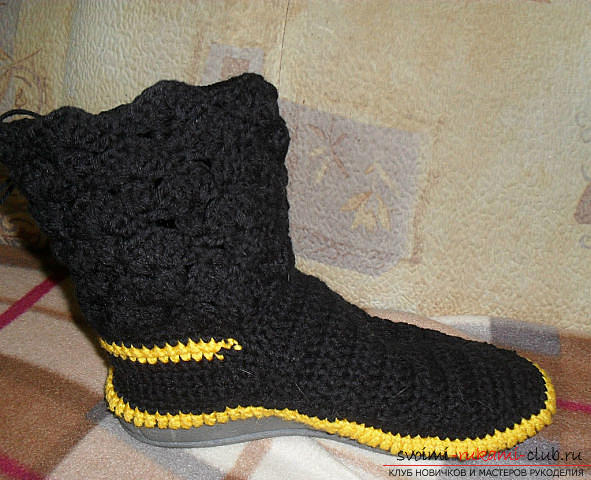 The length of the shaft is individual. The last two rows of the pattern we sew with a contrasting thread.
 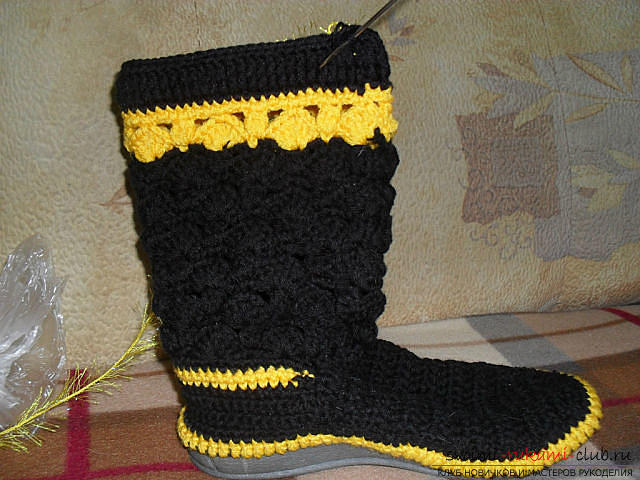 Then we tie two rows of art. with a yarn of the second color. Now you need to make a string of yarn "grass". For her, you can take the hook of a larger number.
 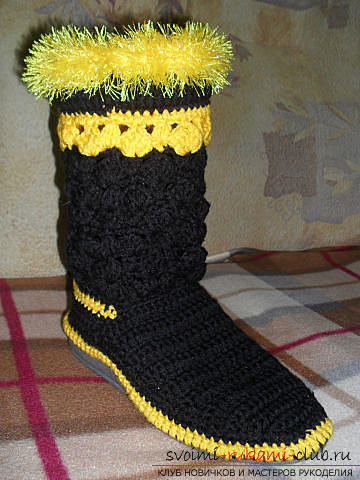 Now we knit the strap for decor decorating with yellow threadcolors. The first row of Art. b / n. second row of Art. s / n and the third row of Art. b / n. the length will depend on the grasp of the ankle. Now we need to associate the chain of b.p. black yarn of the same length as the strap, and insert it between the st. with / n.
 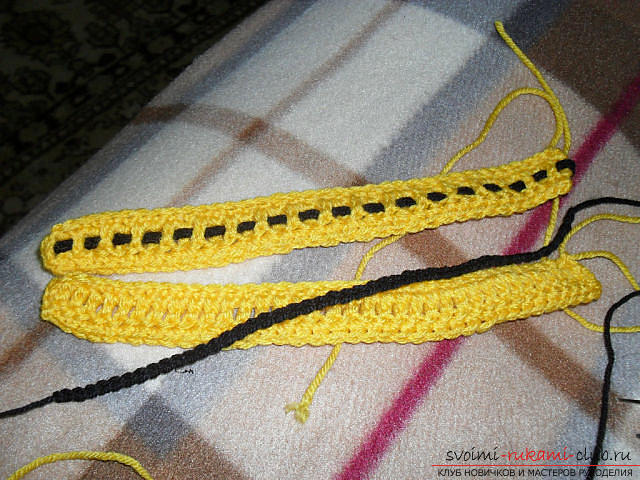 Sew the strap. On the outside we decorate with a button. It remains to bind a pair of boots. Option 2 For those who prefer refined and elegant simplicity, we offer the following options.
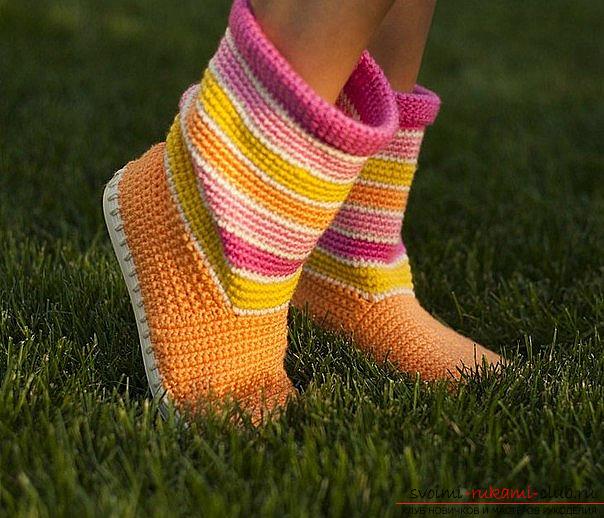
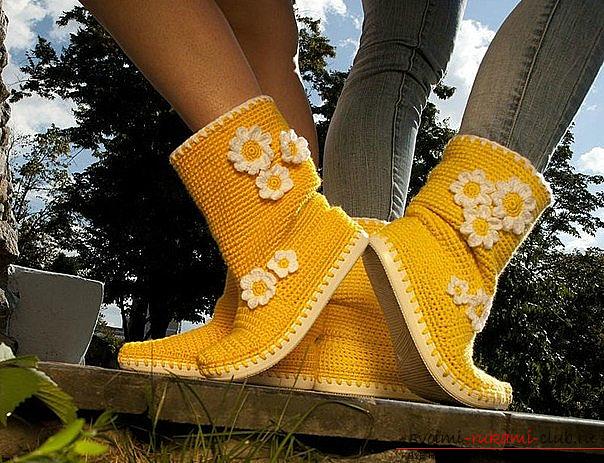 The principle of attachment to the soles and knitting is the same. You can use a variety of colors as decor, connecting the bootlegs stripes or decorate with flowers. Option 3 Crochet shoes with a pattern of "scales"
 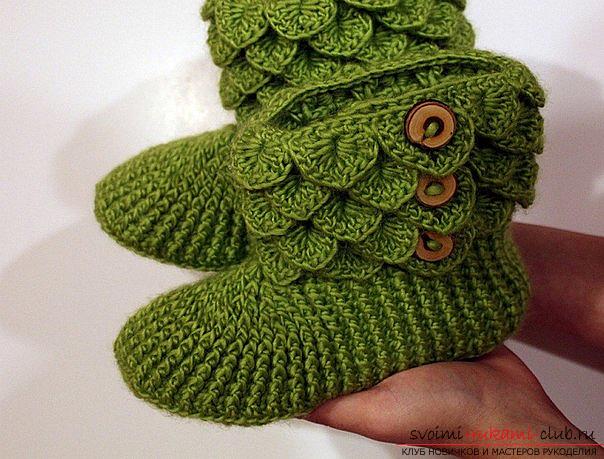 This version of knitting is also called "crocodileleather". No animal will suffer, and you will become the owner of boots made of "crocodile skin". In this model, it will be necessary to attach the sole after knitting, since the insole here is also made using a hook. Of course, you can take a ready-made sole and do the manipulations described above for its strapping. Then knit according to the nozzle scheme proposed below. Try it, experiment. Knitting starts from the sole. The work will take place in a circle (or rather, an oval, but the principle is the same). In order to calculate the number of air loops in the set, it is necessary to measure the length of the foot and its width. Now subtract the second from the first value. The resulting number * is the length of the initial chain. We knit the sample 10 x 10 cm and calculate the number of loops * in one centimeter. Multiply two numbers ω * and get the number of loops in the set. Thus, the chain from b. is typed.
  The first river. 3 percentage points and another 5 tbsp. c / n in the same loop of the base. Now we knit art. with / n. in the last loop we sew 6 tbsp. c / n and go to knitting on the second side of the set. We finish 1 с.с. in the 3rd cp. The second river. 3 percentage points 1 tbsp. c / n in the same loop, in the next five loops we knit 2 tbsp. s / n with a common base, then 1 st. with / n. In 6 tbsp. s / n knitted from a common basis we knit 2 tbsp. with / n. on the second side of the oval we continue to knit Art. with / n. We finish 1 с.с. in the 3rd cp. Third r. We already have a small oval. Narrow sides consist of twos Art. s / n, tied from one base, 12 loops from each edge. In these loops knit for 2 tbsp. s / n with a common base, alternating with 1 tbsp. with / n. It turns out 18 loops. Next, we knit 1 tbsp. s / n on the lateral wide sides. In the fourth row along the edges on 18 loops we knit 2 tbsp. s / n with a common base, alternating with 2 tbsp. with / n. It turns out 24 loops. We knit the broad sides, as usual, without any increase. Next knit by analogy, increasing the number of loops from two opposite sides of the oval. In the fifth row, alternate 2 tbsp. s / n with a common base and 3 tbsp. with / n. in the sixth - from 4 tbsp. with / n. The size of the sole is determined individually. You can draw a foot pattern and periodically try to work. When the sole is finished, we continue knitting the toe and heel without tearing the thread. Thanks to the pattern of elastic from the relief bars, the ready boot will sit tightly on the foot. Below is an approximate pattern of knitting. The pattern will be preserved, only the number of loops in the rows changes.
 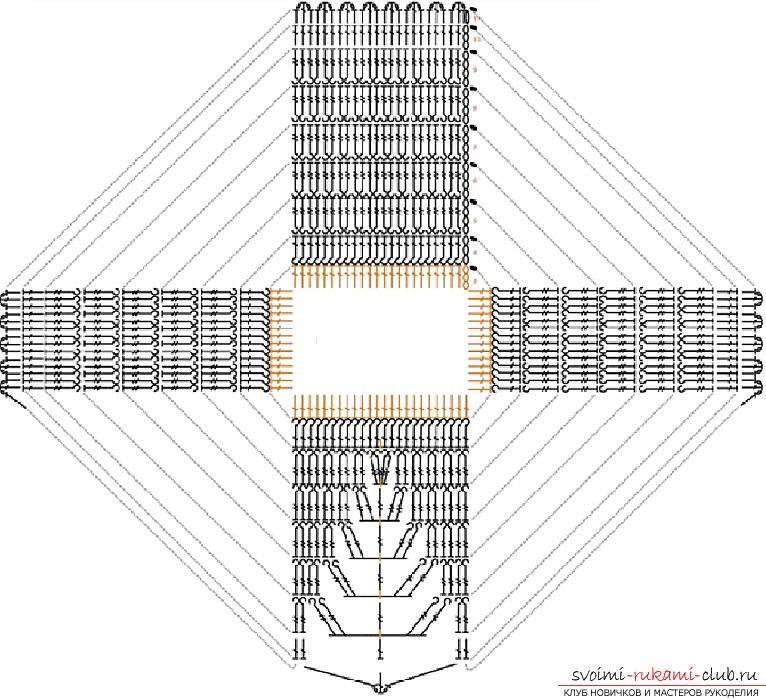 We send one (first) row of simple art. with / without additions. The second river. we knit in a circle with embossed lacquer (concave) st. with / n. Note, on the diagram the wider rows are a heel and a spout. Third r. We knit alternating convex and concave posts. Get an elastic 1 x 1. Follow the diagram. Periodically try on a boot to adjust the number of loops. To go to the knitting of the bootleg it is necessary to tie 1-2 rows of simple st. with / n. We begin to knit the bootleg with the "scales" pattern. The work is done in a circle. Below is a diagram.
 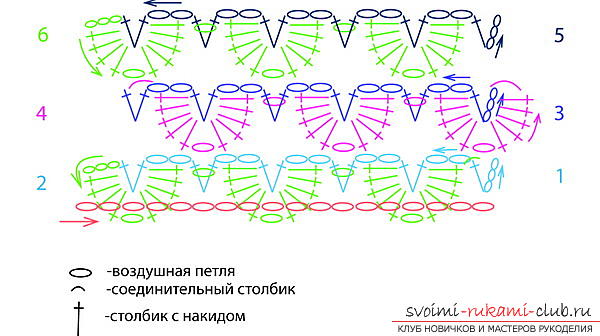 The first river. 3 percentage points 1 tbsp. c / n in the same loop, * 2 bp, 2 loops to skip, 2 tbsp. c / n with a common base *, continue from *. The second river. we knit in the opposite direction, using the bodies of two rows of columns with a crochet as a base. 3 ppp, 4 tbsp. c / n (we enter the hook between two st.st. and the right column serves as the base) + 1 stp. 5 tbsp. c / n (we introduce a hook between two st. s / n, and the left column serves as a base). Knitting for convenience is turned upside down. Every first 2 tbsp. s / n with a common base serve as an arch for (5 items c / n + 1 vs. + 5 st.s / n). Every second 2 tbsp. s / n with a common base is not tied, in the transition between the scales we perform 1 cp. Third r. Turn the knitting back. We knit similarly to the first row. Fourth р. knit "scales" in checkerboard pattern with respect to the second row. The height of the shaft will depend only on your desire. The last row to execute Art. b / n. As an additional decor you can sew on the outer edge of the button. Option 4 Crocheted shoes with funny pom-poms
 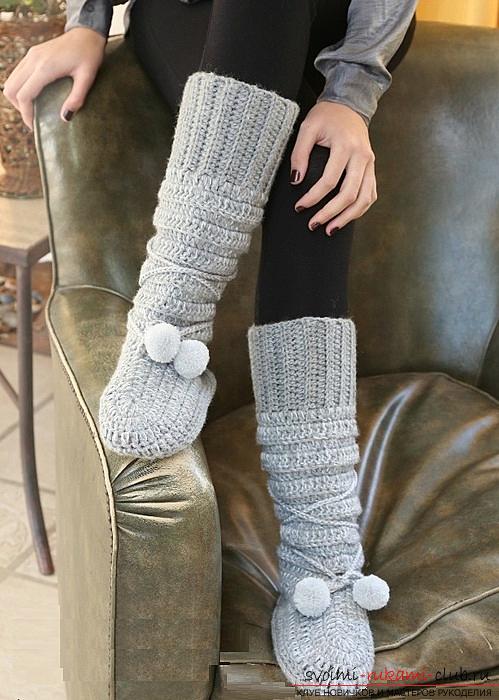 We also perform this model with a knitted sole. It will take:
- Thin and thick acrylic yarn;
- Hooks number 4,5 and number 5.
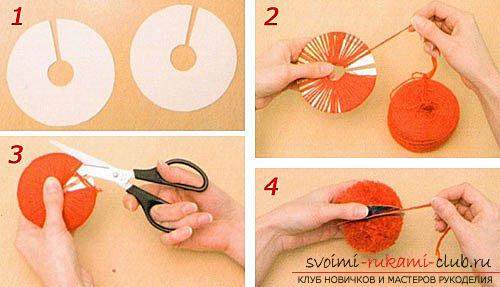
The sole is similar to the previous model. You can choose any other scheme of the oval on the Internet. The last row we sew without the addition of art. b / n. The upper part is not knit up, but along one long and narrow cloth. Hook No. 5 dial the chain of 17 cp. thread in two additions (thick + thin). We knit with return crochet hooks No. 4,5 polust. s / n for the back half loop. When the length of the fabric reaches the length of the leg's girth (this is approximately 30 rows), knitting is finished. We connect the resulting tape into a ring. We fasten the thread, cut and hide. We will knit from the upper part of the boot, fastening the loops of the first row to the side hem. c / n, they act as a series. We knit with return rows. The first river. we sew, alternating 2 tbsp. s / n in 1 side polust. s / n and 1 tbsp. s / n in 1 side polust. with / n. The second, third and fourth rows are performed by relief art. with / n. Beginning with the fifth row, we perform a narrowing of the shaft. To do this, select 4 symmetrical loops at equal distance from each other. This series is knitted art. c / n, in the marked loop perform 2 tbsp. with a common vertex. We knit for the back wall. From the 6th to the 9th rows we knit the relief st. with / n. 10-th р. We knit similarly to the 5th, reducing four loops at an equal distance. The 11th and 12th rows are executed by relief st. with / n. We begin to knit the rise of the boot. The beginning of the 13th row is the central point of the future heel. We select the opposite center point of the future spout. Also mark the loop before and after it. Now we knit art. b / n before the loop before the middle loop of the spout. Here we bind 10 cent. and we knit in them 3 VPP. and further a number of art. with / n. We got an offshoot for the spout. We fix this strip from art. s / n on the boot in the loop, which is after the third marked. We knit further art. b / n. We finish 1 с.с. The following series will be performed around the circle of Art. with / n. The 14th р. In 3 timesp. branches for the spout we knit 5 tbsp. with / n. end the series of 1 c.s. in the 3rd cp. The 15th r. is performed similarly to the 14th, in 5 tbsp. s / n, tied in an arch of 3 cp. spout, we knit for 2 tbsp. s / n with a common base. Now the width of the spout is 10 loops. 16 and 17 rows of knit without the addition of art. with / n. We turn the work and knit the 18th row of the half. with / n. thread we fix. Now it is necessary to connect the parts with the help of 1 row of ss. The line will turn out to be a relief. The seam of the upper part of the boot (it is located across the rest of the knitting) is located behind. It is necessary to tie a string of cp in two rows. length of about 1 meter. Mark its center and fix it on the seam. Attach 1 pompon to each end. How to make pompoms To create pompoms you will need two cardboard circles. They need to cut out the central round part and a small piece along the radius. Fold the circles so that all the cut out partscoincided. Now we begin to wind the thread without detaching it from the tangle. The larger and denser the winding, the fuzzy and fluffier the pompom will be. When you find that the number of turns is sufficient, it is necessary to cut the wound threads along the circle with scissors. Now it is necessary to separate a little from one cardboard from another, into the formed hole to place a piece of thread. Now we tie it around the bundle of threads, level off the cut ends and remove the cardboard. Shake and get a pretty pompon. We fasten them to the ends of the chains and tie them nicely, making a few turns around the leg.
Comments
Related posts:
 How to tie children's crochet hooks, schemes and detailed work description, photo of finished products
 How to crochet lace napkins, charts, photos and job description.
 Features crochet crochet, patterns and description of crochet crochet dress and a few more items.
 How to tie a funny toy crochet "Mouse-baby"? Basics of crocheting technique, description of the work process and quality step-by-step photos
 How to tie a crochet, chart, photo and descriptioncreation of various models of berets, a pattern of "bumps" and twisted columns, a lesson on crocheting crochet with the help of relief convex and concave columns with a crochet