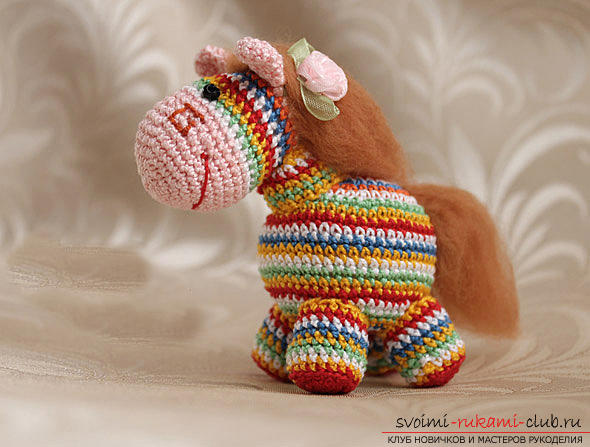
How to tie a horse amigurumi crochet with his hands with a step-by-step description and photo.
Homeland of the technique of knitting amigurumi is Japan. And for today she has won hearts of skilled workers all over the world. Most often in the form of amigurumi, toy animals or dolls are made. In this master class, we suggest that you learn how to knit such a small animal as a horse in the amigurumi technique. The product is bright and cheerful. It can be an excellent gift not only for children, but also for those adults who are very fond of original things. 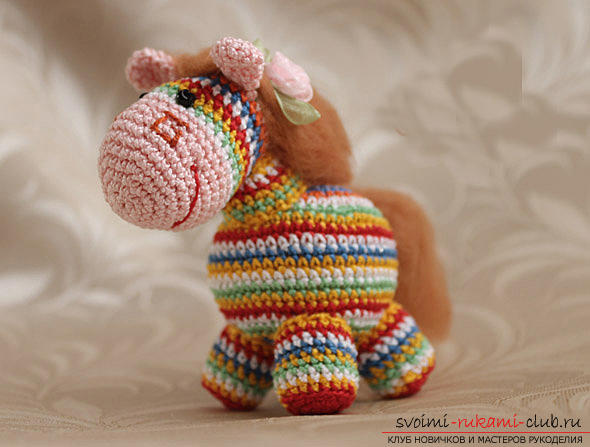 To create such a horse you need to stock up with such materials:
- bright yarn of the brand "Iris" (several shades);
- crochet hook (number one and a half);
- thread of a mulina to embroider a toy face;
- 2 small beads (to create a pony eye);
- weighting agent;
- Synthetic or cotton wool as a filler;
- A small clump of wool to hold the mane;
- a thin needle for holding felting.
 We begin work on the manufacture of the headFirst we use yarn of a light pink shade. First row: you should tie six loops in the form of a circle amigurumi. 2-nd row: six times to add to all loops (it turns out in the end - twelve loops). 3rd ryadochek: 6 times you should create a combination of loops: create one column without a cape, then make an increase (it turns out in the end - eighteen loops). 4th row: 6 times you should create such a combination of loops: create two columns without a cape, then make an increase (it turns out in the end - twenty-four loops). 5th row: 6 times to create such a combination of loops: create three columns without a cape, then make an increase (it turns out eventually - thirty loops).
 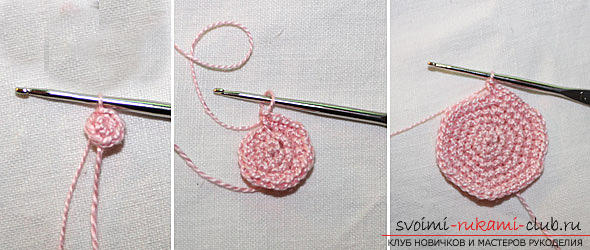 6th row: 6 times to create such a combination of loops: create four columns without a cape, then make an increase (it turns out in total - thirty-six loops). 7th and 8th rows: we perform columns without holding the cape in all the loops (turns out - thirty-six loops). 9th row: 6 times to create such a combination of loops: we make a decrease, and after it - create four columns without a cloak (it turns out in the end - thirty loops). 10th row: we perform columns without holding the cape in all the loops (it turns out - thirty loops). Next, we move on to tying the part of the face that has a striped appearance. Therefore, you need to change the yarn to white color. Then all the rows will be knitted with threads of different shades.
  11th - 13th row: we perform columns without holding the cape in all the loops (it turns out - thirty loops). 14th row: 6 times you should create such a combination of loops: we make a decrease, and after it - three columns to create without a cloak (it turns out as a result - twenty-four loops). 15th - 19th row: we perform columns without holding the cape in all the loops (it turns out - twenty-four loops). Then you need to fill your head with filler (cotton, sintepon).
 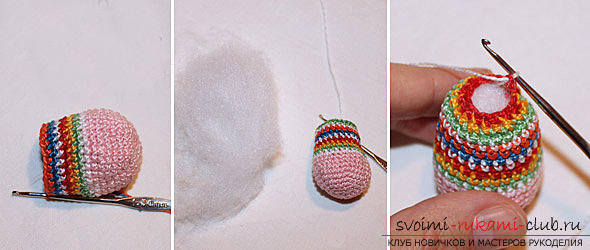 20th row: 6 times to create such a combination of loops: we make a decrease, and after it - create two columns without a cloak (it turns out in the end - eighteen loops). 21st ryadochek: 6 times you should create such a combination of loops: we make a decrease, and after it - one column to create without a cloak (it turns out in the end - twelve loops). After that, if there is a need, we add the filler again. 22nd ryadochek: we make the round-cut (it turns out in the end - six loops). At the end, we must leave a thread of sufficient length to attach to the body.
 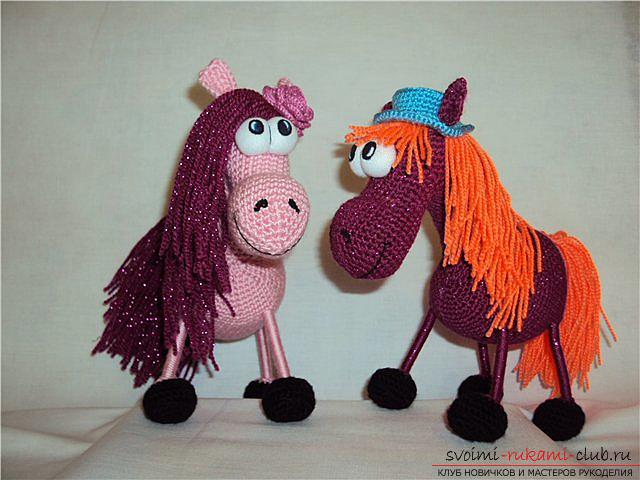 We begin work on the production of the trunkHorses Here, too, you need to use the principle of knitting each ryadochka a new shade. First row: you should tie six loops in the form of a circle amigurumi. 2-nd row: six times to add to all loops (it turns out in the end - twelve loops). 3rd ryadochek: 6 times you should create a combination of loops: create one column without a cape, then make an increase (it turns out in the end - eighteen loops). 4th row: 6 times you should create such a combination of loops: create two columns without a cape, then make an increase (it turns out in the end - twenty-four loops). 5th row: 6 times to create such a combination of loops: create three columns without a cape, then make an increase (it turns out eventually - thirty loops). 6th row: 6 times to create such a combination of loops: create four columns without a cape, then make an increase (it turns out in total - thirty-six loops).
 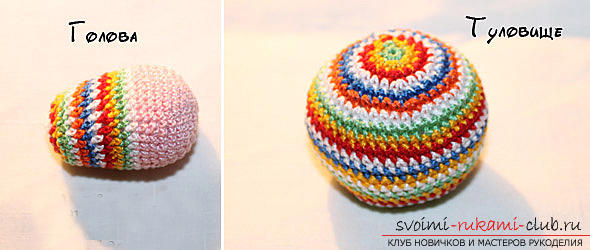 7th row: 6 times we should create such a combination of loops: we make an increase, and after it - five RLS (columns without a cloak) (it turns out as a result - forty two loops). 8th row: 6 times you should create such a combination of loops: we make an increase, and after it - six RLS (columns without a cloak) (it turns out as a result - forty-eight loops). 9th - 17th row: we execute the columns without holding the cape in all the loops (it turns out - forty eight loops). 18th row: 6 times you should create such a combination of loops: we make a decrease, and after it - six bars to create without a cloak (it turns out as a result - forty two eyelets). 19th row: 6 times you should create such a combination of loops: we make a loss, and after it - five bars to create without a cloak (it turns out as a result - thirty-six loops). 20 th row: 6 times to create a combination of loops: we make a decrease, and after it - create four columns without a cloak (it turns out in the end - thirty loops).
 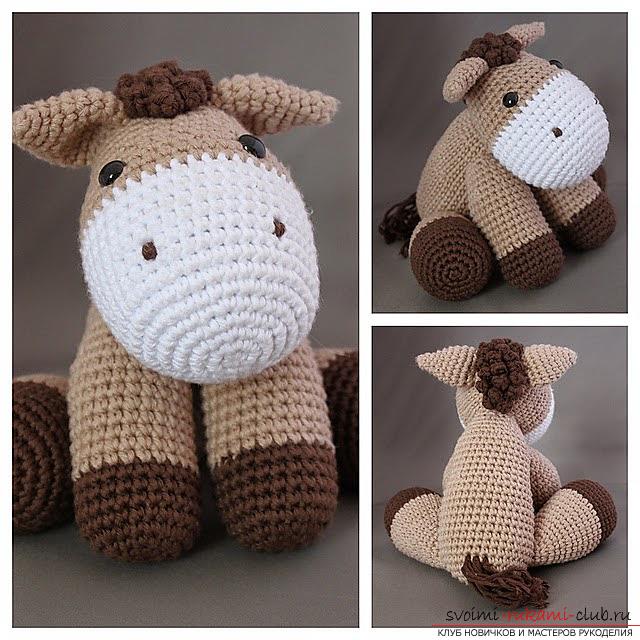 21st row: 6 times you should create such a combination of loops: we make a decrease, and after it - three columns to create without a cloak (it turns out as a result - twenty-four loops). Then you need to fill the body with filler (cotton wool, sintepon). Torso toys try to weight either standard pebbles or granulate. We advise you to do so also because the horse has a fairly large head, which can outweigh the product in one direction. 22nd ryadochek: 6 times to create such a combination of loops: we make a decrease, and after it - two columns to create without a cloak (it turns out as a result - eighteen loops). 23rd ryadochek: 6 times to create a combination of loops: we make a decrease, and after it - one column to create without a cloak (it turns out in the end - twelve loops).
 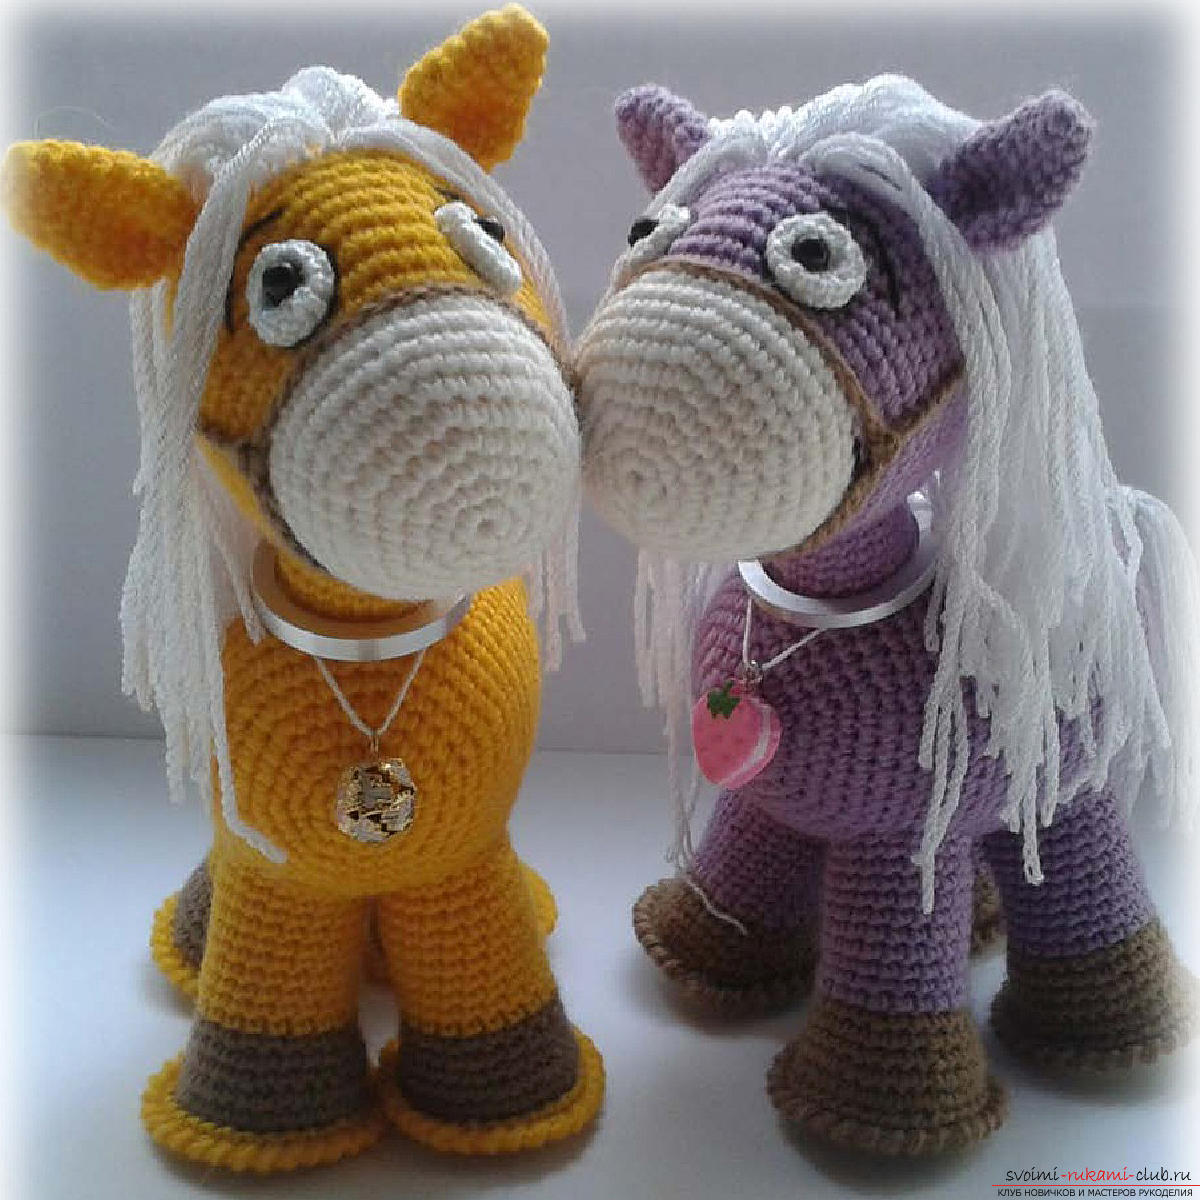 Fill up with another sintepon. 24th row: we make the rounds (it turns out in the end - six loops). In the end, be sure to leave the thread long enough to attach to the head. We begin work on making the legs of a horse (4 parts). Here you must first use a red thread. First row: you should tie six loops in the form of a circle amigurumi. 2-nd row: six times to add to all loops (it turns out in the end - twelve loops).
 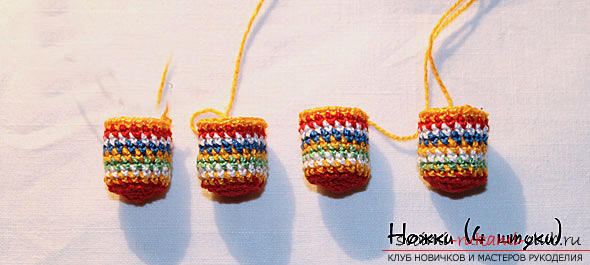 3rd row: 6 times it is necessary to create such a combination of loops: create one column without a cape, then make an increase (it turns out as a result - eighteen loops). Change the shade of yarn. 4th - 11th row: we perform columns without holding the cape in all the loops (it turns out - eighteen loops).
  In the end, we must leave a threadsufficient length, then to attach to the body. We start work on making the ears of a horse. We use pink yarn. First row: you should tie six loops in the form of a circle amigurumi. 2nd row: you should create such a combination of loops: create one column without a cape, then make an increase - so repeat until the end of the rally (it turns out in the end - nine loops). 3rd - 6th row: you should create a column without a cape in all the loops (it turns out in the end - nine loops). 7th row: you should create a combination of loops: decrease and RLS (it turns out in the end - six loops). In the end, be sure to leave the thread long enough to attach to the head. We will not stuff the ears ourselves. Rather, on the contrary, even iron them. How to tie a horse's neck? Spend a set of nineteen air loops. Then we close the loop and get a chain of eighteen loops.
  1st - 3rd row: knit RLS in all the loops (get eighteen loops). 4-th row: until the close of the ryadochka you need to knit such a combination - three RLS + addition (we get twenty-two loops). 5th - 7th ryadochki: should knit RLS in all the eyelets (we get twenty-two loops).
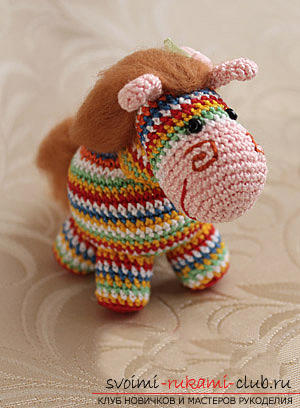
 After that we can begin to assemble the product. In the legs also put a little weighting. Before you attach the legs of the toy, put them in the most comfortable position. Then we attach the ears of the horse. We sew embroidery of nostrils and smiles. We attach eye-beads. From the red bun of wool you need to pile a mane for a horse. Then it is necessary to weld the tail of the toy.
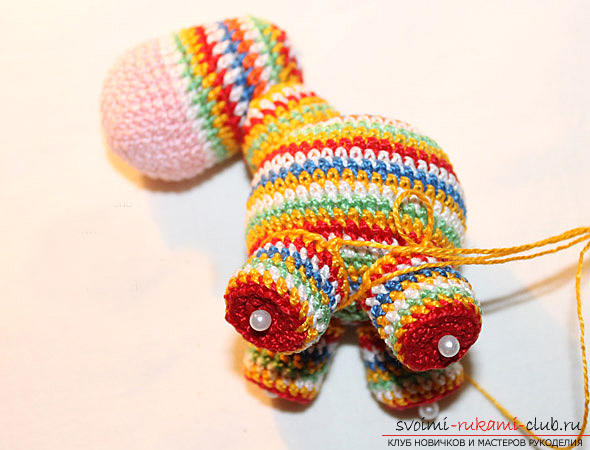
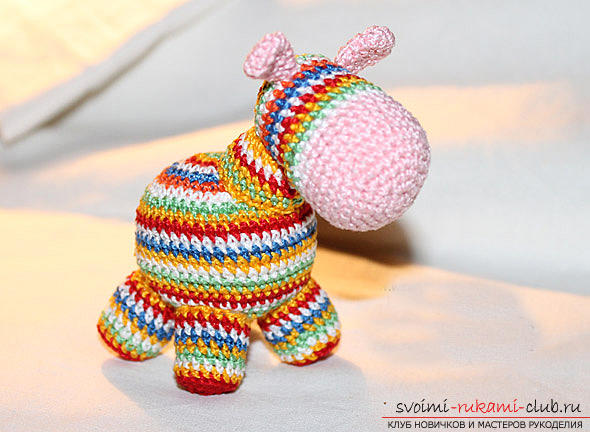
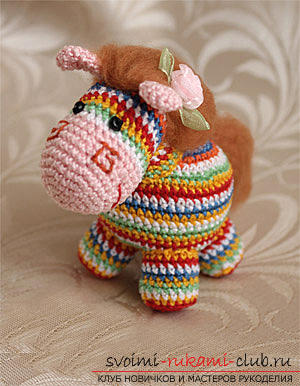
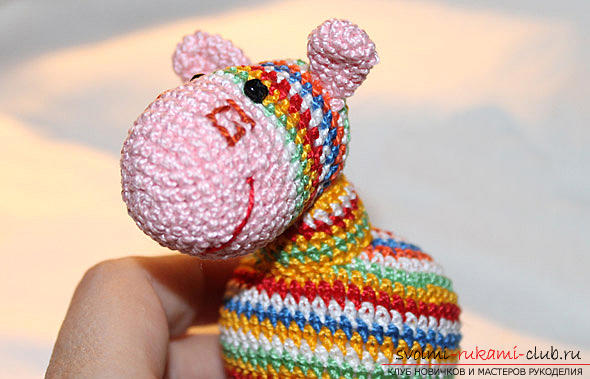 That's all! Our horse amigurumi is ready!
Comments
Related posts:
 A lesson on knitting teddy bears with their own hands with a step-by-step description and photo.
 Master class on knitting monkey amigurumi crochet with their own hands with step-by-step description and photo.
 Master class on knitting monkeys with amigurum crochet for beginners with step-by-step description and photo.
 Master class with photo and step-by-step description will teach how to tie an amigurumi crochet toy
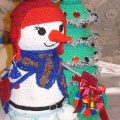 How to connect a merry snowman with an amigurumi with his hands with a description and a photo.