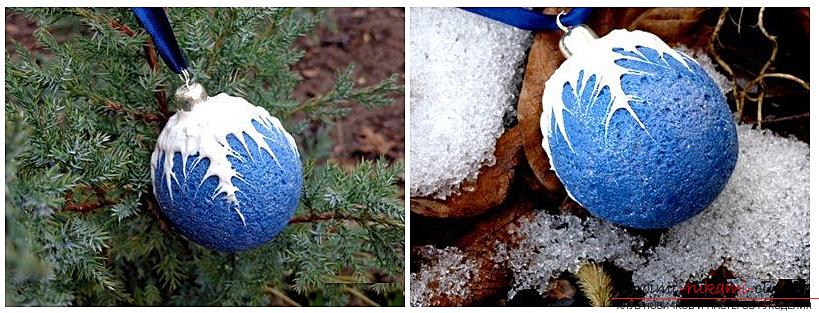
How to make a toy from a polymer clay - a ball, a detailed description and step-by-step photos of the work
Perhaps, not a single holiday is expected asNew Year. Pre-holiday fuss covers both adults and children. Think about the menu, outfits, entertainment and, of course, jewelry. Various decor elements for the interior, Christmas toys, snowflakes and much more are easy to buy in the shops. But if you create them yourself, such products will bring much more joy, because you will enjoy not only the beautiful view, but also the creative process itself. In this article, we will sculpt a Christmas ball from a polymer clay with a snowflake. Due to the variety of colors and shades of plastic crafts can be created for any color solution in the interior. Thermoplastic material is rather heavy, but we will tell you how to make a big and beautiful Christmas tree toy with a small weight. 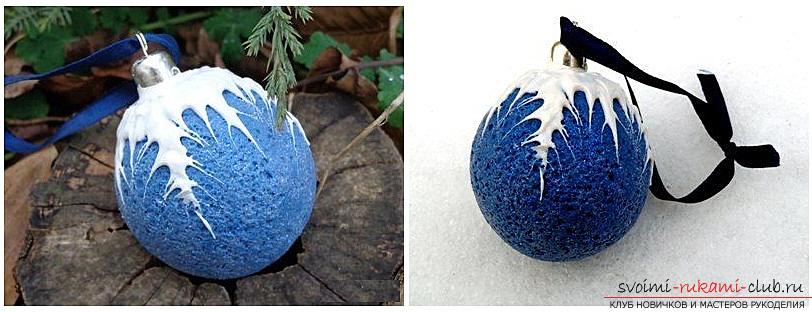 Christmas ball of baked polymer clay, we will create using salt (sugar) technology. It will take:
- Foam plastic ball (diameter to your taste);
- Thermoplastics blue and white;
- Liquid plastic;
- Salt or sugar. If you want a more homogeneous texture choose sugar, its grains do not differ so much in size as the crystals of salt;
- Round form (suitable even for baking);
- Sequins and powder with a metallic effect;
- Stationery knife;
- Roller or paste machine;
- Toothpicks;
- Pin with a loop on the end;
- Metal cap (if left from an old Christmas tree toy, use it, just modify the method of attachment);
- Varnish for plastics.
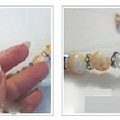
If you previously worked with thermoplastic, thenfor certain remember that she is sensitive to pollution (especially white). The workplace must be clean. So, now you need to carefully stretch the blue polymer clay and roll out a layer about 2 - 3 mm thick. We wrap our foam plastic ball. Excess clay is cut off, and all joints are smoothed to make the surface smooth. In the dishes pour sugar (if you want a more uneven and uneven texture, rinse the salt). Now take our ball and drop it in sugar. It is necessary to carefully roll around and press a little, so that the entire surface is covered with grains. 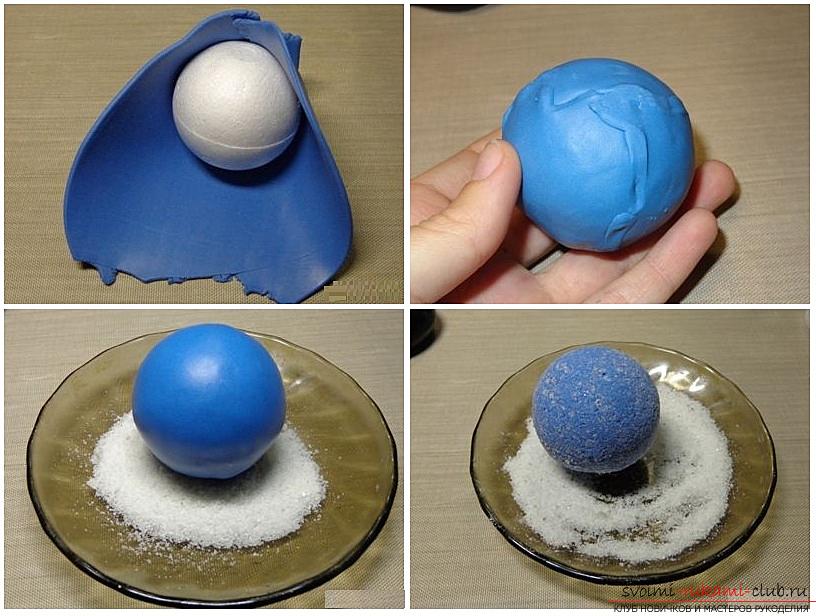 And now we put the bake at 110 ⁰With and no more. And here is the secret of a hollow plastic ball - the foam plastic decreases by about three times in heat treatment. To ensure that our workpiece does not go bubbles and is not deformed in the oven, pierce through the layer of clay with a needle in several places. When the balloon has cooled. wash it in water, it dissolve grains of sugar or salt and you will end up with just an original porous surface. Now take the clay white, carefully kneaded and mixed with liquid plastic. Add liquid clay little by little. Prior to the viscous state, you can stir in your hands, and then transfer to a container and continue to add liquid polymer clay. We should have a consistency about like whipped cream. On one side of our ball we put a white mass. It looks like a snow drift. Now take the toothpick and pull the clay around the perimeter of the ball, drawing the ends of the toothpick with the snowflake beams. That's what we got.
  Take the metal cap and insert itpin. The loop should be inside it. Now we need to "drown" the cap in our drift from white thermoplastic and bake again. Do this strictly in accordance with the instructions given on the package. After the ball has cooled, take the metallized powder of any of the shades of blue and cover it with the blue part. Cover the entire toy with a thin layer of liquid plastic and sprinkle with sequins. Put it back in the oven again. When it cools with varnish for polymer clay. Thanks to him, the spangles do not fall off. It remains only to bend the loop at the end of the pin and hang it on a ribbon, chain or wire loop. Our ball is ready to decorate itself with a Christmas tree.
 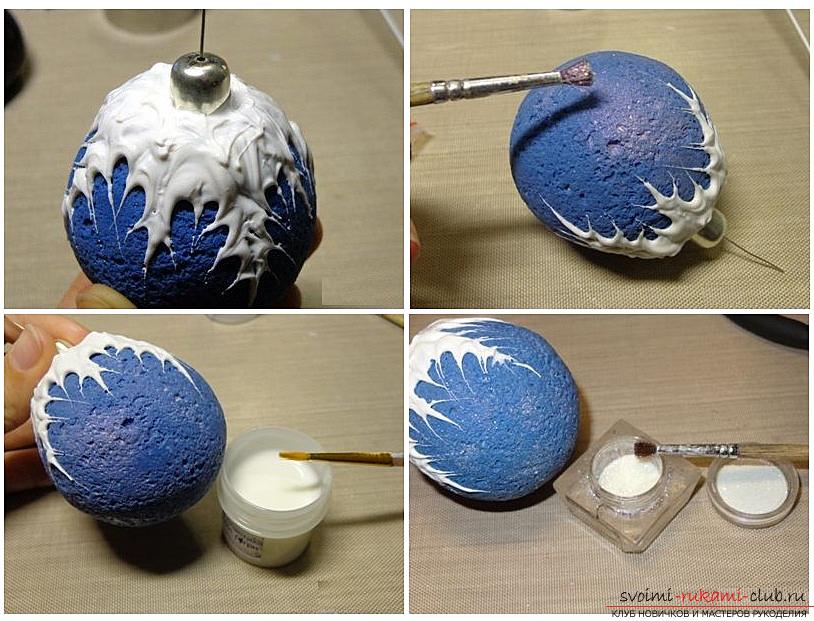 Admirers of astrology can even create before each celebration of the New Year a ball in shades of the animal, the year of which comes in the Chinese calendar.
Comments
Related posts:
 How to make a brooch made of polymer clay in the form of an oak leaf, step-by-step photos and job description
 How to make your own hands a necklace of polymer clay with floral elements, step-by-step photos and a description of the work, an image of a finished necklace
 How to make a ring made of polymer clay with a decorative element in the form of an orchid flower, step by step photos and description
 How to make earrings from polymer clay in the original technique of imitation knitted cloth, step-by-step creation photos
 How to make a beautiful tree topiari from napkins, step-by-step photos and a detailed description of the work on creating topiary with different colors