
How to make a snowman from origami modules? Scheme of origami for beginners
The period of the New Year's celebration is an opportunityprepare new and modern handicrafts made according to the ideas of new master classes on the net. Origami technology, which is very popular with many artists, is also an excellent way of decorating gifts, or preparing a family center for the holiday. Thanks to new modular schemes and design ideas, you have the opportunity to realize an interesting concept of a snowman for a house.
How to make a snowman from origami modules? Scheme of origami for beginners
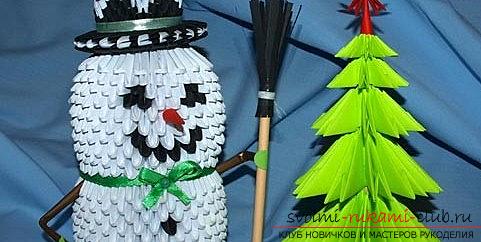 A snowman is an extremely popular character,which characterizes the arrival of winter and opportunities for entertainment for children. Many kids from all over the world, under the arm with their mom or dad, go out in the hope of dazzling the most beautiful snowman they can only do. Thanks to special methods, to build such a snowman with paper - now no problem. Modular schemes of origami personify the possibility of creating the right shape and images, by gluing together various figures from paper. The ancient Japanese technique found its place in Europe and then came to our community. Preparation of a new snowman in origami technique To make a scheme and do everything as shown in our step-by-step instructions for action, it is necessary to prepare special materials for the work, as well as to be able to process and improve useful methods for working with technology. A set of tools and a special scheme will facilitate your work, you will need:
- In total it is necessary to prepare 665 designs of modules of white color
- 14 finished designs of modules of black color in the size of 1 to 16.
- Also we prepare for the hat 63 white modules
- For the hat 166 black modules in the amount of 1 to 32
- Requires PVA adhesive for bonding
Cooking the shape of a snowman 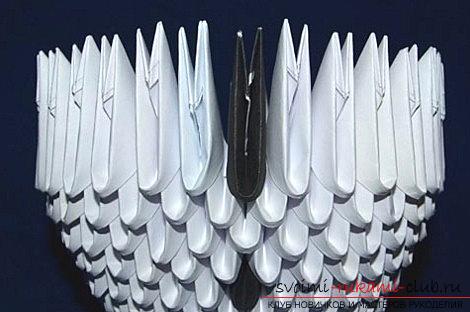 You should know to create a work in the form of a ball,not making an increase or augmentation of modules, you need to insert them deeper in the first three rows of work than usual, at the end of work the ends are pressed as hard as possible to the trunk of the middle of the ball. After the work is completed, you need to insert your fingers inside the ball, spread the ball on the palm in the second hand. In this case, the palm should be in a state of a half-bent kind. With the help of fingers, it is necessary to make pressing movements for the middle of the ball, also to simultaneously turn the ball along the arrow of the axis, thus the shape of the ball will appear. We continue work on the snowman
 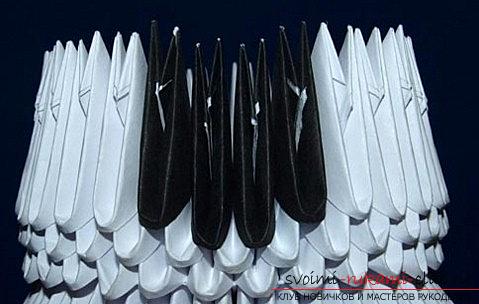 For the fifth row, we form in any place blackmodule. The rest will be white. This is a form for buttons. From the sixth to the eighth row we form a block of some white modules. For the ninth row, one black module is used, using the option opposite the module in black in another block, the remaining blocks will be white. From the tenth to the twelfth series we form only white modules. Next, we need to insert the white modules on the back. There are about 30 modules per row. In the fourteenth row, we use 30 modules of white color, and also with sharp ends form a hem from the central part to the other sides. In the fifteenth row we use only white modules. For the sixteenth row, we use four modules in black, which will be formed in the central part of the product.
 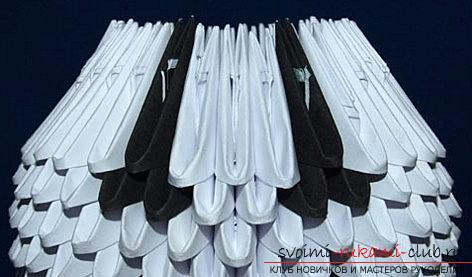 Next - the orientation is on the buttons. We use two modules of black color, which will stand in the middle, they need to be inserted deeper than the others. Three modules of white color are inserted in the middle, then black modules will be the edge modules. In the white module, which will be centered, we make the indentation deeper. For the eighteenth and nineteenth series we use white modules. Snowman Modules
 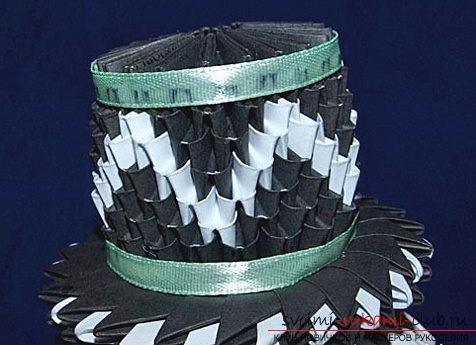 The row of eyes is 20, consists of several modulesblack and white modules. In the 21 rows we add one more black module. The twenty-second row consists of white modules. In the twenty-third row, it is necessary to reduce the number of modules using the entire perimeter of the product, without a gap, in the row we form twenty modules. Snowman's details We form a hat for a snowman. For the series we use 20 modules in the amount of 1 to 32. We form eight such series. For a hat you need to make a field. They are formed using modules of black and white in the size of 1 to 32. You get 23 modules of white color. Also, you can change the size, you need to measure the form. Fields must be matched with the main cylinder, glued with PVA. Also, you can add PVA. The broom is formed from paper of light brown color, which is twisted in the tube by 15 centimeters, which is equal to half the sheet. You need to take a sheet of paper in black for 1 to 8. Next, cut the tape and do not cut their edges by 15 millimeters. Next, you need to glue the part that was not finished and glue it around the circumference of the tube. In the outer part we knit a thread of white color. Next, a spout of red paper is formed. In this case, you need to make a blank to a size of 1 to 16. You need to twist the bag and glue it, cut it in the amount of three centimeters and glue the nose in the desired place. The hands are formed from the workpiece in the amount of 1 to 8. Next, turn the tube, produce a bend in the middle part. You need to cut out the mittens, and then - glue them in your hands. The broom is also attached to the sleeve. The bow is fixed with a colored button. That's all, the shape of our snowman is ready!
Comments
Related posts:
 Snowflake from origami modules - formation of snowflakes on the basis of the origami scheme
 Rose-origami for beginners of paper masters - a scheme for work and a master class
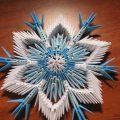 The scheme for creating modular origami snowflakes from paper for beginners. Detailed master-class with photo
 Master-class origami from the modules, a step-by-step instruction for creating pineapple from modules.
 Modular origami, how it affects a person practicing modular origami, making modules of a triangular shape, as well as creating a dragonfly in origami technique.