Fundamentals of beaded floristics, how to weave a bead of petals of different shapes, nuances of work.
Making bouquets and various decorativecompositions of flowers is called floral. In the original this kind of decorative art uses living and dry plants. However, these components are fragile and short-lived. In the modern world, bead floristry is gaining in popularity. Bright small beads are an excellent material for creating flowers, thanks to a wide variety of colors and shades, from natural to absolutely fantasy. In addition, now manufacturers produce beads not only different in color, but also in texture, in shape and in size. Twins, farfal, delicacies, bicones, abacus, this is not a complete list of materials that will allow them to create flowers themselves. 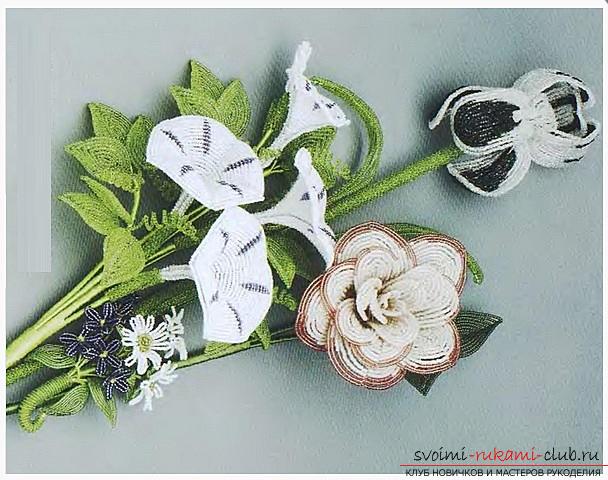 As in any other fine needlework in thebeadwork is very much nuanced. In order for your creations to become real works of art, you need to understand them well. This article will help you understand the types of beads, the techniques of weaving flowers, working with wire and many other knowledge necessary for a beginner beaded florist. The first thing to consider is materials. There are beads of different sizes and colors. It is round (the most common), faceted, felling (small tubes) and bugles (long tubules), the latter can be different in shape, for example, twisted. Coloring of beads deserves special attention. It is matte and transparent, the latter can still have the color of the walls of the hole. They produce pearl, with the effect of gasoline overflows and divorces, beads, imitating metals or ceramics. The main thing in choosing beads is quality. Excellent calibration (all beads of the same size package) and the strength of the color coating will be the key to a neat appearance of the craft. Products from quality beads do not warp, they do not fade with time and are not afraid of moisture and exposure to sunlight. The most high-quality is the beads produced in the Czech Republic and Japan. Beads of Chinese, Indian and Russian production can be used for weaving in looping technique or for children's crafts. Beads of different sizes and sizes can be made of glass, semiprecious natural stones. Beads can be made from various seeds and seashells, and also produce plastic beads. To create flowers, you also need a wire. It can be copper or metal, painted in different shades. Floral wire is of different thickness. For colors from beads use in the main section of 0.2 - 1 mm. You will also need a floral tape, different colors for the stems. It can be replaced with thread for embroidery, shoe made of silk. It will take a glue. It can be a transparent instant or conventional PVA. They are needed to fix the thread-tail. Special accessories: pendants for pendants, brooches, buttonholes, швензы, пины and many other things. All this can be found in specialized handicrafts. Still, different capacities will be needed for the formation of flower compositions: pots, baskets, frames for paintings or relief wall panels. The following necessary things are tools, because work is done with wire. Special wire cutters. Tweezers or round nose pliers for bending wires. Sharp and strong scissors. The next necessary condition for effective work is the workplace. Beading, as a hobby, should bring pleasure, and for this you need a comfortable workplace. It is especially important in its arrangement to correctly arrange the beads. Some skilled workers are comfortable working on a light flannel folded several times. Such a flat and rough pads will serve as an excellent workplace, beads of different colors, scattered into separate piles, is clearly visible and does not roll. Other needlewomen prefer to scatter beads on saucers. An important role is played by lighting. In order to keep your eyes from getting tired, you need a 15-minute break every hour. If the babies work with beads, then it is necessary to limit these activities from 30 to 60 minutes a day, depending on the age. So, when everything is ready for the creative process, you need to think about how the flower will look. It is necessary to carefully read the description and recommendations to the chosen sample. Think color solutions for your flower. You can use the already suggested color scheme or choose the shades that you liked best. Do not be afraid to experiment. Try to choose another beads, this will create completely unexpected and original compositions. Many flowers can be large in size, so that the product is not deformed, use a special floristic wire. Having a small enough cross-section (0.6 mm - 1.2 mm), it is very elastic, and the flower will have an excellent shape. In any creative process, minor troubles can occur, for example, the delay was cut short. If this happened at the very beginning of the process, then a couple of rows of beads can be dissolved. And if the product is at the final stage? Let's consider several methods for fixing wire tails. To begin with, you need to dissolve a couple of rows and release the end.
 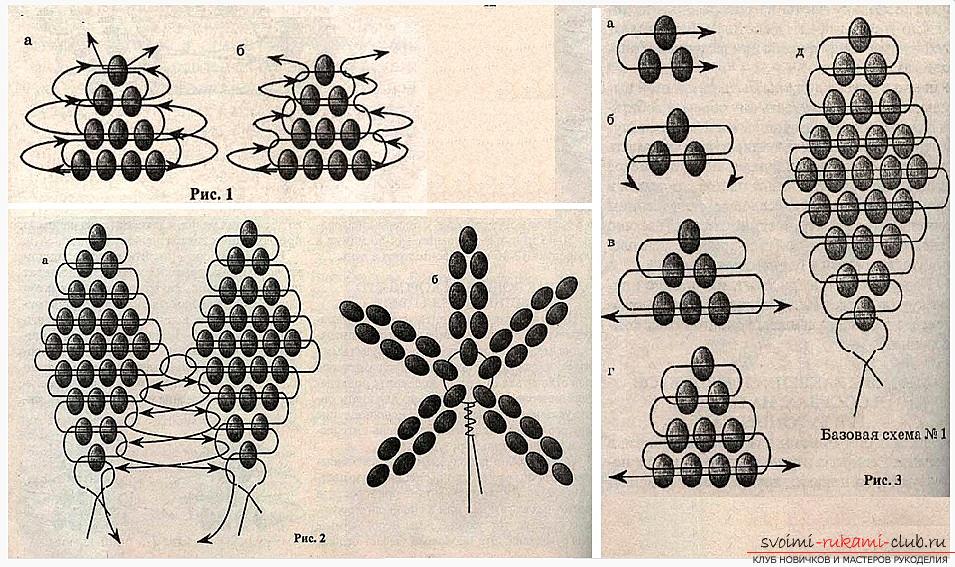 The first method. Each wire tail goes back to work (see Figure 1.a). They repeat the principle of weaving. But this method is good only when the beads have a wide opening and the wire can be passed several times. With a large cross-section of the wire or small holes in the beads, the following method can be tried: the wire tails gently pass through the eyelets between the rows along the edges of the product (see Figure 1b). If you want to disguise the wire tails, you can use any of the methods. Very often, to give the product a shape, it is necessary to attach several parts to each other. It is possible to cut off the necessary length of the wire and pass one end into the loop between the rows along the edge of the first part, and the second end to pass through the symmetrical loop of the next part. Then cross them and again pass into the loops around the edges (see Figure 2a). If you want to arrange all the petals or sepals on the same level, then this is easily done by connecting an additional piece of wire into the ringlet. You need to pass it through the bottom row of all the details and tightly twist the tails (see Figure 2b). Instead of this additional delay, you can use the wire tail of one of the parts, if it has enough length. If the stems are not made using a green wire, it will be necessary to make the winding with threads, paper or floras. First, cut off the wire, leaving the desired length of the stem. Start winding always from a cup. In the first two cases, it is necessary to glue a small area near the sepals and make several turns - this will fix the winding. Then gently wrap the stalk, the junction of the leaves and the stalk should be located between the turns. If there are several branches, then first you need to wrap the secondary (lateral), and only then the main stem. Now consider several techniques for performing petals and leaves. The most common is the technique of parallel weaving. The title already has a meaning. The canvas of beads in this technique is obtained from parallel lines (beaded rows). The simplest and easiest petal is done as follows: take a piece of wire about 25 - 30 cm, thread 3 beads (see Figure 3a), move them in the center, and then one wire end into two beads in the opposite direction (see Figure 3b). Tightly tighten the delay. It turned out a triangle. On one tail of the wire, put on 3 beads and go through them with the second end of the wire (see Figure 3c). Then make a row of 4 beads (see Figure 3d), etc. according to the basic scheme 1. When the petal is ready, the tails of the wire need to be tightly twisted. Having made about 5 - 6 such details, it is already possible to create a flower or twig with leaves. In nature there are not only flat petals, they are convex and concave. First, it is necessary to weave the half of the part in parallel weaving (see Figure 3d). Then you need to take exactly the same piece of wire and put it in the loop between the 1st and 2nd rows. Now for one ponytail thread 1 bead and pass through it the second tail. Tighten the loop tight. Now that tail, which is closer to the woven part of the part, pass through the eyelet between the 2nd and 3rd rows, and weave further, stringing the beads (see figure 4, basic diagram 2). It is very important to tighten the wire tightly, otherwise the product will turn out to be "loose" and will not keep the shape. Next, try to make a carved edge (see Figure 5a, basic diagram 3). The first 4 rows weave according to the already known scheme. Then on both ends of the wire, put on 2 beads and pass the wire to the second end of the bead, tighten. Again weave several ordinary rows and again make a manipulation with two beads on both tails. If you want to make smaller teeth, then cut 1 additional bead (see Figure 5b). Then pass the wire through the eyelet between the 3rd and 4th rows (the wire passes into the loop before the last woven row).
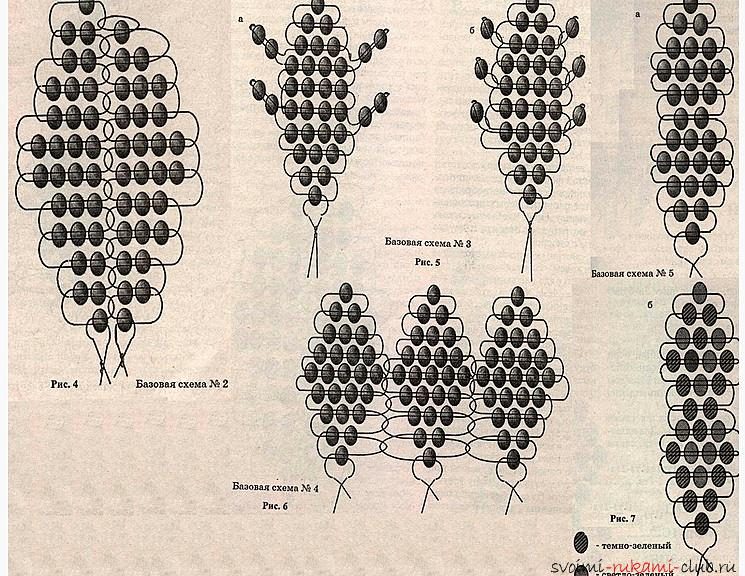
 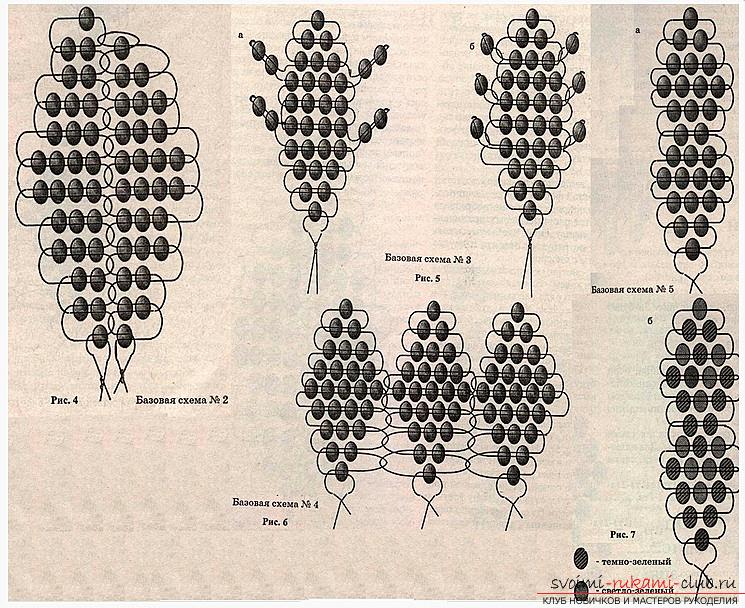 There are products with components morecomplex shape. For them it is possible to propose a method (see figure, basic scheme 4). A flower with a corolla, and its petals unfold not from the stem, but at a certain distance from it (see Figure 6). Such a product must be implemented in stages. First weave the 1st petal in the usual way. Now, in the process of weaving the second lobe, attach it to the first one (for example, see Figure 6). Before you get to the place of joining the petals weave usually, and then use the principle of weaving convex petals. This method can be made with a beautiful maple or currant leaf. Parallel weaving can also create wavy edges in leaflets. To do this, you first need to weave a row with a lot of beads, and the next with a smaller, then again increase the number of beads. (see figure 7a, basic diagram 5). Which model and shape of leaflets and petals you would not choose, for the convenience of weaving, you can use the formulas of the set rows. For example, for Figure 3e, it will look like 1, 2, 3, 4, 5, 4, 3, 2, 1. This simple method makes it easier for you to count the beads, you can control the width of the petal (if you create your own fantasy petal). You can write down the formula by the formula that is the flower that you saw on the store window or the Internet. If the lobe has protrusions or denticles, as in Figure 5a, the formula takes the form 2 2 1, 2, 3, 4, 4, 4, 4, 3, 2, 1. 2 2 If desired, you can replace commas with hyphens, oblique lines or any other sign. To mark beads of different colors, just next to tsiferko put a mark.
Comments
Related posts:
 How to weave an orchid of beads, a detailed and step-by-step master class of French axial technique of weaving flowers from beads with a lot of photos and a description of the work
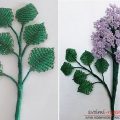 How to make a lilac branch of beads, step-by-step photos and a description of several techniques of weaving for beaded floristics
 How to weave a bead flower alstroemeria ("Peruvian lily"), a scheme, a description and a photo of the work
 Napkins of different shapes and colors, connected with their own hands, a crochet with detailed diagrams and descriptions.
 Bonsai from beads with own hands, how to weavetree of beads, schemes of weaving of trees from beads, birch from beads with their own hands, herringbone-souvenir from beads, creation of albition from beads, advice and recommendations on performance of works.