Beautifully depict the spring, drawing in five stages, it will be easy for even a beginner painter
Image of spring, drawing in five stages, nota complex process even for a novice painter and in this you can see for yourself, having familiarized yourself with the proposed material. You will need only a little free time and desire. Follow all descriptions, and you will have a wonderful spring landscape, drawn in pencil. Drawing the spring, or rather, everything associated with it, the landscape, flowering branches, drops, streams, the first spring flowers and so on, is not at all difficult. Especially if the drawing you will perform in stages. It's enough just to see in front of you (mentally) what you want to display on paper and, of course, follow descriptions and instructions that you can not do without at first. After a while, you can already independently represent any objects and objects without resorting to hints. Today we offer you a landscape, an image of spring, drawing in five stages using a simple simple pencil. In the step-by-step drawings, in our article red objects are selected that need to be drawn in each individual step, the already drawn drawing details are shown in gray. Thus, you can easily navigate what exactly you need to do at one time or another. The descriptions of each individual stage will greatly facilitate the task and make the process of performing the work easier. So, let's start the first stage of our creative process. First we need to determine the center of the sheet on which we will draw. A little above the center you need to draw a horizon line. The next action is the image of the road. Draw two curved lines, long enough, such as you see in the picture. This will be in the future road. On both sides of the road you need to draw stones in the form of ovals of different sizes. Now, to determine the roadway, add a few bushes on the sides. In our case, there are three. The form can be arbitrary. Too much accuracy is not required here. 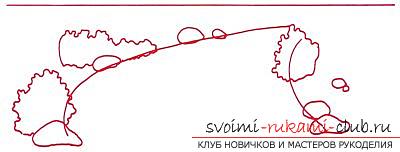 The second stage In the second stage of the work,To depict the trees in the foreground along the left and right sides of the road. The tree on the left has a high main trunk. The bark on it should be drawn using vertical lines. The second tree is on the right side. It's a birch tree. It has a lower high main trunk and the bark on it needs to be drawn a little differently. Here, horizontal, short lines are used, as seen in the figure. At this stage, only the base of the trees is depicted, so they do not yet have a crown. Leaves to draw will be necessary at the next stage of work.
 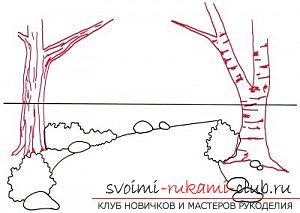 The third stage First you need to finish on top ofthe horizon line is a long wavy line that will show us the height of the trees located in the background of the picture, in the distance. Using uneven lines, it is necessary to finish the trees with branches. Now go to the leaves. How many of them depict, depends only on you. the shape of the leaves should be in the form of droplets or tears. The size is small. In the distance, draw another small tree, as it looks like in the picture. along the road with the help of undulating circular lines, you need to draw another bush, then the roadside will not look naked. On the road itself, you need to draw a few small ovals or lines that act as stones.
 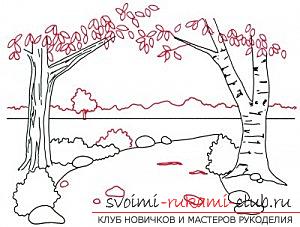 The fourth stage It was the turn to drawingdetails of the road. On it you need to do something that resembles the ruts from the wheels. To do this, add jagged parallel lines, such as the following figure shows. on the side of the road on both sides draw grass, the same blade of grass and directly near the bushes. Their location must be vertical. Blades of grass should be painted under a slight slope.
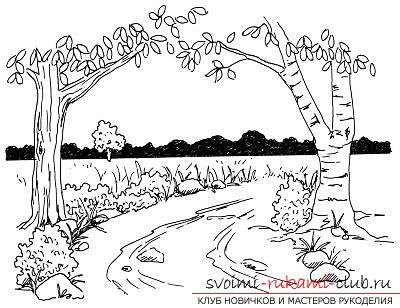
 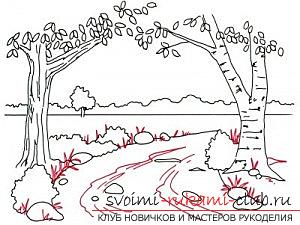 Fifth stage This is the last final stage of the work. It is necessary to darken the individual sections of the picture so that the image is more expressive and saturated. First, isolate the part of the picture that is between the top of the trees and the horizon. On a single tree in the background, apply a few short strokes in the form of wavy lines. Therefore, the principle of doing and hatching bushes, which were previously painted on the sides of the road. On the same road, add a few strokes, short enough. They will perform the role of grass bush. The drawing of the landscape of spring nature is completed. The only thing you can do is decorate the resulting pattern. Then it will become brighter and more saturated. Perhaps you will not like something in the work done. Dont be upset. Just keep practicing and soon you will be able to achieve excellent results.
Comments
Related posts:
 Draw a beautiful picture in the technique of grafting can easily even a beginner or a child
 Draw a tree in stages easily, even a novice artist can easily with photos and descriptions
 Draw a simple landscape pencil in stages can even a novice artist in accordance with the instructions
 Sew an original dress, not requiring a pattern, it will be easy for even a beginner seamstress
 Quickly sew a beach bag of terry towels own can easily even a novice seamstress