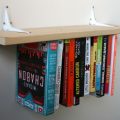
Bookshelf as a rope bridge
Rope bridges are often associated withexciting adventures, extreme hikes, danger and the release of adrenaline into the blood. This perception is inspired by Hollywood films and tourist advertisements about the "most dangerous places in the world". This funny rope bridge will serve as an unusual shelf for adventure books, and you will do it yourself. On standard bookshelves, you need a pointsupports for standing books, whether it's a side panel or a wall, but the idea of this flexible shelf is that the "relaxed" approach pushes the books towards the middle, thus keeping them in place. The author of the unusual idea of the bookshelf with his own hands, Ed Lewis likes to make things useful and, at the same time, unusual and funny. And he shares with the world detailed instructions how to do it. To create a rope shelf you will need:
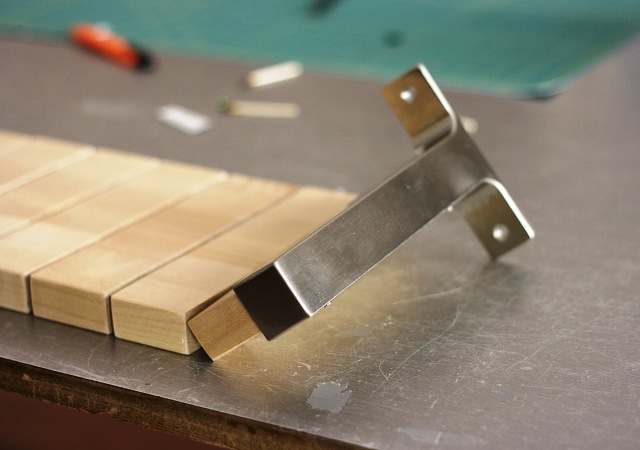
- board or a set of wooden beams (in this example, taken from the panel Statlig Board of Ikea)
- holders or fastening elements for the shelf (here: Ekby Bjarnum from Ikea)
- cord (harness, rope, cord, elastic)
- steel washers
- saw
- drill
 If you do not have ready-made bars suitablesize, then cut the existing wooden board into equal parts. Remember the main rule: measure seven times - cut once! In particular, the author of the idea needed 2 brusks with a width of 6.35 cm and 11 brusks with a width of 5.08 cm. The board itself should be not very thin, at least 2 cm in thickness.
  Next, you need to drill two holes ineach bar. To do this, Ed Lewis used a desktop drilling machine, with which the holes were at the same distance in all details. If you do not have such a tool - do not worry, carefully measure and mark the hole in the pencil with a pencil, and then drill, trying to keep the drill strictly perpendicular to the ground.
  Cut two pieces of rope or cord, burnlighter ends to prevent rasshyvaniya, pass through the first bar and tie at the ends of a strong, reliable knot. For added safety, melt the unit lightly with a lighter and glue it with a formed adhesive.
  Pull the cord through all the pieces of wood using washers as spacers.
  Fix the end of the shelf in the brackets, in this case the special holders from Ikea were used. Done! It remains to find a good place for the bookshelf, to attach it to the wall and with a sense of satisfaction to rest after working with an exciting book, which you, of course, will post after reading the new rope shelf!