How and what to do on the window drawings in the New Year theme, the material and ways of drawing them, photos, as examples and ideas for inspiration
If you ask which holiday is the most expected andfavorite, and adults, and children almost in chorus will say: "this is the New Year"! This is a wonderful winter period, when the windows are cold and snow, and the house is warm and cozy. Festive commotion captures everyone around. The most delicious dishes are prepared, the Christmas tree is decorated, the most unusual and amazing things used for home decor. This tradition is in fact already many centuries. Even in the pre-Christian era, the ancient Celtic tribes brought to their home branches of evergreen trees, as an act of sensual magic designed to drive away evil spirits. They decorated spruce branches with various sweets to propitiate the deities of nature and get prosperity and prosperity in the new year. Among the peoples of the East, for example, in China, such ornaments were "wind music". It was believed that her chime would scare away all evil ghost creatures and demons and not let them into the house. In Russia, the tradition of decorating firs appeared along with many other innovations, thanks to the decree of Emperor Peter I. It was then that the first decorated fir-trees and the interior of the houses appeared. The popularity of this tradition then increased, then calmed down, but even in Soviet times snowflakes cut from paper were on the windows of houses on New Year's Eve. In the modern world, there are more ways to decorate window panes. New materials appeared, and old methods were refined. Of course, I want to make windows in the house frosty in the New Year's holidays, but what if the moody nature was abnormally warm for this time of the year? In this article, we will suggest several methods and ways to create beautiful patterns on the window glass with your own hands. Drawing New Year's patterns with toothpaste This is one of the simplest and affordable options. Toothpaste is in every house, and the cost is not high enough to use the tube as a colorant without the slightest hesitation. In addition, do not forget that now they produce toothpaste not only white, but also green, blue and even multi-colored (for example, striped). Another few indisputable arguments in favor of the choice of toothpaste is that the patterns dry very quickly, the paste is completely harmless and will not spoil the window glass and is easily removed using a conventional wet wipe. Even if you draw, draw an incorrect line or incorrectly fill an area, you can easily wipe it and draw it correctly. 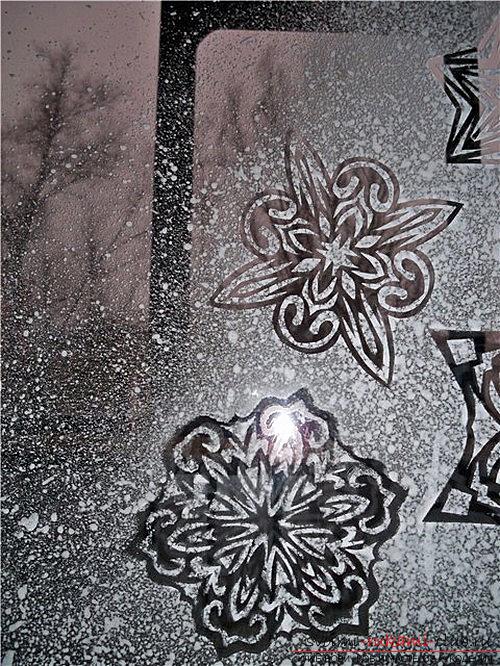 So, before you start drawing,you must select a topic. What exactly do you want to portray on your window? Once you have decided what it will turn out to be: snowflakes, snowmen, a Christmas tree or a snow-covered house, you have two ways of creating a pattern. The first - drawing with the help of brushes and special sponge. This option is good if you can draw. In a small container, squeeze out a toothpaste from the tube. The selected section of the window wipe dry with a cloth. Now you can start drawing. Brushes are suitable for the application of clear lines and contours, and it is very convenient to create backgrounds of varying degrees of saturation and to conduct shading with sponge. The second way will suit those people who do not know how to draw. If you do not have an artistic talent, but want to draw beautiful New Year patterns on the window, use a template or a stencil. The simplest and best option is a lot of ready-made drawings on the Internet. It can be a scattering of stars, which you just need to cut. Now just attach this sheet of paper to the window and apply a layer of paste.
  As in any case. There is a small nuance here - depending on which part of the stencil you attach to the window, you will get two completely different pictures - both positive and negative in photos of the past.
 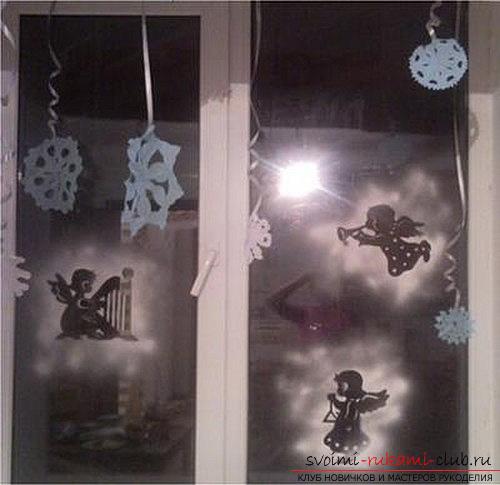 Drawings in the New Year's theme on the windows with the help of soap
 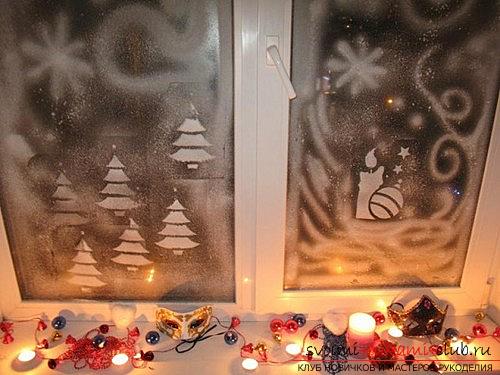 The application process will be approximately the same asprevious, and the way the dye is prepared is easy and simple. The hue of the picture will depend on the color of the soap you choose. Of course, images of white soap will look really snowy and festive, but if you decide to draw a snowman with a hat, with a scarf and a carrot-carrot, for example, using a colored soap solution is an excellent solution. So. On a small grater, three halves of a piece of soap. Add half a glass of warm water. The temperature of the liquid is important, since soap chips will last longer in cold water. Mix the resulting mixture with a blender. Must get a stable thick and dense foam. You can correct its consistency by changing the proportions of the ingredients. It only remains to take a piece of sponge, even an ordinary kitchen dish for washing dishes will do, and start painting. Like toothpaste, soap foam does not harm glasses and is easily wiped off. New Year's drawings on the windows with paints
 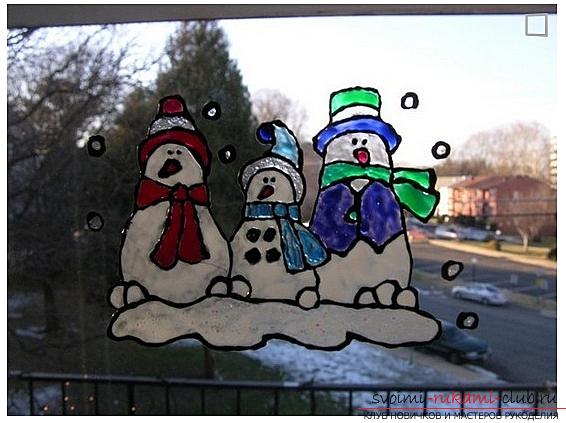 Draw on the windows, we will either acrylic, or gouache, or finger paints. The latter deserve special attention.
 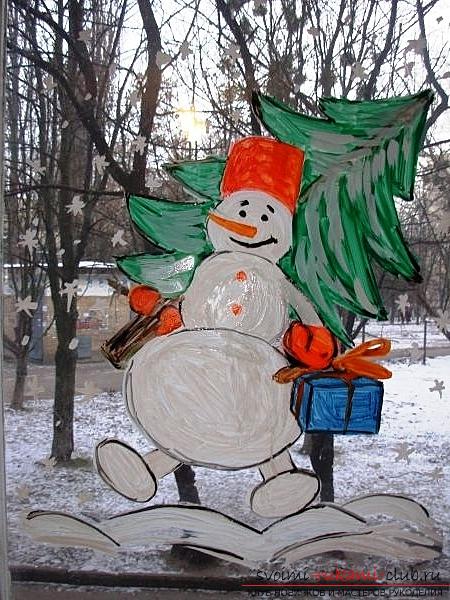 Such material as finger paints isa wonderful developing material for kids. Even quite crumbs can be safely entrusted to them, since they have several indubitable pluses for both kids and their mothers. First, they are not tasty and safe for the health of the child. Even if your young artist tries, nothing terrible will happen. Well, the second and very important aspect - finger paints are easily washed and washed from almost any surface. So if you want to please the baby, suggest painting New Year patterns on the window with just such material. And finger paints, and gouache have another plus - bright colors. Acrylic colors are suitable only for adult artists. They have rich colors and more durability.
  So, when the pattern option is selected, moveit on the window pane. Black or white color draw contours. When they dry, decorate in different colors to your liking and as fantasy tells. In order for the fir-tree or snowflake edges to look fuzzy, you can use a knitting needle or a skewer for skewers. They are very easy to shade contours, until the paint has not yet dried. Advice! Refuse specially stained-glass paint. After drawing, the picture on the glass will be fixed forever, and the New Year mood will remain with you on a warm summer day. Drawings on the window using artificial snow
  With the advent of this magnificent assistant,drawing on the windows in the New Year theme was amazingly simple and easy. The main thing is to choose high-quality material, so give up cheap, with a sharp chemical smell of the goods, in favor of German or Hungarian products. The next moment is the texture of artificial snow. For drawing on windows it is necessary to use finely dispersed structure. In appearance such a coating resembles hoarfrost or frosted windows frosty in the frosty patterns. Another excellent option for festive decoration will be artificial snow is not the usual white, but silvery, golden and even bronze shades. If the material is even with the effect of luminescence. If you just want to write a good wish on the window or draw a pattern, you should practice separately to determine the distance and force of pressing to choose the optimal snow cover intensity. Very often, together with a can of such snow, they already sell ready-made templates for drawing. You can make your own stencil. It is enough to cut out any pattern you like from paper, moisten the sheet with water so that it sticks to the glass for a while, and apply artificial snow over its entire surface. Another version of drawing with it will be the following: a piece of glass covered with artificial snow, and then wipe a small piece. It turns out such an effect, as if you with a hot breath melted the frozen window. Drawings in the New Year's theme with a film As a New Year's decor of windows you can use ordinary polyethylene film. Such jewelry can be called reusable. They are more like stickers that you can save until the next holiday. The method of manufacturing them is quite simple. The first is to select an image. It can be a New Year's fairy-tale character, for example, Santa Claus, Snow Maiden, a snowman or an elegant Christmas tree. The second is a piece of strong, transparent, dense film. It is necessary to draw on it with the help of an ordinary ballpoint pen (it fits best for drawing on such a surface), we depict on it the selected pattern or pattern. Using bright acrylic paints, we make a color image. Now it remains only to leave until completely dry, then cut and paste on the window with the help of glue, which can be washed off. This can be wallpaper paste or special glitter for tattoo. Drawings on the window with the help of PVA glue This material is, like toothpaste, and soap, in almost every home. With its help you can create beautiful and fluffy pictures on the windows. For this it is enough to have at hand a version of the pattern, glue and glitter. Further everything is easy and simple. We apply a layer of glue in the form of a chosen pattern or picture, and on top we cover with sequins or even a New Year's tinsel. Shiny and fluffy drawings are obtained. Advice! To ensure that your windows look in a painted form harmoniously and beautifully, do not weight the format of the drawings. Let them be light and airy, without overloading any one shade, except white. Snow landscapes are appropriate in any number and saturation. In such monochrome drawings, only one small bright accent will look good. Below we offer a small master class on drawing on windows. It will take:
- Scissors.
- Brushes.
- Toothbrush (old).
- Knitting needles or skewers for shish kebabs.
- Water tank.
- A piece of cloth or napkin to wipe away unnecessary.
- Material for drawing (soap, toothpaste, paints).
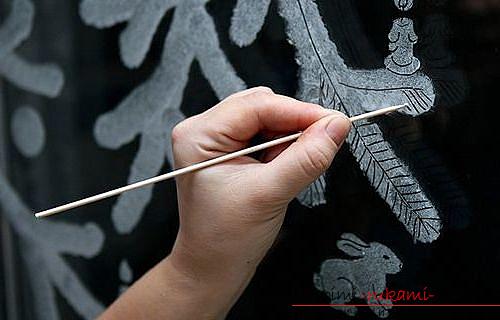
Choose a beautiful drawing that you want to applyon the window. You can draw it yourself or print it. Using the scissors, we cut out all the necessary details. Now it is necessary to securely fasten the stencil to the glass. For this, a soapy water solution is perfect. When the paper is attached, we begin to draw the image with the selected material. We wait until the lines are completely dry and we remove the paper. In order to depict small parts, use a wooden skewer or spoke. They are very easy to scratch the right lines and remove excess paint. The effect of "fluffiness" is achieved with the help of a toothbrush. It is simply dipped in water with a droplet of coloring material. Now you can apply it with patting movements. Make the contours blurred and smooth with your fingers. Advice! To dry the picture on the window faster, you can dry it with a hairdryer. Just do not forget to set the cold mode and weak power. The main thing is not to use this option when drawing with artificial snow.
Comments
Related posts:
 How to make snowflakes with your own hands made of paper, in the technique of killing, from dough, beads and beads, from tapes in Kansas technique or crochet, turn-based photos and ideas for inspiration
 How to cook delicious New Year cookies, step-by-step production photos, an original idea for a baking dish in the New Year's theme
 Several master classes to decorate caskets with beads, photos, ideas for inspiration.
 Drawings "Gravity Falls", drawings in pencil and drawing lessons
 Unconventional ways of drawing