
The schemes of assembly of decorative baskets in the modular origami technique will help you in your work.
Modular origami (assembly scheme) of basketscan decorate any home. Schemes of assembling a basket in the form of a flower will help to cope with the task of making even children. It is enough to take a paper of two colors and set to work. Step-by-step recommendations for assembly according to the scheme In this manual we took the modules of yellow and blue. The production of any modular origami begins with the assembly of the base blanks - modules, as shown in this diagram. 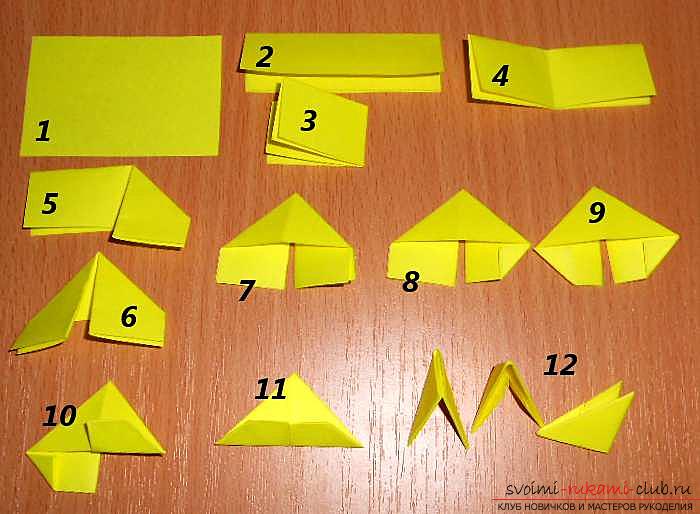 Prepare 192 such yellow modules and 500blanks of blue color. You can use different colors, which are most suitable for the interior of your room. So, when everything is ready to start assembling an attractive basket - a modular origami. We assembled the assembly of baskets in this material to facilitate the creative work to create a beautiful product, as in this photo.
 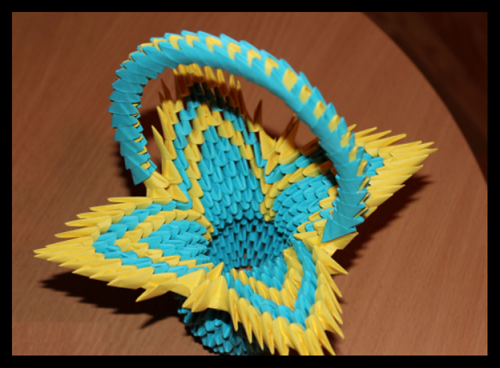 The assembly of such baskets begins according to the classical scheme - each new module is inserted into the pocket of the previous one. See the diagram.
  Thus, 28 blueblanks. Next, you need to climb eight rows in height. When performing the assembly of the ninth row, the workpieces are inserted by the back side, alternating with one yellow insert with six blue ones. As it should turn out, look at the assembly diagram.
 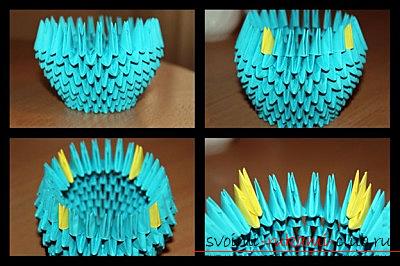 The next stage is the formation of "wings"baskets. To do this, on the yellow module, which is assembled in the 9th row, it is necessary to fix one yellow workpiece and five blue elements. The next row is made up of 6 blanks of blue color. Next, we form the "herringbone" from six modules, reducing the number of elements in the "wing" series to one. According to the same principles, there are three "Christmas trees" - a petal. The presented photo shows how it should turn out.
 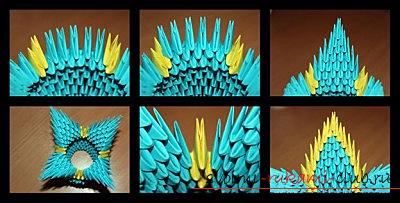 The edges of the resulting "wings" are made out by modulesyellow color. The details of the design of the "wings" modular origami on the basket assembly scheme, which was presented above, are clearly visible. After a series of yellow elements, we collect a series of blue modules. And finish assembling our petals with yellow modules. The additional module on the edges between the sides makes the product more expressive. Two of them will be attached to the basket in the next stage. When the "wings" - the petals of our basket in view of the flower are collected, you can begin to make a handle. If you work together with young children, then for them this is the best and simple occupation. After all, to make a handle it is enough to alternate two blue elements with one yellow one. Do this until the length of the handle is the required length. Our attractive basket lacks only the bottom. It is formed from elements of yellow color, as indicated in the diagram. It remains to install the basket on the bottom, neatlyfasten the handle. Agree that the finished product is able to make every person, despite the fact that modular origami is more difficult than simple imitations of paper. The main thing when assembling any product, follow the instructions of the circuit, correctly rotate the number and color of the modules.
Comments
Related posts:
 Schemes of assembly of decorative plates in the technique of modular origami will help to create a beautiful product
 To make a tulip flower or a whole bouquet in a modular origami technique you will be helped by schemes
 Create figurines from paper on the technique of three-dimensional origami will help you the proposed scheme
 A voluminous paper vase made in origami technique, modular origami from paper circuit and video for beginners
 Scheme for a swan-origami with their own hands - modular origami and master class assembly