Schemes and description of the techniques of weaving from beads (French, Ndebele, Gobelin, parallel)
In the first part of this section, we talked aboutthe most simple techniques of weaving. This amazing material for creativity is very old and eternally young. Tiny pieces of a rainbow in skillful hands can become a surprisingly beautiful flower, an elegant handbag, an original pendant or a necklace. From beads create stunning items for interior decoration - a bonsai tree, New Year's wreaths, curtains, vases and much more. The history of beading is rooted in the distant times of the pharaohs. It was in Egypt that the first glass beads were born. Then the ability to make glass passed to the Greeks and Romans and spread all over the world. Masters of glass business added to the mass of chemical elements - manganese, strand, cobalt, and received various shades of purple, green and blue. The creation of the first beads was a very capacious and painstaking business. A thin glass thread was wound on a thin metal rod, after which the pin was pulled out sharply, and the resulting glass cylinder was finely chopped until it cooled. Not only glass served as a material for the creation of beads. In the course were gold, silver, pearls, ivory, shells and semiprecious stones. In modern production, beads are made of glass or plastic. There is a lot of color and shape. For each species there is a suitable model of the product. In this article, we will consider more complex weaving techniques from beads. Having mastered the basic skills, you can create decorations, decorations and much more, you can come up with your own unique style, become the author of an exclusive creation that will become a source of pride, a magnificent gift and an occasion to create again and again. The method of parallel weaving will be considered first. This type is great for creating strong and dense structures. In a parallel method, petals of flowers, details of necklaces and earrings, voluminous hand-made articles are well received. In order to facilitate the work and make the schemes understandable for the needlewoman from any country in parallel weaving, the following designations are recognized: 8 (3) - 5 - 7-8 (2). Figures through a dash indicate the number of beads in a row, and the figure in parentheses - how many such rows need to be weaved. This means that it is necessary to weave 3 rows of 8 beads in each, then a row of 3 beads, then a row of 7 beads and at the end of 2 rows of 8 beads in each. The principle of weaving is quite simple. Schemes, as an example, are given below. Consider the example of the first figure. On a piece of wire, line or thread strung 1 bead. This is the first row. Now for one pony thread 2 beads and pass the second tail through these 2 beads to meet the first tail. It turned out that the threads intersected inside the two beads. Tighten the wire or thread tightly. We have 2 rows. Now string on one ponytail 3 beads and again we miss the second tail to meet. We have 3 rows. This diagram shows the weaving with increasing beads, weaving the same amount and joining the individual parts. 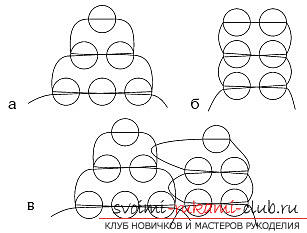 Due to the fact that the thread or wire twicepasses into all the beads of the rows (except for the 1st), the craft gets additional strength, but at the same time, the wire consumption doubles. If you are just learning beadwork, then do not worry, when decoding to a small scheme will indicate the consumption of wire in 55 - 60 cm. There is one important point in weaving voluminous products in parallel technique. On the sides of the workpiece, gaps are obtained, where the wire arcs are visible. If you want to close them, there is a wonderful option: do not start from the beginning, but from the end of the workpiece, for example, from the end of the petal. When the weave reaches the top, it is necessary to make 2 low beads long equal to the length of the side. Strongly tighten and secure in the front row. The wire will keep the shape, but for greater reliability you can sew a side row using a monofilament or fishing line. How to connect several parts is clearly visible on the diagram. The wire must be tightened strongly. Correctly picking it up in tone to the beads can achieve almost complete invisibility.
 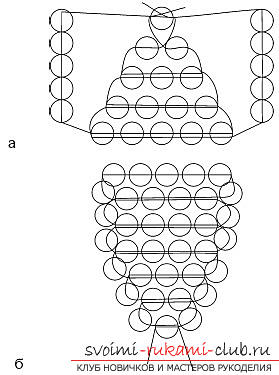 The following weaving technique will be French orarc. It can be axial and without axial. This method of weaving is used to create very beautiful roses, hairpins, belt buckles and even bulk caskets. Without the axial is simply a variation of the loopback technique. On the piece of wire string beads. Push back to one edge and make a loop. One end of the wire turned out to be longer, it will be working. On him string another bead. Their number should be greater than that of the first loop. So that it's enough to bend the first loop around the arc, being in the same plane. The arcs must be snug against each other. We make a coil of working wire around a small tail and again string the beads, already for the third loop. Axial, as the name implies, is distinguished by the presence of this axis. To create it, take the wire and make a loop near the end so that the beads do not slip. The short end is the axis, the long one is the working wire. For a short put on a certain amount of beads. Then the beads begin to thread on the working wire. The length should be slightly more than the axis. Working wire make a turn around the top of the axis. Both low tightly adjacent to each other. Then another one is low and the turn is around the bottom of the axis, etc.
 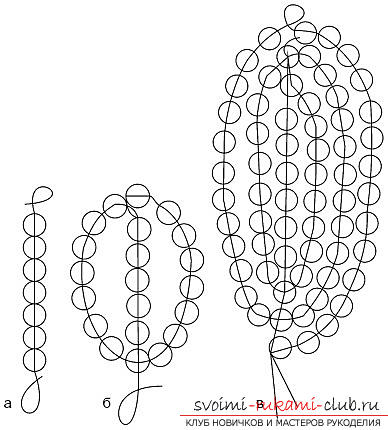 If you want to do a three-dimensional thingtake not one but several axes. The weave will resemble the creation of a basket. Before you start, you need to attach the core bars. If you need an even number of arches, the wires just twist together in the center. If the necks need an odd number, then additional lengths of wire need to be tightened with pliers and thread on them 2 - 3 beads. Now you can start creating arcs of low beads, as usual. This kind of weaving with one axis is possible on the wire without detachment from the coil. You can make a long low bead and just move further by wire that seed beads, which is not needed yet. The next technique is ndebele or herringbone. This technique was given its name from one of the tribes of Africa. Women of the Ndebele tribe have been creating products in this way for more than 200 years. In the canvas, woven by this method, the beads are at an angle relative to each other, it looks like a "Christmas tree". A distinctive feature of this particular method of weaving is the indispensable multiplicity of the 4th or 2nd number of beads in a row. If the multiples of the 2-m, then the extreme "Christmas trees" will be halves, if the 4-m, then the whole. Consider an example of 12 beads. We string 13th, unfold the needle with a string or line and pass it in the opposite direction through the 12th bead. We skip the 10th and 11th beads, pass the needle with the thread in the 9th, string 14 and 15 beads, pass the line through the 8th, again skip the 7th and 6th beads. We pass the line through the 5th, we string 16th and 17th, we pass the line to the 4th, we pass the 3rd and the 2nd, we pass the line to the 1st, we string the 18th and the 19th and we pass the fishing line through the 19th and the 18th. in this case, the 19th bead is the first bead of the next series.
 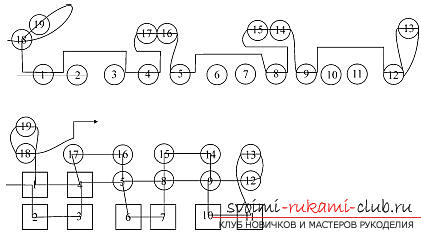 If you need to weave the canvas, whichwidth 10 or 14 beads, then dial 14 and 15, pass the needle through the 14th, skip the 13th and 12th, pass the needle through the 11th, thread the 15th and 16th beads, needle in the 10 th bead. We skip the 9th and 8th, through the 7th we pass the needle and thread the 17th and 18th beads. Between the 3rd and the 2nd, the 19th and 20th turn out. To finish the 2nd row, you need to turn the needle back and pass it through the 20-bead. Now we string two more beads and weave a row in the opposite direction similarly to the previous one. These options are suitable for those who already have experience in the weaving, as it requires a certain skill when working with a fishing line or monofilament. Beads "do not want to" lie "on the ground and crumble, sliding along the line, so for greater convenience it is worth using a kapron strong thread, suitable color, so that the product looked holistically and harmoniously, without color spots. The third variant of weaving is suitable for beginners. In this method, the rows do not crumble, but the beautiful pattern of the "Christmas tree" will be obtained only from the 2nd row. This method is also good in that you immediately see the width of the proposed product, whereas in the first two, it will be clear only after the 2nd row. Therefore, if you want to change it, then in 1 or 2 cases it will be necessary to disband the entire weaving. The number of beads in this method should also be a multiple of the 2nd. The first row must be weaved as a brick or parallel weaving in 1 bead - both tail of a thread or a line intersect inside each bead (see figure). Beads become sideways. Holes of beads are located vertically. The line connecting the beads runs from below and from above.
 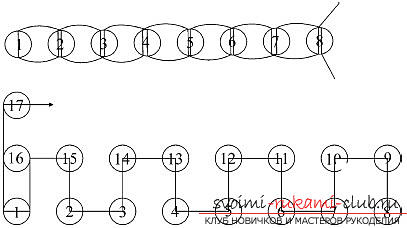 Now we type beads of the second row on the 9th and 10th,We pass through the 7th and 6th. The line comes out of the 6th bead, strung 2 pieces and passes through the 5th and 4th, etc. To fasten the second row, you need to pass a fishing line or string in the first bead. Now we rub the third row as well as the second, but in the opposite direction. If you need to weave a circular product, then the "herringbone" pattern will be obtained only from the second row, as in the previous case. The number of beads should also be even. A set of pairs of beads is made and carried through the next two beads of the previous circle. Expansion of the series is possible in two ways. Zoom in the center or sides. If you decide to increase in the center, then simply string down once, not two, but four beads (see figure 26. This is the 26th, 27th, 28th and 29th beads). When we weave the next row, then after the line is out of the 30th bead, we pick 36th and 37th beads, we pass the line through the 28th and 27th beads, we pick up the 38th and 39th beads , we pass the line to the 26th and weave further as usual. The next series of plait in the opposite direction. The line comes out of the 40th bead, we pass the line to the 39th, we string the 50th and 51st, we pass the line to the 38th and the 37th, we pick the 52nd and 53rd squares the line in the 36th and the plait further as usual. The next row of weave without any increase, but it will be more for 1 vertical row.
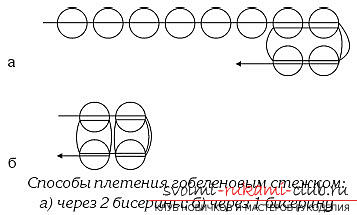
 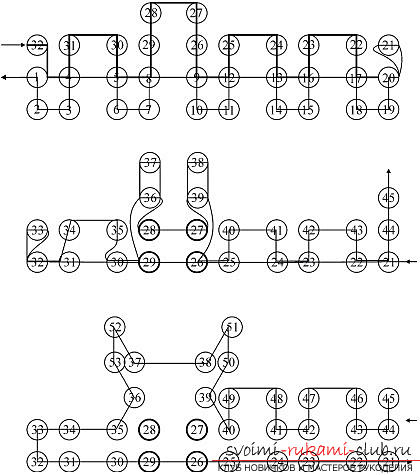 In the following way, the canvas will be expandedoccur gradually. To begin with, in the middle row, add one bead, for this you will need to string 3 beads, instead of 2. When typing the next row to it, add two more, forming a connecting pair. In the third row in the horizontal row from the beginning of the addition of the first bead to this deuce, once again add a pair of beads in the usual way. The fourth row will differ from the others only by an additional vertical row. Beads can be added not only in the center, but along the edges of the canvas. There are two methods of increment. For the case when the original number of beads was a multiple of 2 and the extreme "herringbone" turned out half (the line out of the last bead from above), you can simply add 1 bead on the sides and make the "Christmas trees" whole. To do this, after completing the series, you need to string 2 more beads, turn back the line and pass the line through the last bead. The next row will begin with the additional bead. Increasing the number of rows, when the number was a multiple of the 4th and all the Christmas trees whole will be similar - after the series is finished, add 2 beads. And you can add 5 beads, pass the line to the last, and then the first of five. A whole series (deuce) was formed and one more bead remained to create the next row. In order to reduce the canvas, just remove from the lateral or central pair of first one bead, and then another. Another technique for weaving a thick fabric is a tapestry or "square stitch". This kind of canvas is characterized by the fact that the beads in it are strictly located one above the other, in contrast to the mosaic weaving. The rows are even and vertical, and horizontally. This method produces beautiful purses, belts and pictures. We fasten the line or thread in the first bead, and then just string on it the beads to the desired width of the product. the number can be either even or odd, in the first case, the addition of the next row can be done in pairs, in the second case, by 1 bead. An example of both types of connection is shown in the figure.
Comments
Related posts:
 Various schemes of weaving beads from beads. Ornaments with the help of possible techniques of beading.
 Lessons of weaving from beads by the method of hand weaving, the scheme of work with a canvas, the description of various nuances of weaving
 Bantik from beads master class of different techniques of weaving (video)
 How to weave a flower of narcissus from beads two variants in different techniques of weaving, diagrams, photos and description
 Types of different toys from beads with patterns of weaving. Variants of schemes of weaving beads of toys with the help of various techniques.