Knitting lessons on warm knit socks "Chess" with step-by-step recommendations and photo
Knitted socks in winter are simply necessary asadults, and children. Perhaps no one manages without socks, especially in the winter period of time. Socks that are made of yarn, warm and protect our feet from cold. As a rule, the socks knit on special knitting needles, to be more precise, on 4 spokes. The yarn for knitting of socks is selected depending on the color and type of the yarn itself. Basically, before the needlewomen there is a choice between woolen and artificial yarn. Each of them gives preference to one or another species. After all, there are reasons for this. Not everyone can put socks out of pure wool. The main advantage of this yarn is the heat that the wool "produces", thereby warming our legs. However, there is also a large shortage of wool yarn. I think it's no secret to anyone that dressing, woolen socks, immediately begin to itch legs. This indicates that the wool has an annoying effect on the skin of the legs. Whatever one may say, the sensations are not pleasant, as we would like. Therefore, the choice automatically switches to artificial yarn. Since the socks are designed for children, it is possible to pick bright colored yarn and very interesting patterns for their knitting. The knitting process of the socks consists of five components, namely, the elastic band, the boot, the heel, the foot and the toe. Each part is knitted differently and has its own characteristics, which I will discuss in this article. First you should choose the type of yarn and choose the colors. Acrylic yarn of different colors is used for these socks.
Materials and tools
So, for knitting such children's socks the following materials will be required:
Progress
Knitting such baby socks begins withgum, so you will need to work stocking knitting needles and yarn "Violet acrylic." The first row is formed by a set of loops, so for 4 hosiery needles, type 10 loops per each, that is, the total should be 40 loops. The second row of rubber bands is tied with face loops in a circle. From the 3rd to the 15th rows we knit directly the elastic band itself. These rows are knitted alternating between two facial and two purl loops. The optimal length of the elastic band for a baby's socks is 5-6 cm. The length of the elastic of these socks is 5 cm. In general, the length of the elastic is chosen by each individually, someone likes long socks, and someone likes short socks. 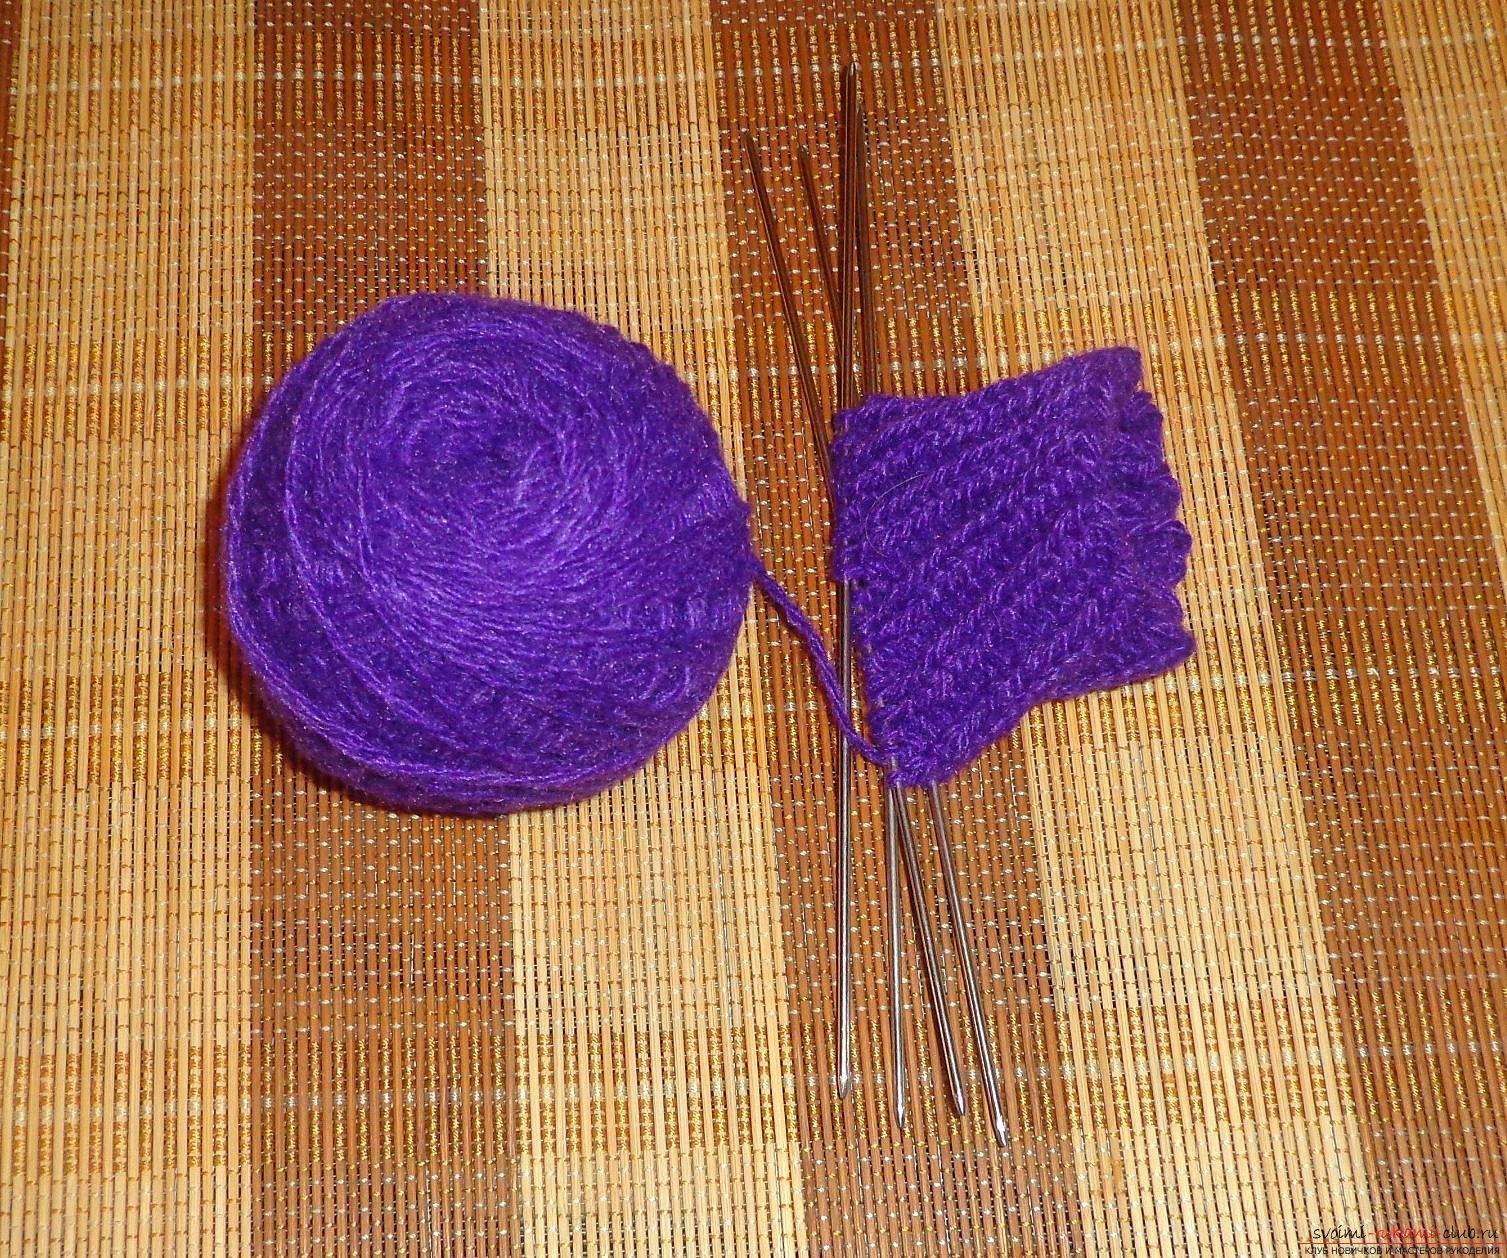 When the length of the gum has been determined, and itcompletely connected, go to the knitting of the second main part of the socks - the boot. The top of the socks is made with a pattern called "rice" and the yarn "Coral acrylic" is used. I want to note that the through numbering of the series is used. So, the 16th row of the bootleg is tied round in a circle with the eyelets. The violet thread can be cut off so as not to get in the way, and remove the remainder with a hook.
 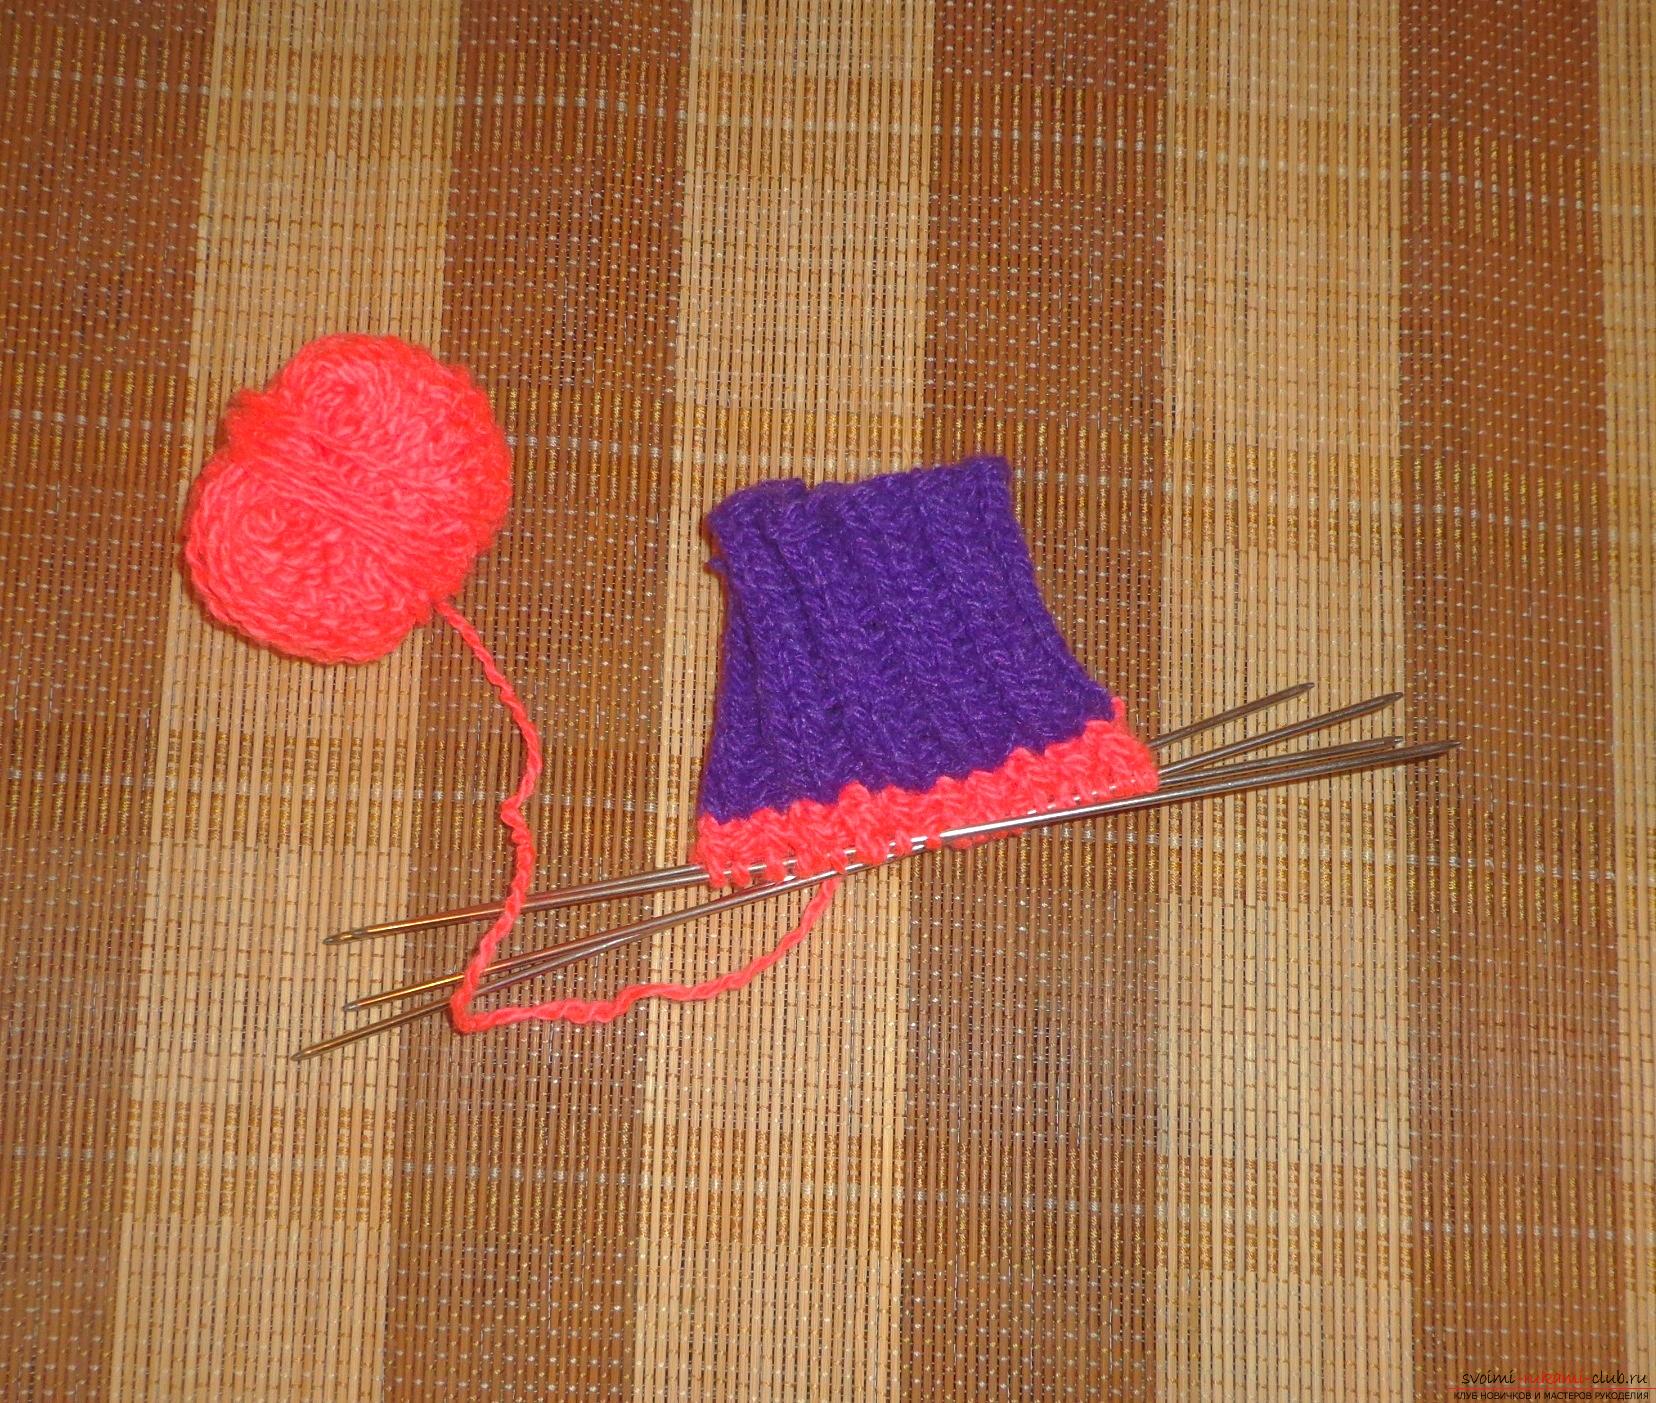 The 17-18th series must be connected as follows: 1 facial loop (hereinafter referred to as "lits.pelent."), 1 purl loops (hereinafter referred to as "lap stitch"), 1 lits. and so you need to alternate the loop, until the above mentioned rows are completed. The 19-20th series are knitted on the contrary: 1 of the back of the chain, 1 of the ladders, 1 of the back of the stern. and so you need to alternate the loop, until the above mentioned rows are completed. 21-22th series: 1 persons., 1 arch., 1 persons. and so on until the end of the series. 23-24th series: 1 purl., 1 lits., 1 purl. and so you need to alternate the loop, until the above mentioned rows are completed. 25-26th series: 1 persons., 1 arch., 1 persons. and so on until the end of the series. 27-28th series: 1 purl., 1 lits.pel., 1 purl. and so you need to alternate the loop, until the above mentioned rows are completed. 29-30th series: 1 persons, 1 stub., 1 lits. and so on until the end of the series. 31-32 series: 1 purl, 1 lits., 1 purl. and so you need to alternate the loop, until the above mentioned rows are completed. The top of the baby's socks is tied, now you can move on to the knitting of the heel. The length of the shaft is 6 cm.
 Many do not undertake to knit socks, precisely because ofheels, because they think that this is the most difficult element. However, after trying for the first time, doubts in the future will dissipate. Here the main thing is to be careful and not rush. First of all, we transfer the loops from two spokes to one single one.
 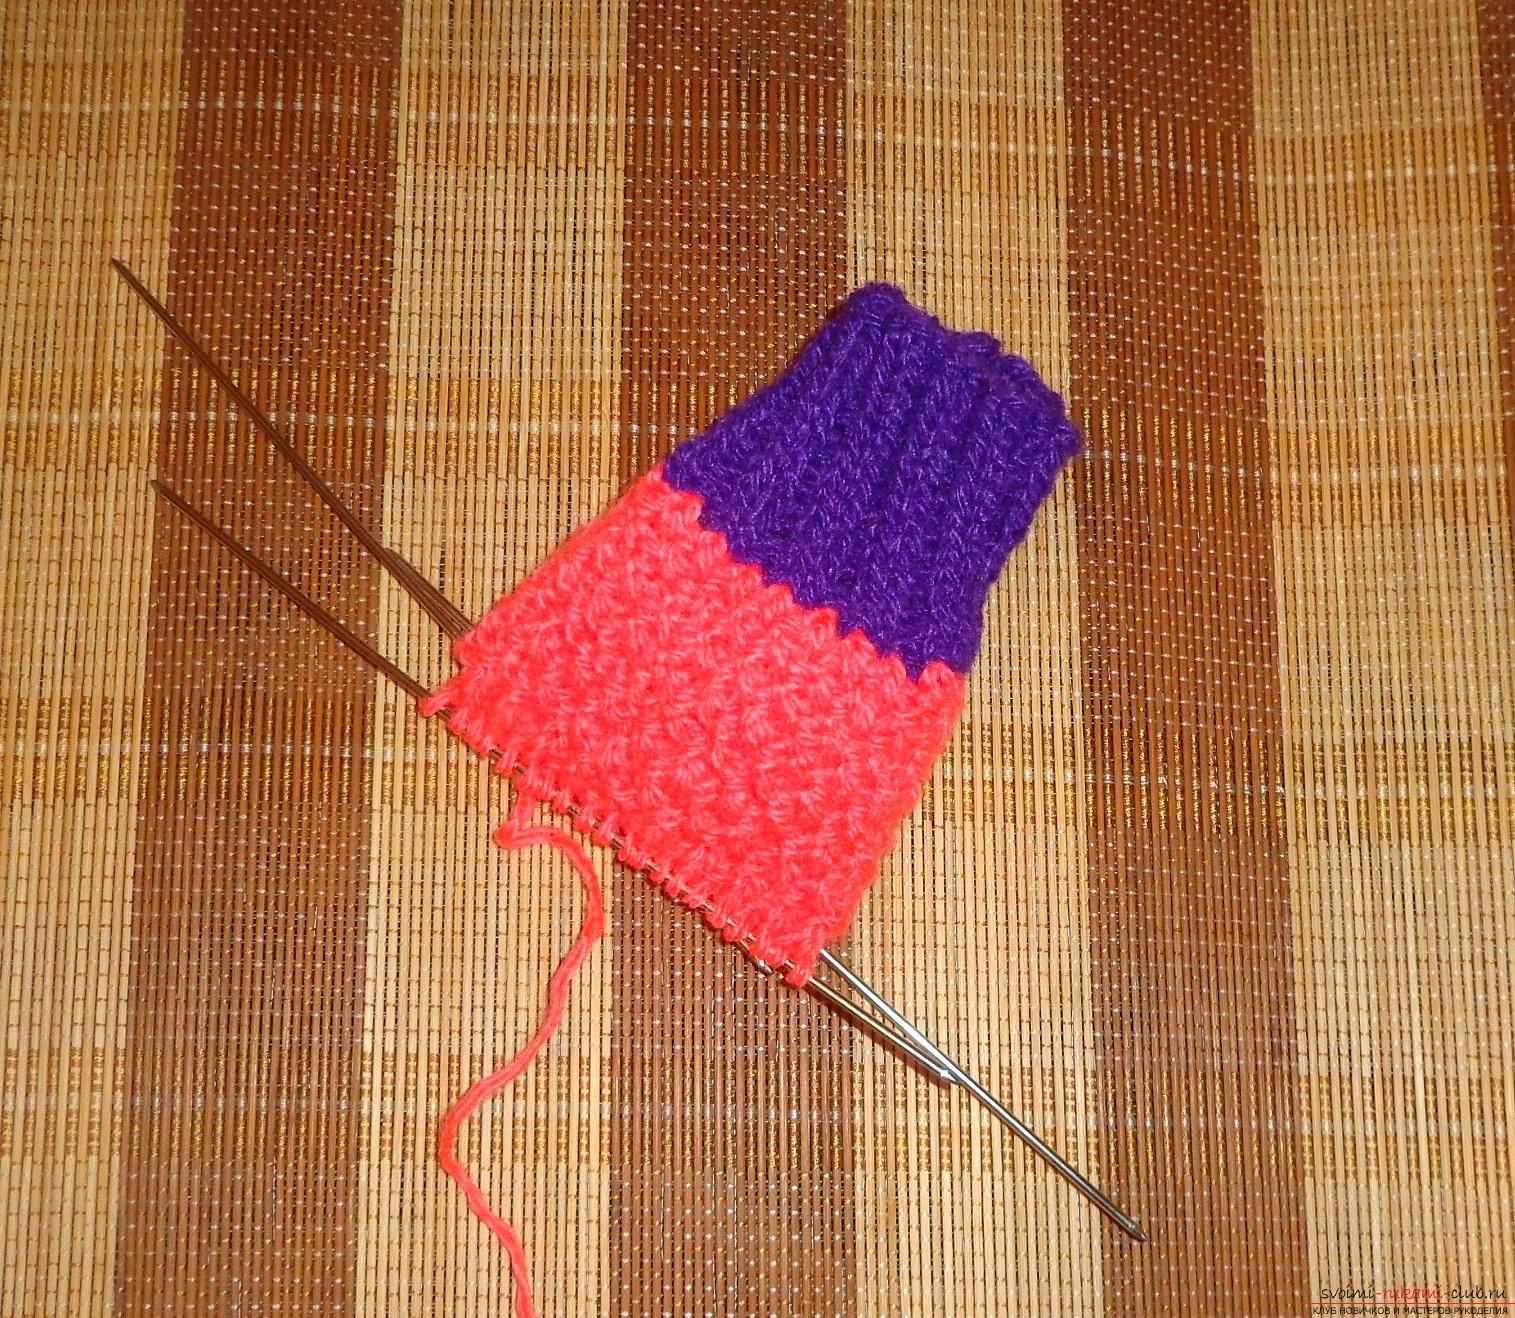 Now we are tying the 33rd series with the wrong onesloops. At the moment, only the heel is tied, so only one spoke is tied, but the other two are not touched. The 34th row is to be tied with the eyelets. The 35th row is tied with the wrong laces. The 36th row is to be tied with the eyelets. 37th row - purl loops, and 38th row - facial loops. The 39th row is sewn with the wrong stitches, the 40th row is sewn with the eyelets. The 41st row is to be sewed with backing loops, the 42nd row is the face loops. 43rd row - purl loops.
 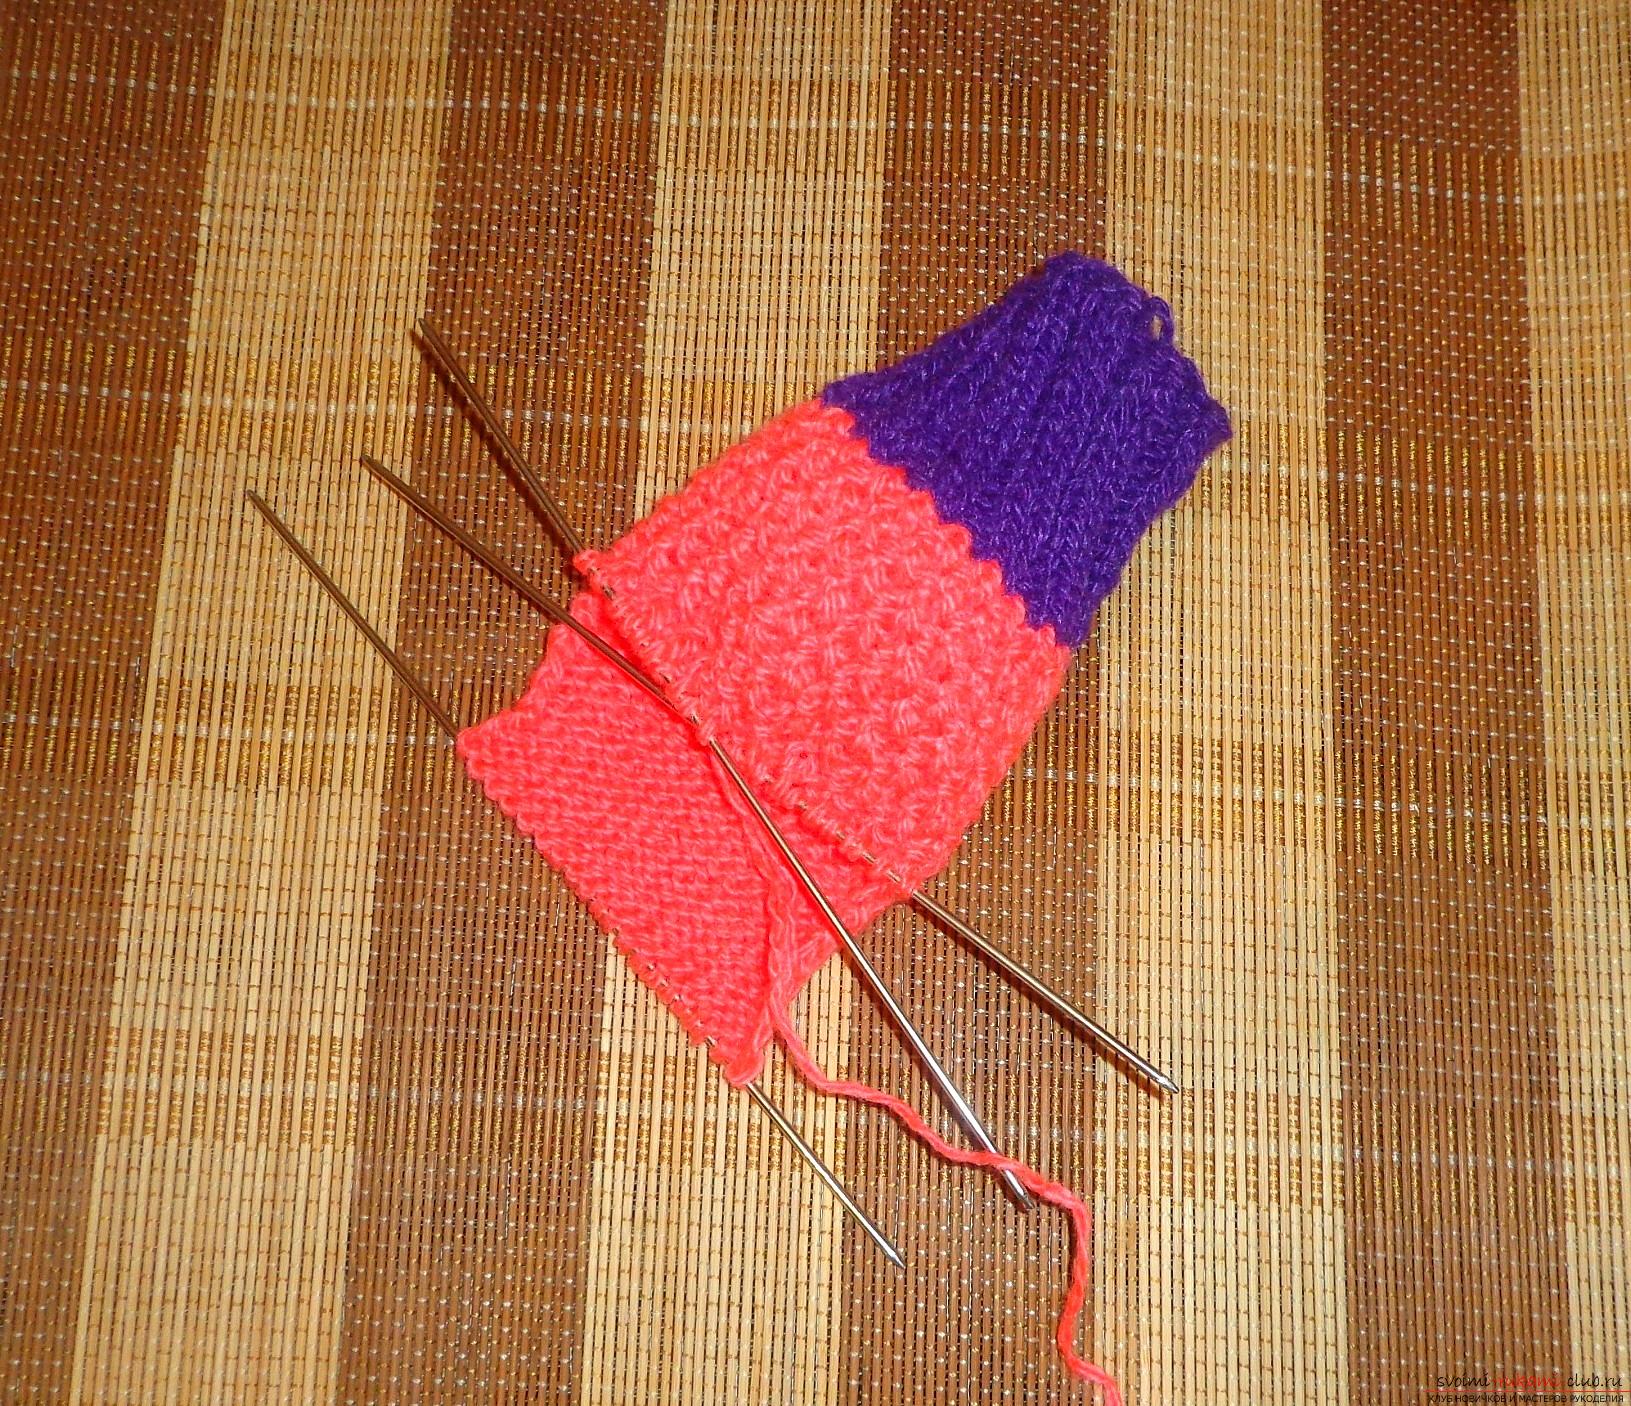 From the 44th row we begin to round the heel, sowe tie 13 litsov.petel., and the 14th and 15th loops to tie together. On the left spoke there are 5 loops - they do not need to be tied! Turn the knitting and go to the 45th row. To knit the 7 stitches, and the 8th and 9th stitches together, again on the left there are 5 stitches - they do not touch and unfold. 46th row: tie 7 litsov.petel., And 8th and 9th stitches to tie together, again on the left there are already 4 stitches - they do not touch and unfold. 47th row: 7 back of the stern, and 8th and 9th stitches together, on the left there are 4 stitches - they do not touch and unfold. 48th row: 7 litsov.petel., And 8th and 9th stitches to tie together, on the left there are 3 stitches - they do not touch and unfold. 49th row: 7 backpack, and 8th and 9th stitches together, on the left there are 3 stitches - they do not touch and unfold. 50th row: 7 lits. Drag., And 8 and 9 th stitches together, on the left there are 2 eyelets - they do not touch and unfold. 51st row: 7 of the back of the knuckle, and the 8th and 9th loops to be tied together, on the left there are 2 eyelets - they do not touch and unfold. 52nd row: 7 litsov.petel., And the 8th and 9th stitches to tie together, on the left remains 1 loop - it does not touch and unfold. 53rd row: 7 of the back stitch, and the 8th and 9th stitches are tied together, on the left one stitch remains - we do not touch it and turn around. 54th row: 7 lits.petel., And the 8th and 9th loops to tie together, left 0 loops left, unfolding. 55th row: 7 of the back of the stern, and the 8th and 9th stitches are tied together, the left remains 0 loops, unfolding. Pig is made, and you can go to knitting your feet.
  56th row: you need to get missing loops. To do this, divide the heel pin into two equal parts, that is, 4 loops and transfer them to two spokes. On these spokes get the missing 5 loops. Question: why do we get 5 instead of 6, so that there are 10 loops on each spoke? The answer is simple: to make the foot of the toe not too wide, you need to collect a little less loops than they were originally.
  57th row: we knit all the facial loops. Trim coral acrylic. 58th row: here it is already necessary to change the thread color to "Yellow acrylic". This series also matches the facial loops. The 59-61 series begins with the formation of a pattern in the form of chess. The pattern requires yellow and green acrylic. At the same time, the foot is knitted as follows: two knitting needles are tied with a "chess" pattern (the upper part), and the other two knitting needles are tied with the front loops (lower part). This is understandable, then on the sole of the pattern? Of course, he does not need anything there, but it's just right at the top. So, to fasten 5 yellow lits.petel., 5 green purl., 5 yellow litsov.petel., 5 green purl., And two spokes with green acrylic and facial loops.
 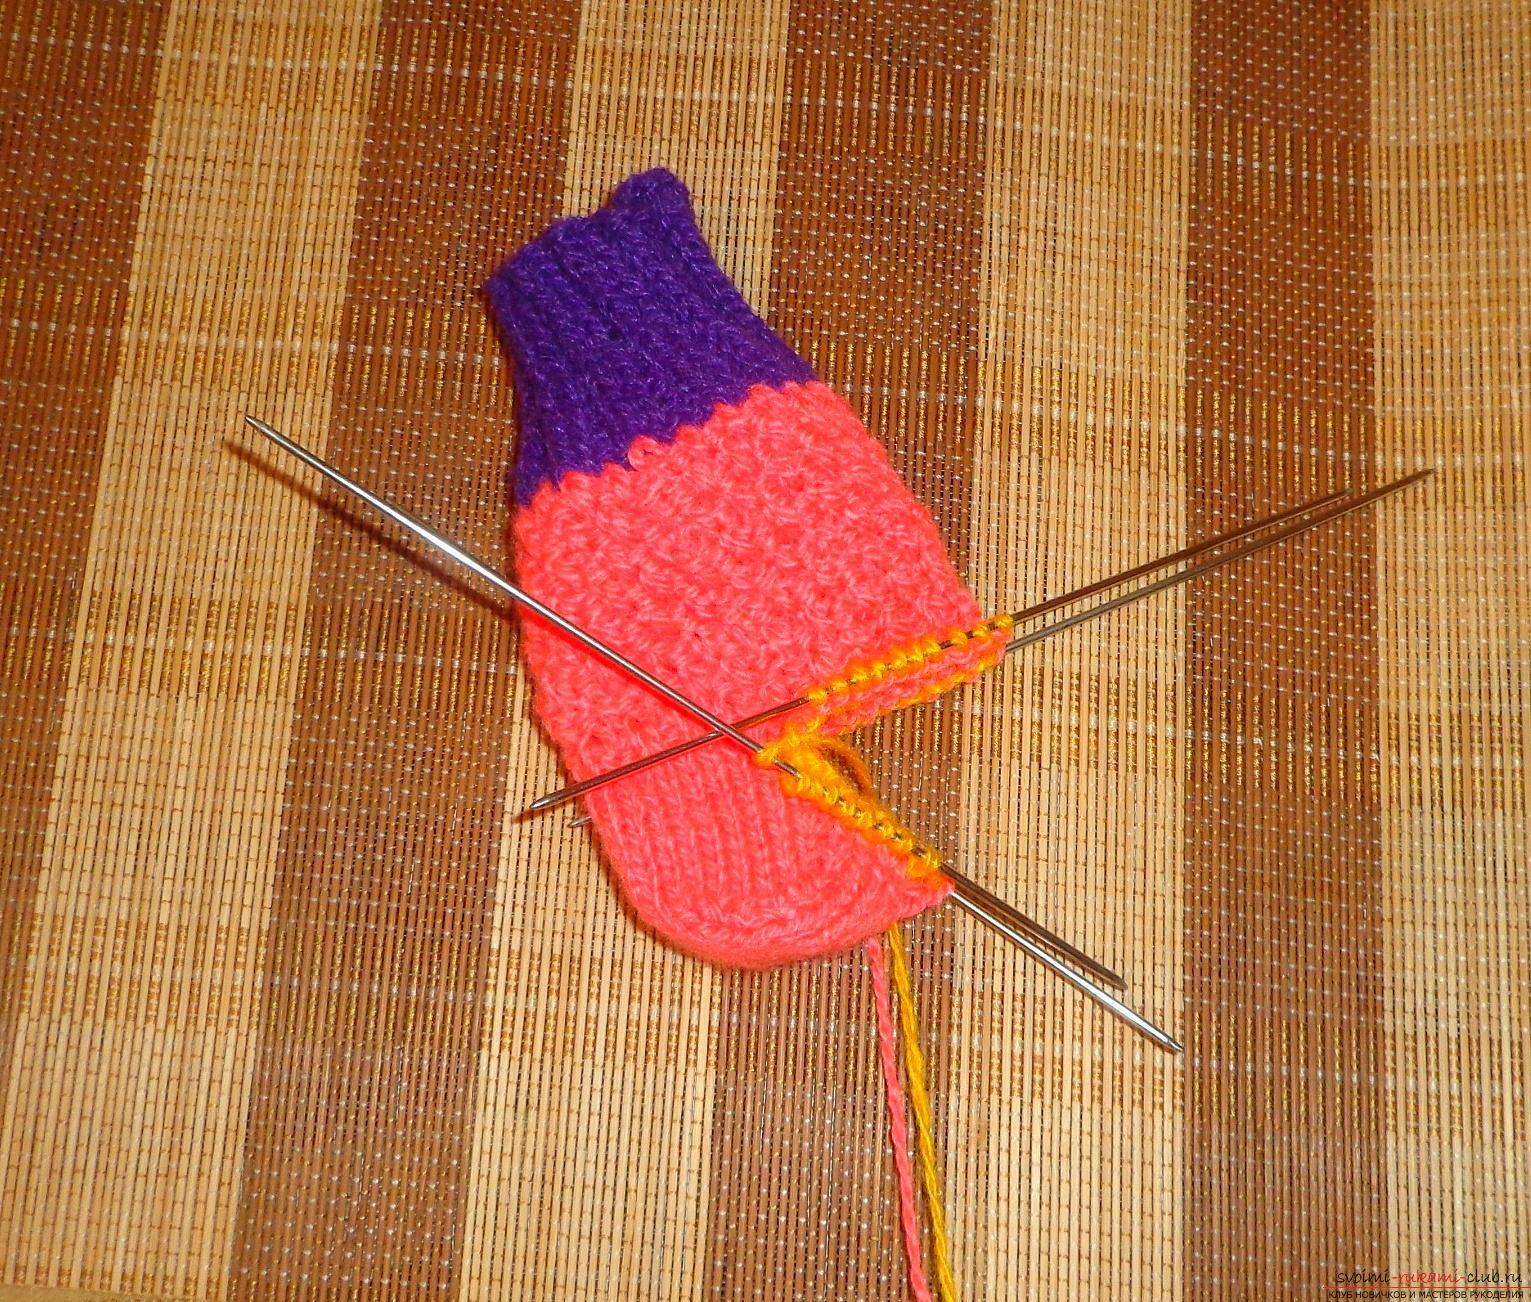 62-65 Rows: tie 5 green lace knuckles, 5 yellow lits.petel., 5 green lace knuckles, 5 yellow lits.petel., And two spokes with green acrylic and facial hinges.
 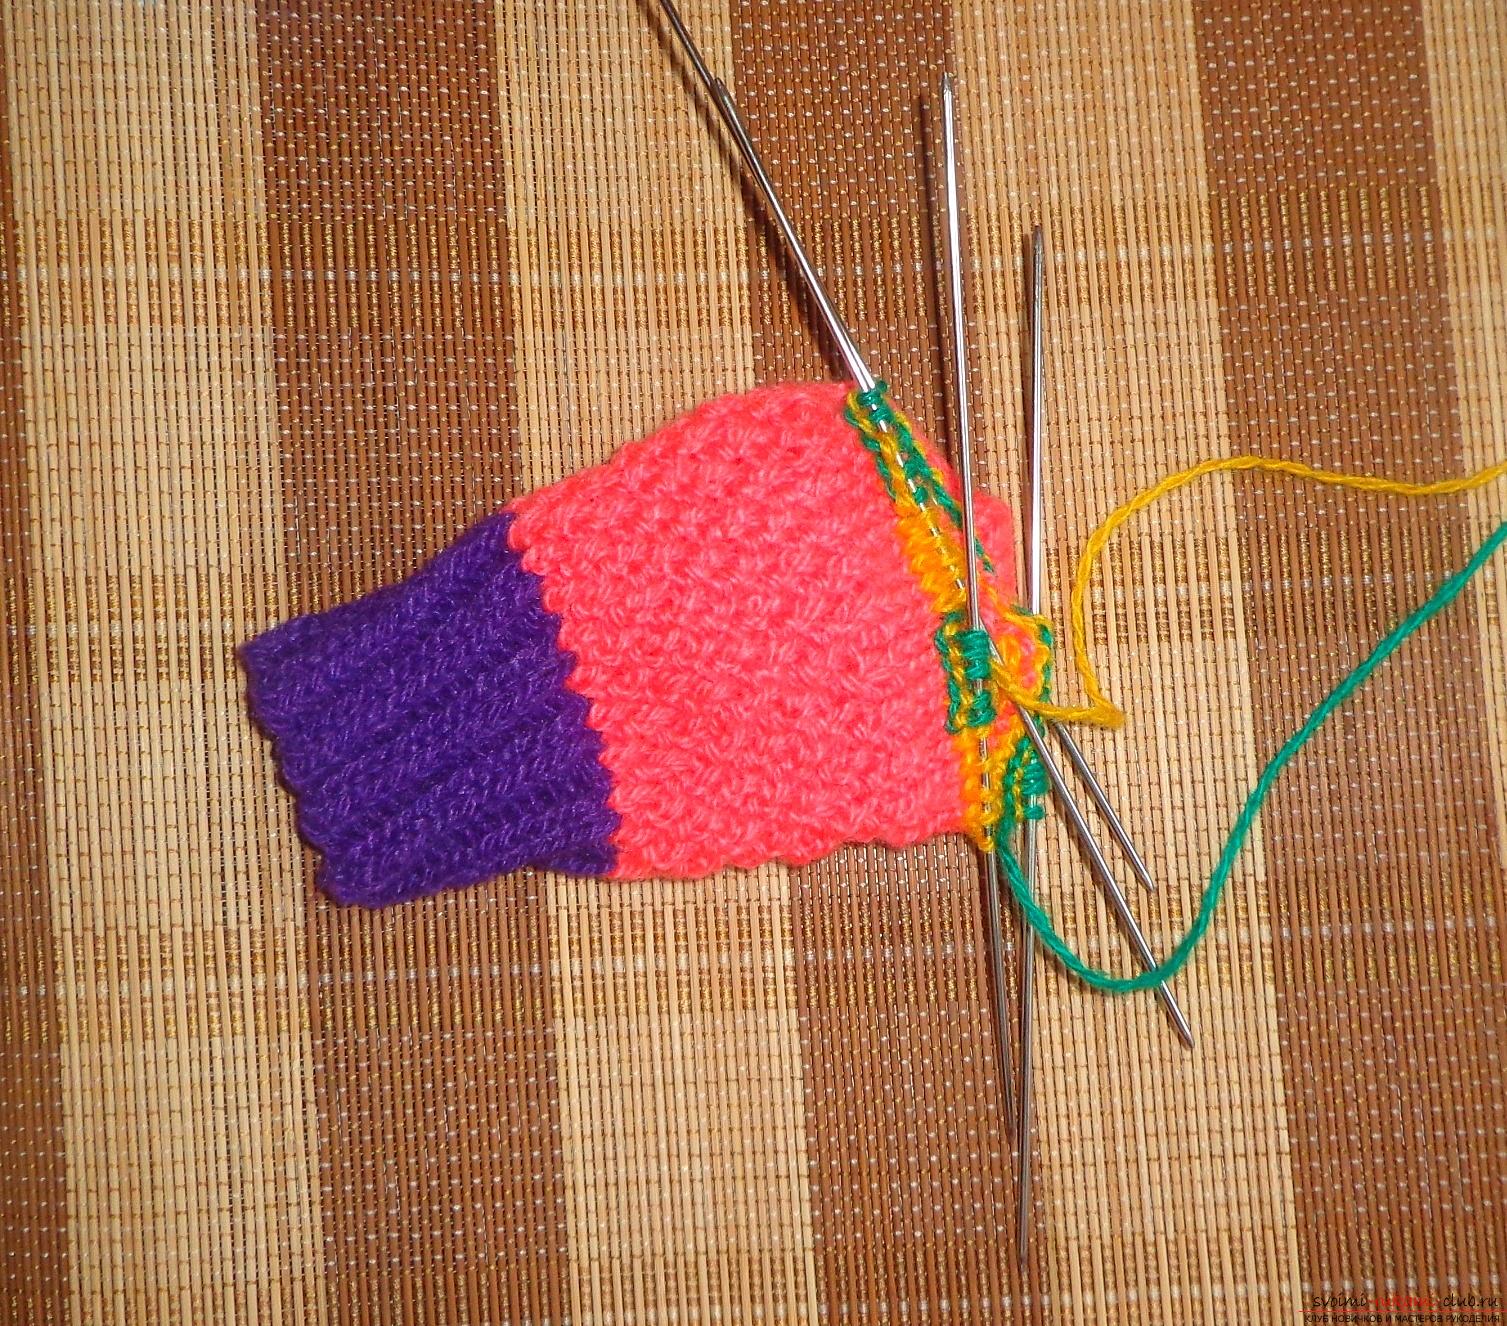 66-68 Rows: tie 5 yellow litsov.peel., 5 green leaves, 5 yellow lits, 5 green leaves, and two spokes with green acrylic and facial loops. 69-71 Rows: to tie 5 green purlins, 5 yellow lits.pellet., 5 green purlets, 5 yellow litsov.petel., And two spokes with green acrylic and facial loops. 72-74 Rows: tie 5 yellow lits.petel., 5 green purl., 5 yellow lits.peel., 5 green purl., And two spokes with green acrylic and facial loops. 75-77 Rows: tie 5 green purlins, 5 yellow leaves, 5 green leaves, 5 yellow leaves, and two spokes with green acrylic and facial loops.
 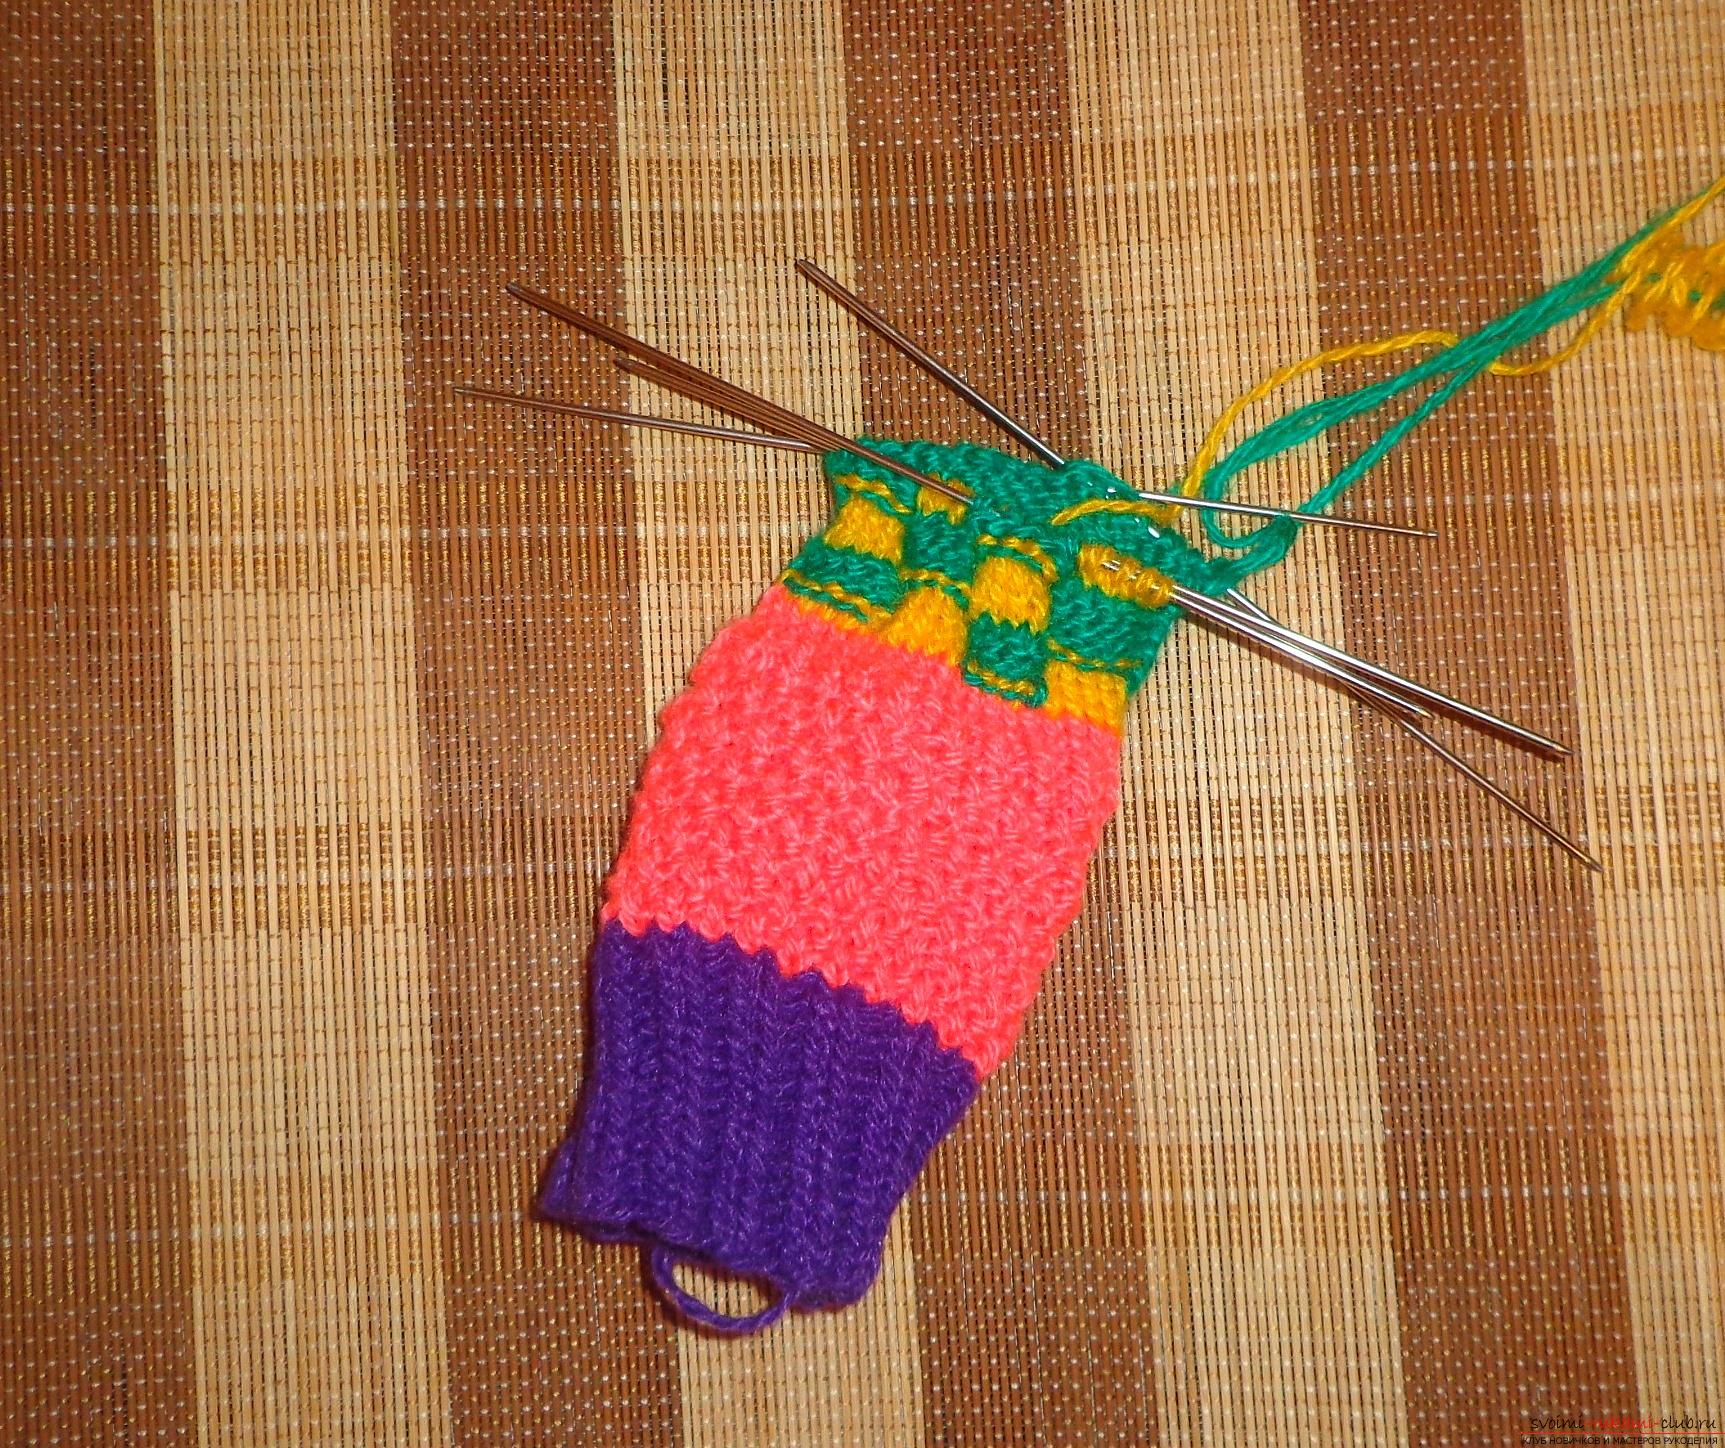 78-80 rows: tie 5 yellow litsov.peel., 5 green leaves, 5 yellow lits, 5 green leaves, and two spokes with green acrylic and facial loops. 81st row: we begin to knit the final part - the socks. For this, we loop the loops into two spokes, one will knit the sole, and the other a chess pattern. To knead 5 green leaves, 5 yellow leaves, 5 green leaves, 5 yellow fingers, and the other needle with green acrylic and facial loops.
 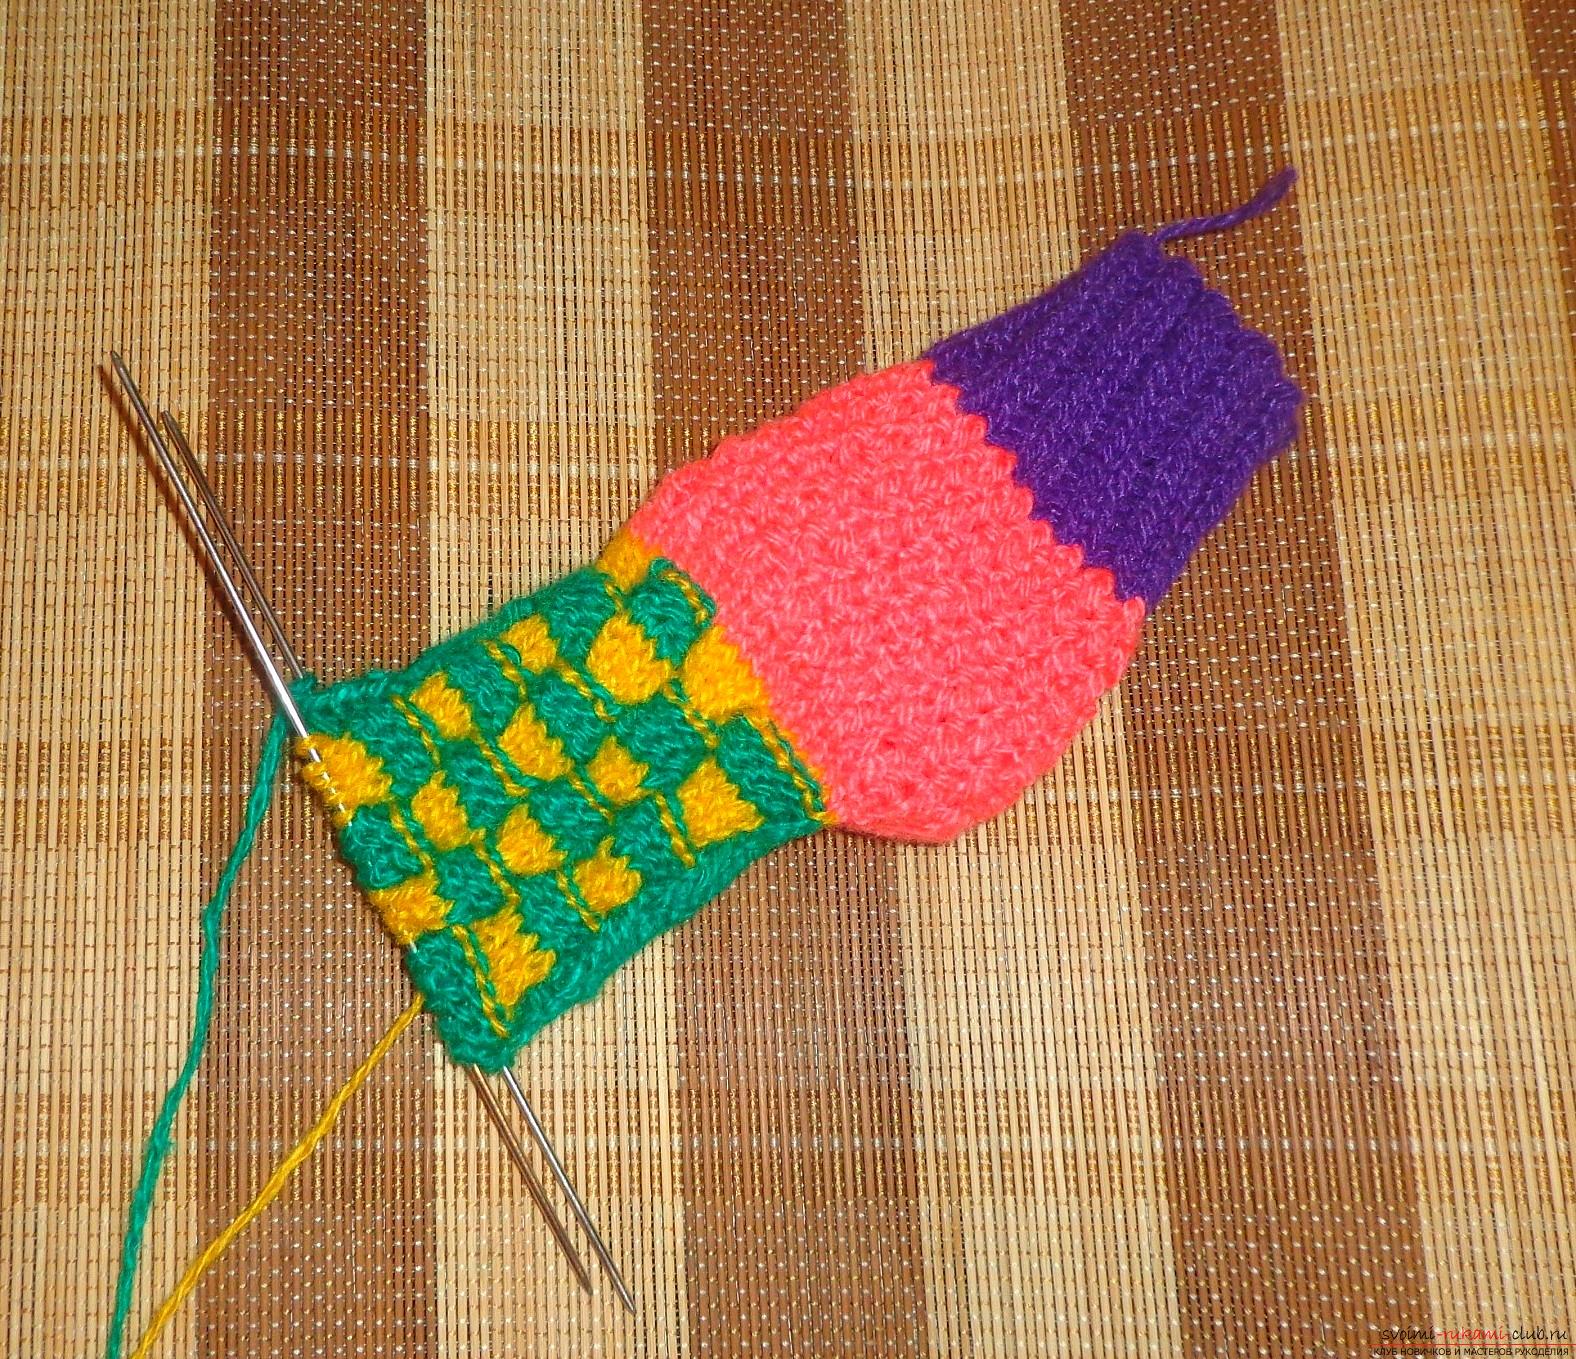 82-83 series: we start to knit from the green purl loops, and at the beginning and at the end of the spokes, two loops are tied together, so the number of loops will be reduced. 84-86 series: we start to knit from the yellow facial loops, at the beginning and at the end of each knitting needle is sewn on two loops together. 87-89 series: we start to knit from the green purl loops, at the beginning and at the end of each knitting needle is sewn on two loops together. 90-91 rows: it is necessary to knit two loops together at the beginning and at the end of the two spokes, until one loop remains. Remove this loop and tie it with a string.
 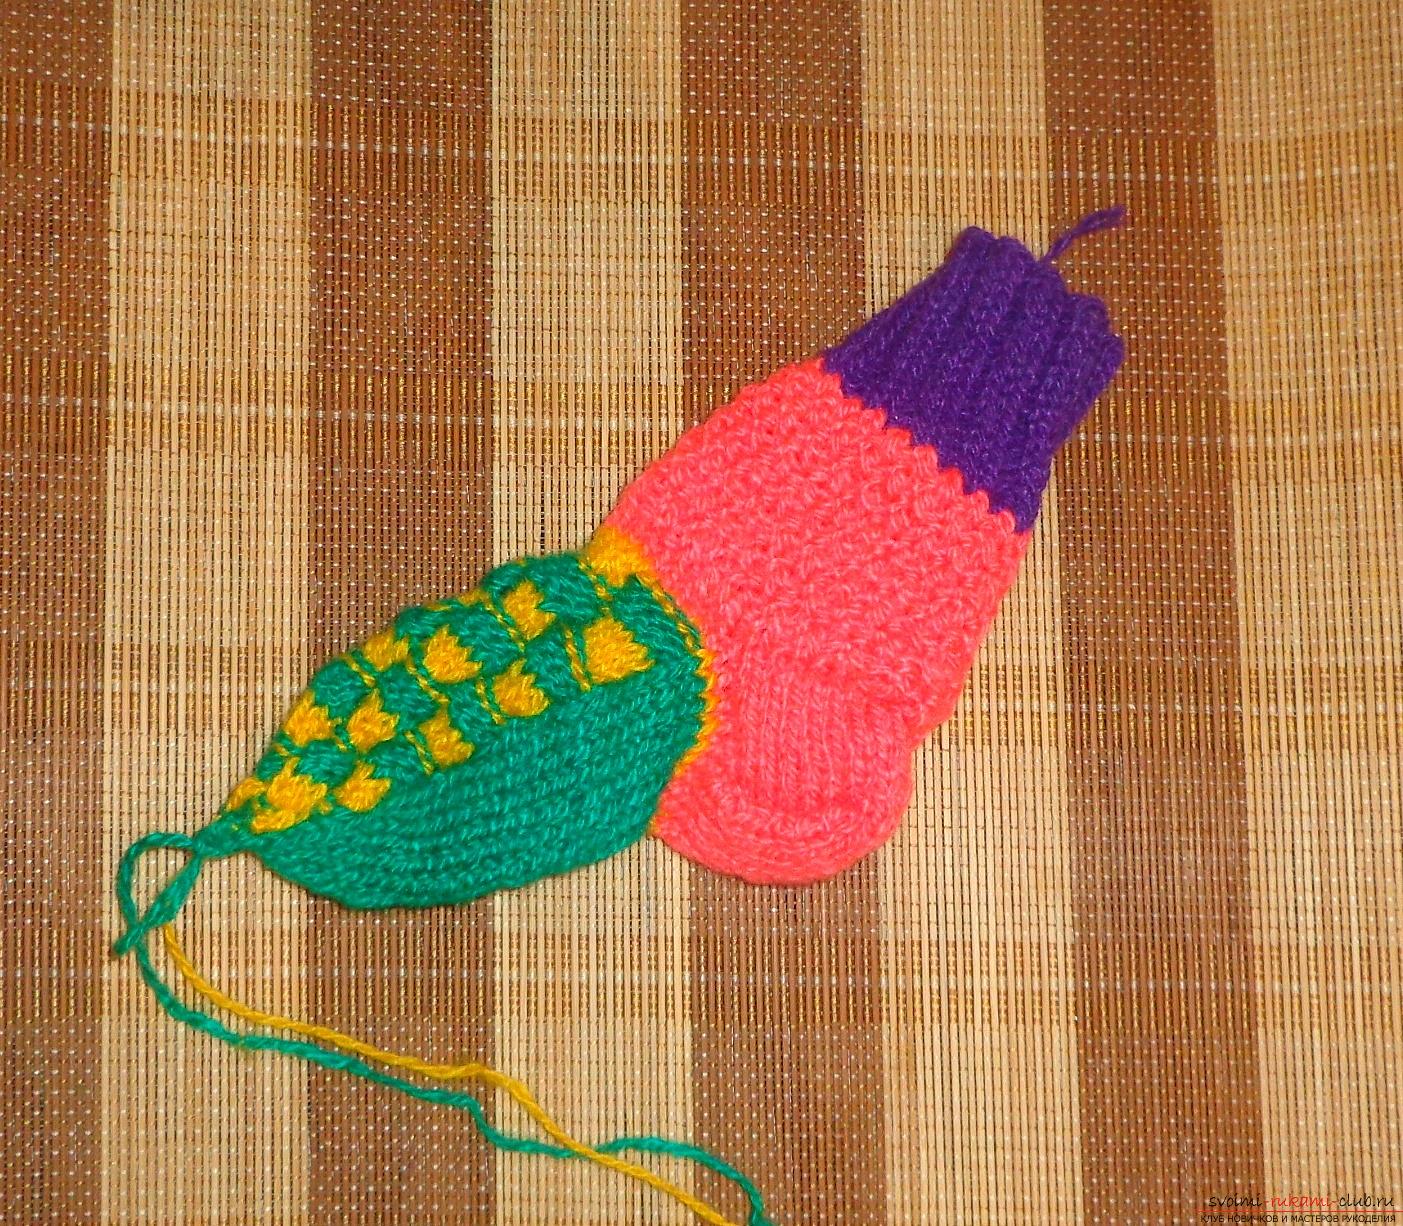 Scissors cut the thread, and crochet it into the toe. The first socks are ready. The length of the foot along with the heel is 17 cm, which means that the socks will fit the child with the 27th foot size.
 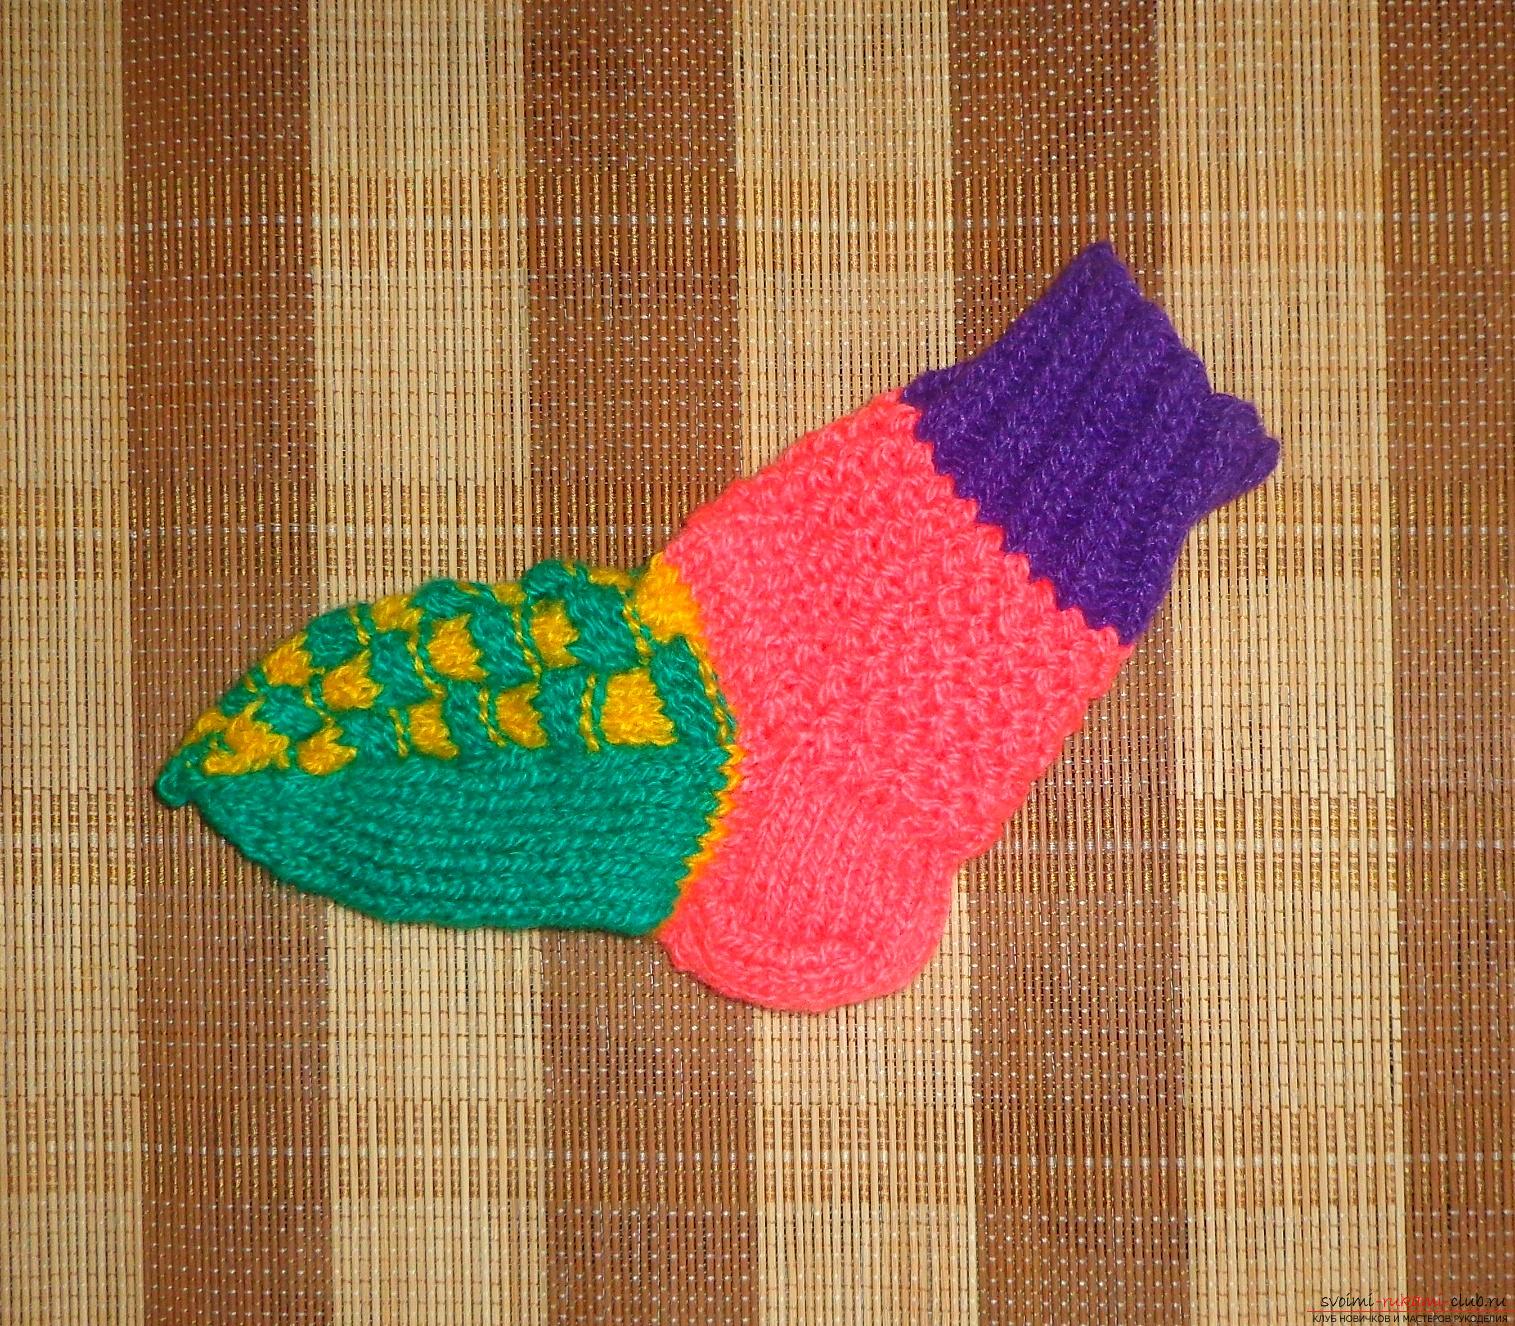 The second socks are also knitted, beginning with a set of 10 loops for each stocking knitting needle. Now it's a little easier to knit, as there is a pattern that you can easily navigate.
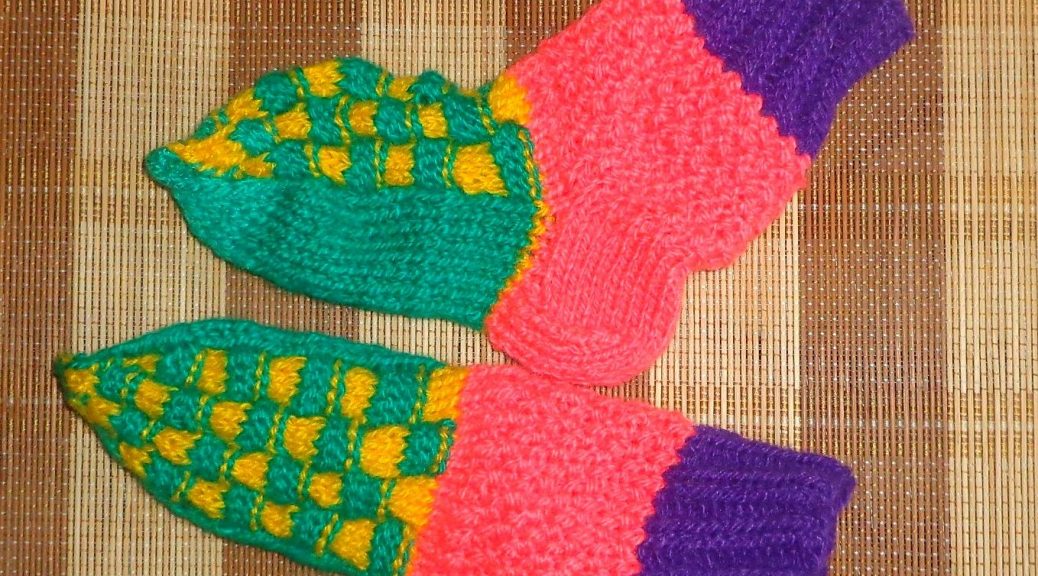
 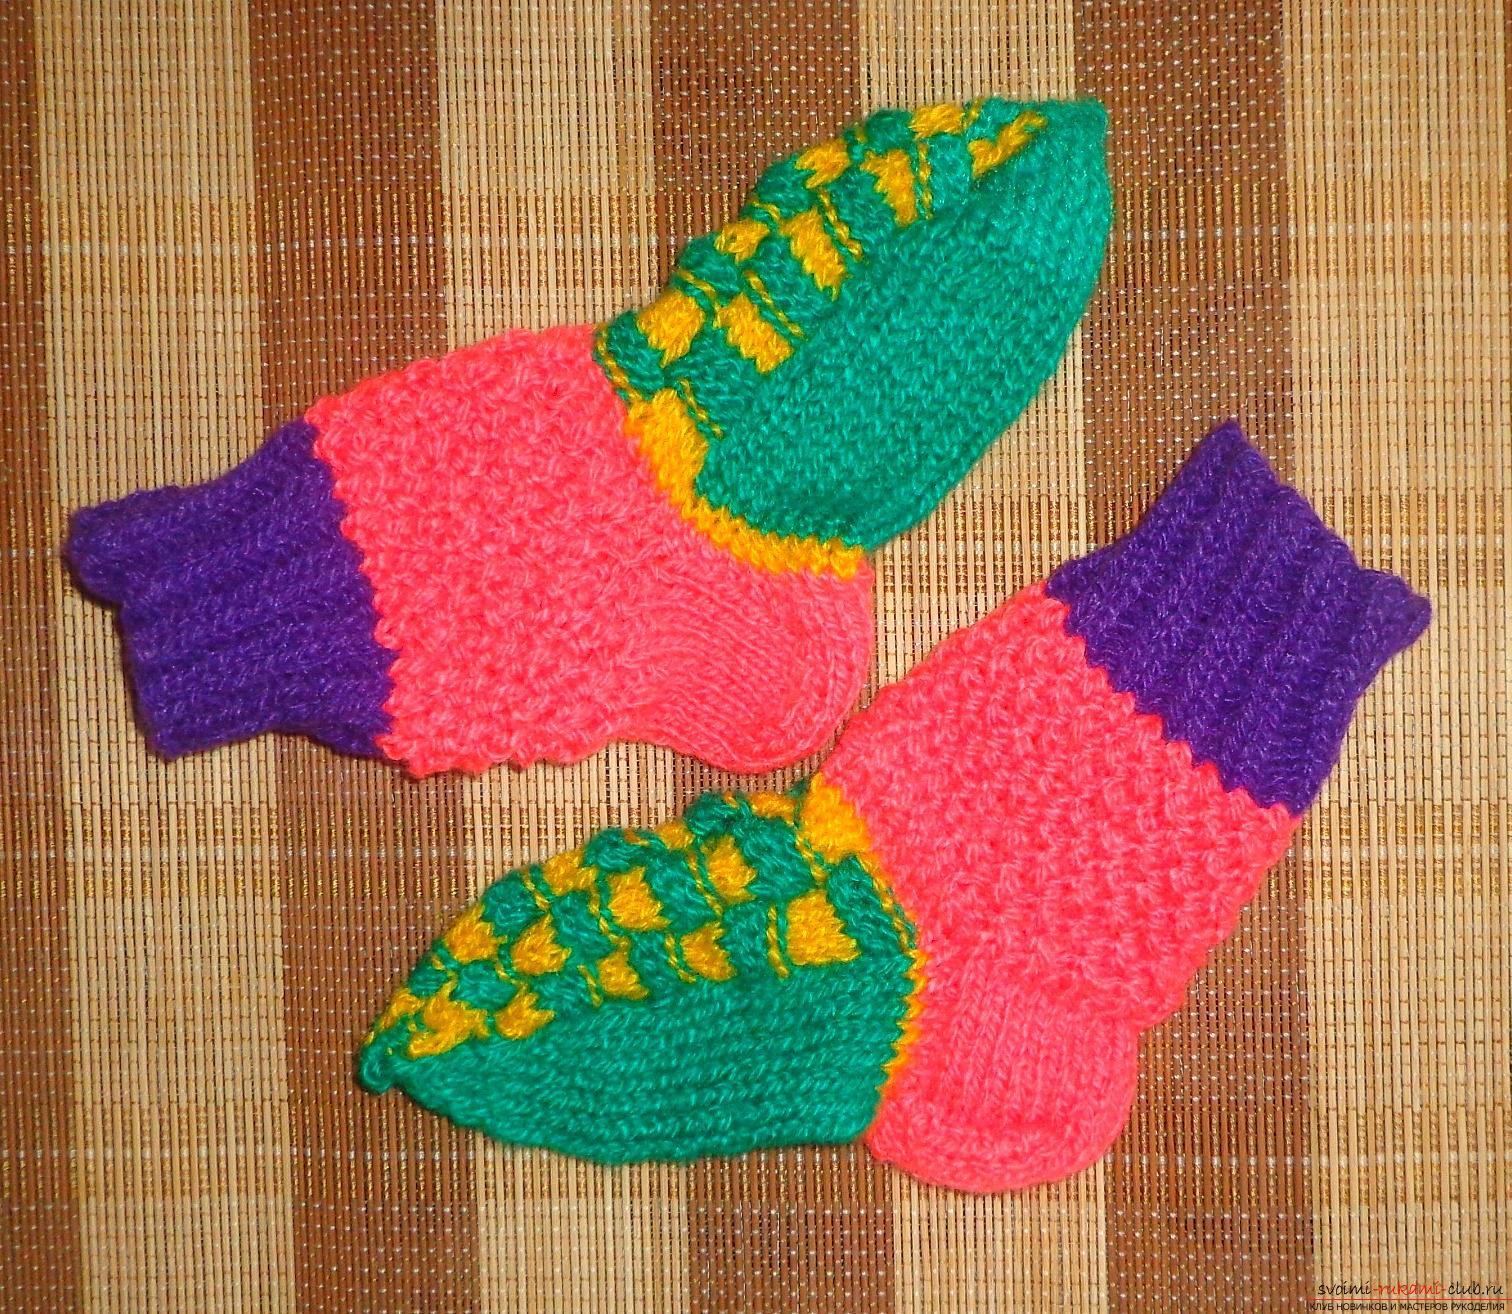 Baby socks with an attractive and at the same timean unusual chess pattern ready! These socks are very comfortable to wear in boots or just around the house. Children love bright things, so the socks made by themselves will not be an exception.
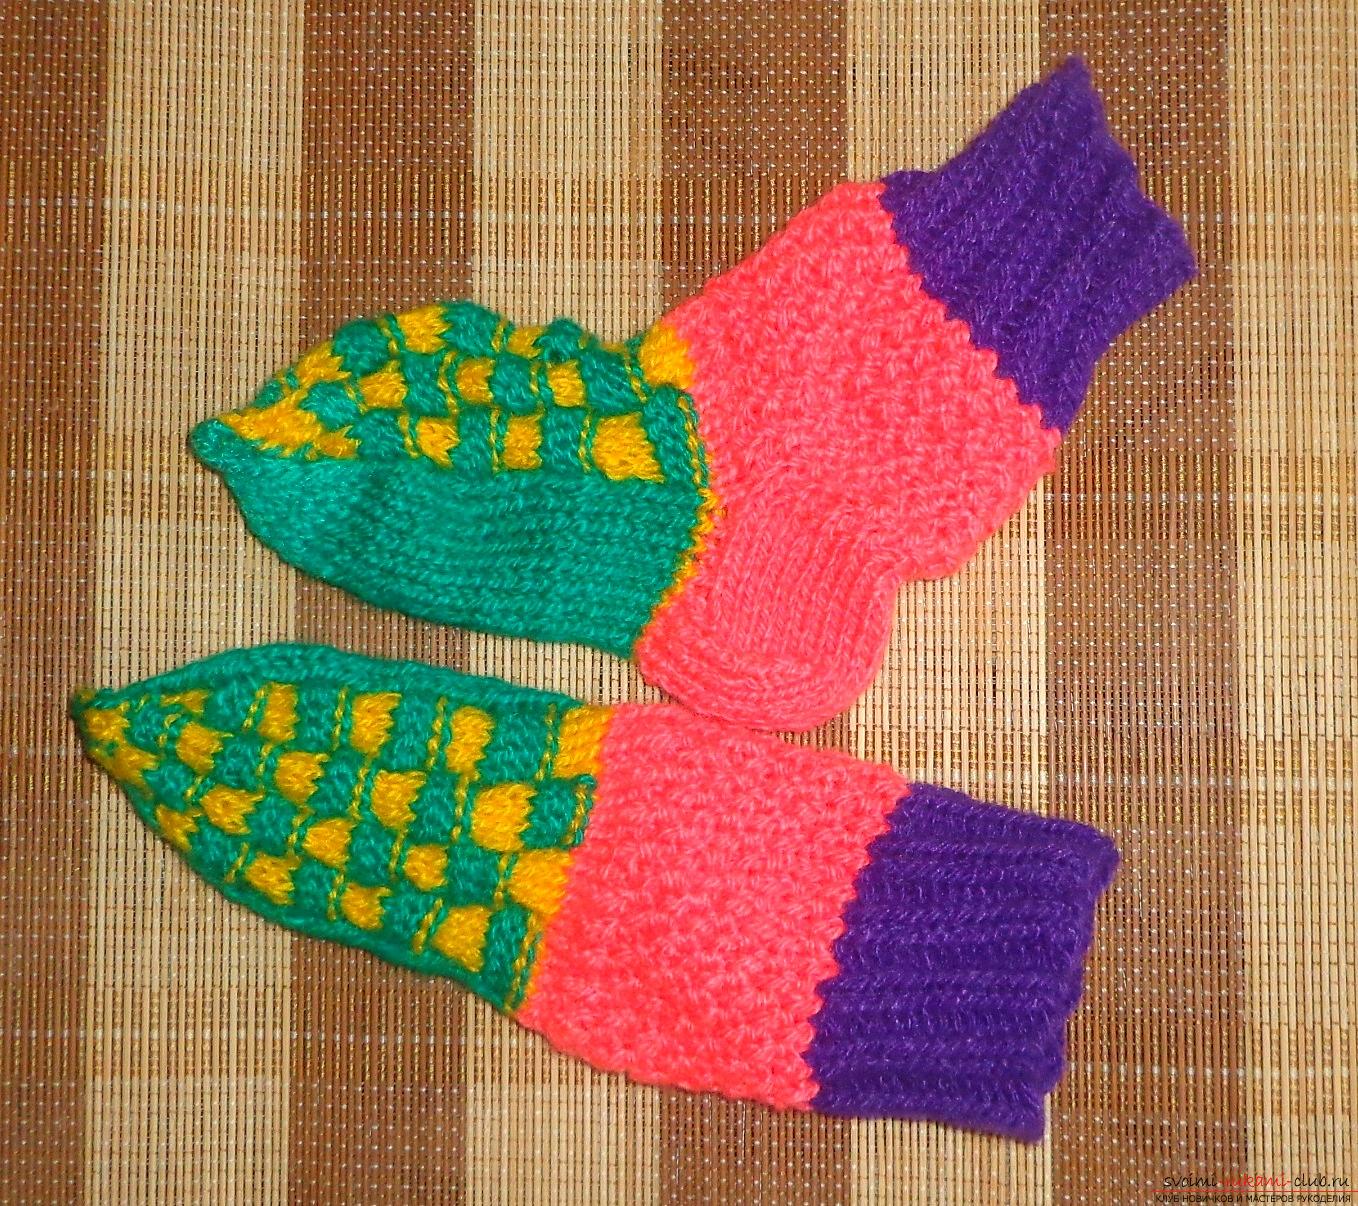
Comments
Related posts:
 How to tie children's warm socks "Winter" with knitting needles? Lesson on knitting with children's socks "Winter" with detailed description of the technique of binding, recommendations and step-by-step photos
 A lesson on knitting an original cover for a mobile phone on knitting needles, with step-by-step instructions and a photo
 How to knit with cute mittens "Winter Tale"? A lesson on knitting winter mittens from acrylic on knitting needles, with a detailed description of steps and photos
 How to tie a snowflake with a crochet for the New Year's decor of the interior? A crochet lesson on the openwork snowflake with detailed recommendations and step-by-step photos
 Crochet crochet lessons of the original needle bed with step-by-step recommendations and photos