Lesson on the correct selection of needles for different types of felting, for dry felting out of wool, how to choose the right size of the needle for felting by photo and description.
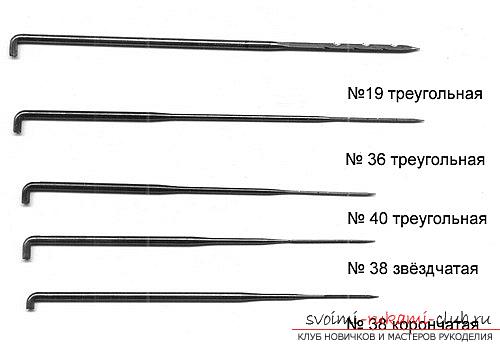
In dry felting, special needles are used,having incisions on the sides, which allow the fiber to adhere to each other. The modern market of needlework items is represented by such a wide range of needles, differing in types, size categories and length, which in them can be difficult to understand at what stage of felting they should be used. In this master class, we will work through this together. Needles for felting have their own numbering. It is inversely proportional to the thickness of the needles. Thicker needles contribute to a faster dumping of fibers with each other, but they leave large holes in products. The use of long, thick needles, as a rule, is important in the formation of the original type of product, and thin and short needles are ideal for "smoothing out" surfaces.  In work, you will use 3-4 needles. The most popular are star-shaped needles №38 and triangular №36, 38, and also 40. They fall in the shops for needlewomen and sets of these needles.
  Each of these needles has a specialDestination: No. 36 - used at the beginning of the process, when there is a rough and accelerated part of felting; No. 38 - it is this needle, due to its universality, that is called to connect the layers of wool and to tie felt parts among themselves; No. 40 - used for working with small elements, as well as for "smoothing" the surface. This is an excellent option for felting Merino wool types.
  The stellar needle is equipped with 3 or 4nested faces, for which it received the additional name "three-beam" and "four-beam". The number of incisions is directly proportional to the number of faces, so the hair of this needle is faster and more convenient to fold. The stellar needle No. 38 is designed for a fast and thin part of felting. "Three-beam" is used during stitching of wool to the fabric basis, as well as during the felting of flat products (ears, tails). "Four-beam" is used for basic and finishing works. Above we have given descriptions for the main types of needles for felting, but in shops for needlewomen you can meet other species.
 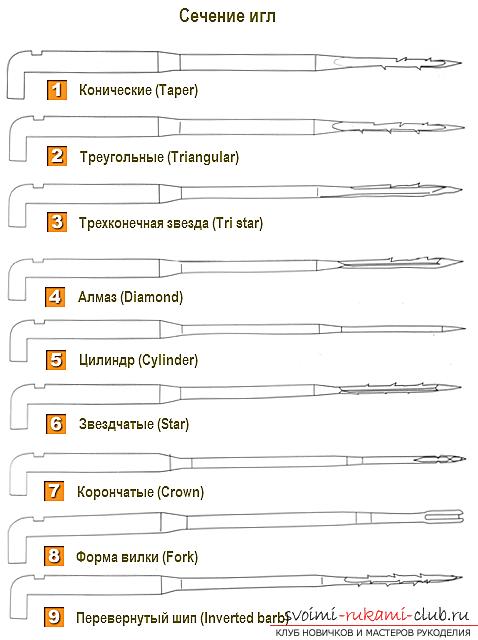 The crown needle (No. 36, 38, 40, 42) has a sectionalso triangular, but she received her name because of a notch in the form of a crown at the end of the needle. With such needles it is convenient to work on surfaces. They do not fall deep into the material. Crown needle, as a rule, ringlets to the heads of dolls, wool to the fabric bases. The back needle (No. 32, 40) pulls the pile out of the felted products outwards. So usually, raspushivayut toys or achieve an unusual game of shades, mixing the deep-lying fiber with the surface.
 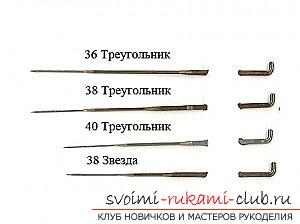 Twisted needle (stellate No. 36 and triangularNo. 40) differs by a coiled working surface, and the arrangement of notches along the diameter. Due to this they benefit from other needles in strength and speed at work. Puncture when working with such a needle is almost invisible, because it perfectly smooths the surface. In conclusion, let's talk about needle holders. Their use makes the felting process more convenient. the first advantage is that finger fatigue is reduced; the second - it becomes possible to use several needles (from 3 to 7) simultaneously, which greatly accelerates felting. Needle holders allow you to change and alternate needles according to your desire. It is not necessary to buy them in the store. You can do it yourself. To do this, a cork from a wine bottle is suitable, or you can wrap a few needles with the help of a rubber band, additionally wrapping with adhesive tape for convenience. After studying this master class, you can pick up an optimal set of needles for felting, and therefore fully ready to create your first masterpiece!
Comments
Related posts:
 This master class felting of wool will help make a toy monkey with your own hands
 Schemes and photos of different types and styles of weaving jewelry. Ornaments to anyone along, created with beading.
 Felting panda out of wool for beginners, master class and photos
 Step-by-step description of the process of felting scarf without holes with a photo