Making an owl quilling for a postcard on a teacher's day - a master class
Autumn crafts are always famous for theirinteresting and unique ideas. Basically, the technique of creating autumn handicrafts appeared thanks to a wonderful place of education - the school. It is here that most often show all the talents of students, children with talent for needlework, who can show their abilities, depicting them in their own applications and handicrafts. Therefore, many popular technologies are very often used inside the lessons to create interesting subjects.
Making an owl quilling for a postcard on a teacher's day - a master class
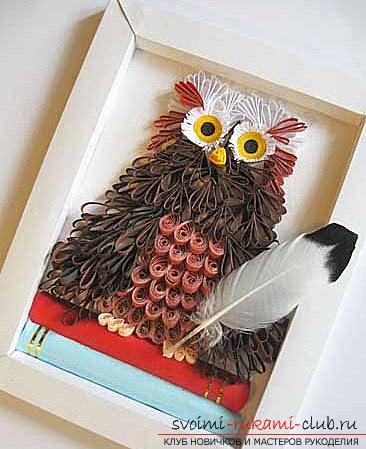
Crafts in quilling technique differ in theirsimplicity, although they require a certain skill, as well as following the elementary rules. For example, creating a bird-owl is a special technique that involves the use of other objects, as well as work on your own ideas. Using an ordinary master class to create an owl, you can form your own idea, which will become a real discovery and will please loved ones. Based on the master class on handicrafts for the teacher's day, we will tell you about the creation of a real owl, based on the techniques of quilling. The owl is one of the birds of knowledge, which symbolizes diligent studies, the desire to receive information and absorb it in oneself. The owl is a calm bird that leads a midnight life. Therefore, very often in hand-made articles it is depicted in the night color. But, our artwork will be different from others and will be a gift for the teacher, therefore, we will depict a scientist owl in bright and interesting colors. Quilling quill turns will be a distinctive opportunity to improve and supplement your own work to realize the element of a complete paper owl. Materials for the owl 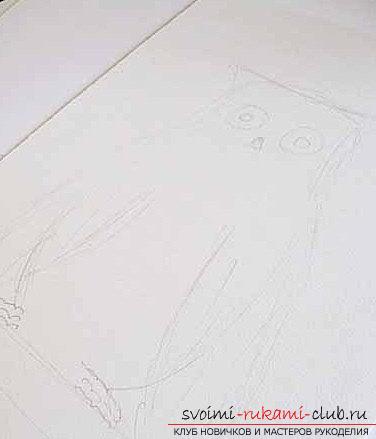 To work on the material, we will need specialtools that will help to recreate a special postcard. They include special paper, as well as ordinary materials for the application. You will also need a quilling tool and all kinds of tools for processing the paper surface:
- Prepare specialized quilling paper
- Also need a special tool for quilling or toothpick
- Take PVA glue
- Prepare scissors for work
- As a basis, we will use dense cardboard
- For decoration we will find a bird feather to decorate the craft
In order to make a picture with an owl,you need to make a substrate-base. To do this, take a tight cardboard. To begin with, we will form a sketch of our future bird. You can make this sketch manually, but it is recommended to use Internet templates, with which this task will be easier. Also, the owl should be put on a pile of books, which will hint at the connection with education. Eye for an owl 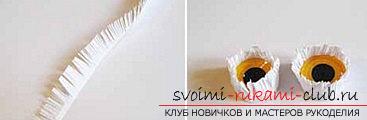 After you have prepared the image of an owl,proceed to quilling. To begin with, we will form eyes - a distinctive element of an owl. You need to take rolls in black (they need to be twisted) and glued, not giving the opportunity to disperse the tips. Thus, the pupils are ready. After, you need to glue the yellow paper strip with glue and continue by winding it onto the finished black roll to fit the sketch. After, we work with a strip of white paper, which we cut into fringes. Then, it needs to be greased with glue and glued to the strip of black and yellow roll. Then, it is necessary to repeat the procedure with another roll. We wait until the material dries and after that - we pryototkryvaem fringe, eyes of an owl we have! Next, we form books. Here we will make the roots for books. Take the quilling paper and make strips in order to form a volume. The spine should be convex. To do this, we use the pencil to process the paper. The edge of the blank should be greased with glue and glued to our workpiece. We form the image of an owl
 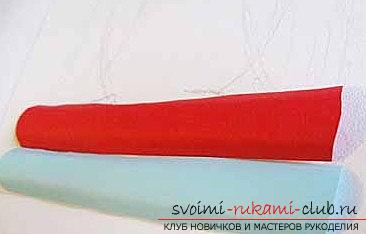 Now, when the owl takes place on the postcard,continue to work on it. We will create six blanks of bead from beige paper. Billet glued to the substrate cardboard and to the spine three on each side of the side. After, we form strips in a brown shade and a dark brown hue. Just brown form in the form of a drop. They are glued to the paws. Then, for the next row, we make gluing by entering the previous row. So we make actions before the end of the breast. Wings of the owl
  After, you need to make wings. For this, we form a queller quilling. Three or four loops will be enough. Strips of paper need to be folded together in one loop, then add the next, then the third and after - leave the end of the strip with a small end. The end needs to be bent over the loop in front, glued. In this way the loops come out. We glue the elements with the eyelets in the lower part, with the same overlapping overlap. Thus, we lay out to the end of the wings. Head of an owl
 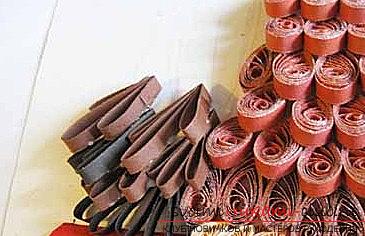 In the head you need to glue our eyes andprepare the feathers. They are formed from loop quilling of white and brown hues. The bill is formed from three triangles of a strip of yellow quilling. We make them in different sizes and paste them on each other, starting from the big one, ending with the small one. Do not forget about the beak. For him, out of a strip of yellow color, we will make 3 tight triangles of different sizes and glue them on each other - from bigger to smaller. We fill the space with loop quilling.
 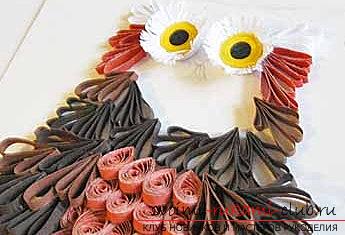 The panel is ready! You can complete the image with a beautiful and voluminous frame.
Comments
Related posts:
 How to make quilling and appliqué for teacher's day? quilling master class
 Making a Christmas tree snowman from paper - master-class crafting quilling techniques
 We make beautiful cards for the teacher's day with our own hands
 The lesson of creating a poodle with the help of quilling techniques for beginners - a master class
 This master class will tell you how to make your own cards for Valentine's Day.