We are building a school suit for a boy with a detailed description and photos.
In this article we will talk about how to sewwith their own hands, a school suit for a boy, using half-woolen or woolen cloth. You can try to make a jacket of the same color material, and pants create a different shade material, which, however, will be in harmony with the color of the jacket. Pockets for a jacket create at your discretion: either overhead or slotted. The lower part of the trousers can have cuffs or be without them. 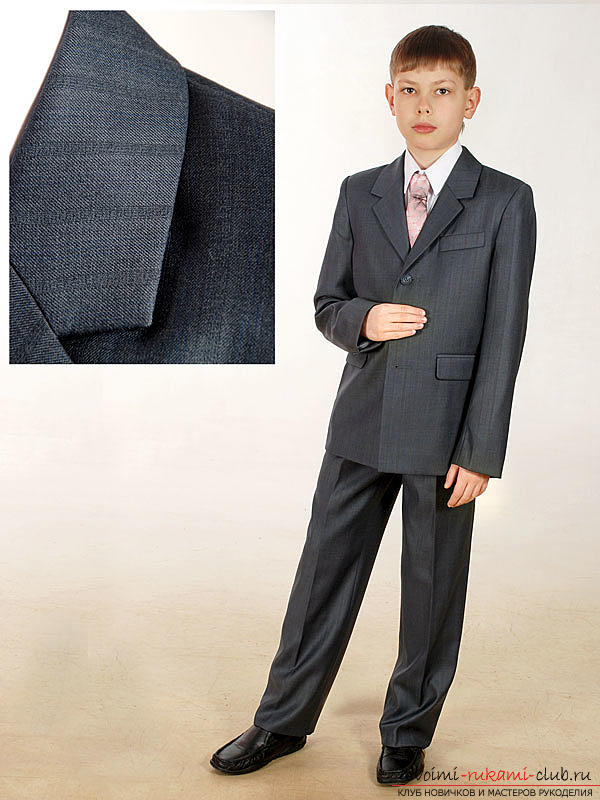 So, we begin. To build a pattern, we make the following measurements: the semicircumference of the chest (thirty-six centimeters), the length of the back to the waist line (thirty-one centimeters), the semicircle of the boy's neck (fifteen centimeters), the length is fifty-five centimeters, the sleeve (length) is forty-eight centimeters , the shoulder (length) is eleven centimeters. Draw a rectangle of ABSD, in which the lines along the vertical AD and BS will be equal to fifty-five centimeters, and the horizontal lines AB, SD, corresponding to the width, amount to forty-two centimeters. We create the depth of the armhole. Postpone down the straight bloodline seventeen centimeters, then put the end of the G point (calculate: one-third of the chest's semicircle + five centimeters for any size): thirty-six: three + five = seventeen centimeters. From the point Г it is necessary to draw a line horizontally until it intersects with the straight line BS, the point of intersection of these lines will be Г1.
 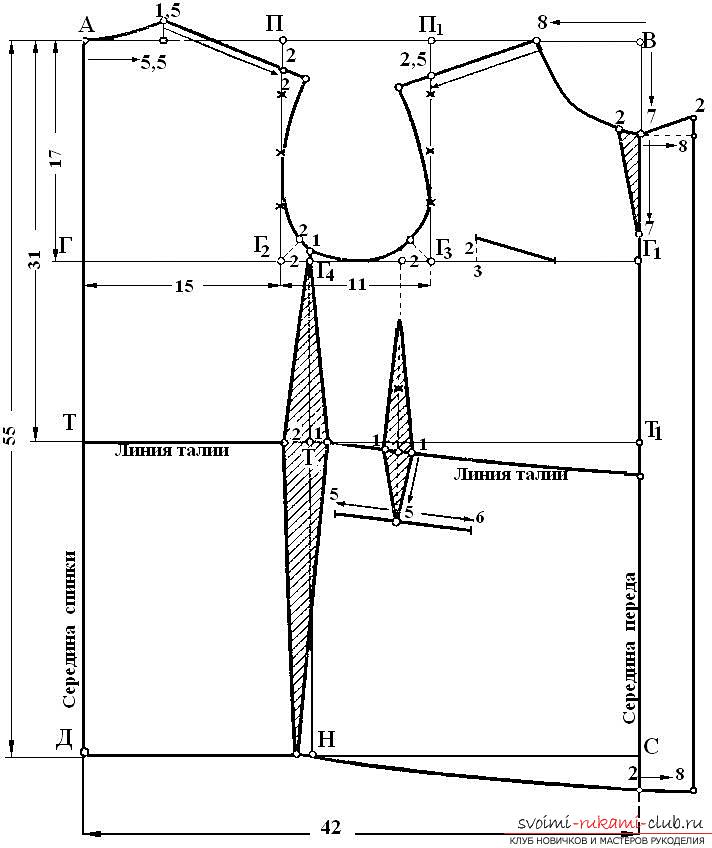 Create a line of waist. Postpone down the straight bloodline thirty-one centimeter, then put the end point T in the end. From point T, it is necessary to draw a line horizontally to the right side until the intersection with the straight BS, the intersection point of these lines will be T1. Determine the width of the back on the pattern. Set aside the point G on the right-hand side, fifteen centimeters, then put in the end the point Г 2 (calculate: one-third of the thorax's semicircle + three centimeters for any size): thirty-six: three + three = fifteen centimeters. From the point T2 it is necessary to draw a perpendicular line up to the moment of intersection with the straight line AB, the point of intersection of these lines will be P.
 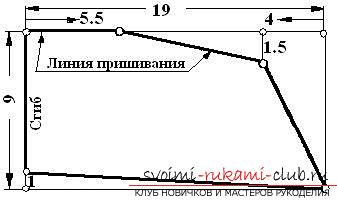 Determine the width of the armhole on the pattern. Put 11 centimeters on the right-hand side of point D2, then put the point Γ3 at the end (calculate: quarter of the semicircle of the chest + two centimeters for any size): thirty-six: four + two = eleven centimeters. From the point T3 it is necessary to draw a perpendicular line up to the moment of intersection with the straight line AB, the point of intersection of these lines will be N1. Determine the pattern on the side line. To postpone two centimeters from the point F2 along the line ГГ1, then put the point Г4 in the end (for any size.) From point Г4 it is necessary to draw a perpendicular line up to the moment of intersection with straight line СД, the point of intersection of these lines will be H. The moment of intersection of the perpendicular line with straight line ТТ1 we will call the point T2 The construction of additional points along the line of the armhole and shoulders The straight lines P1G3 and PG2 must be divided into 4 equal parts.With this additional constructions on the pattern are completed, it is necessary to proceed to the creation of the drawings of the back and front h Write a product.
 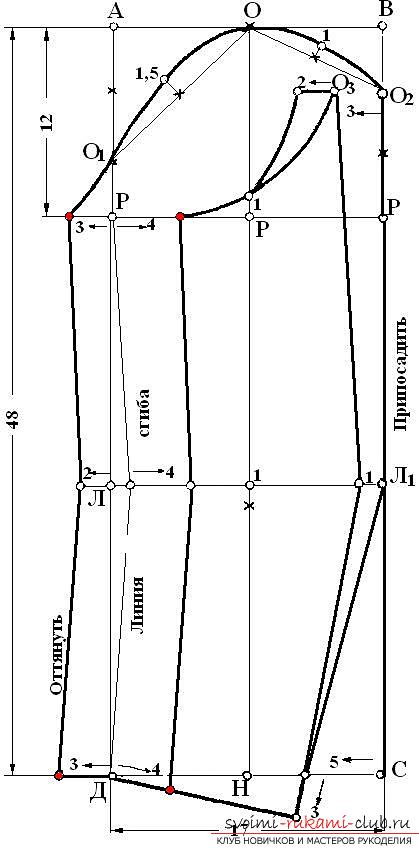 Next, we make the construction patterns for the back of the jacket(neckline, shoulder incline, shoulder line and armhole line, side seam), then create the drawing of the shelf, make out the waist line and the bottom line of the product, do not forget about the darts on the jacket, create the sleeves (Draw a rectangle of ABSD in which the lines along the vertical AD and the BS will be equal to forty-eight centimeters, and the horizontal lines AB, SD, corresponding to the width, are seventeen centimeters). Then create a pattern of the collar. The cutting of the lining elements should be carried out according to the patterns of the parts of the product itself. Then go directly to the very tailoring of the product. 1. Duplicate all elements of the cut. 2. Pockets should be processed. They can be either overhead or slotted. If you select the invoices, they will need to be created on the lining, when using woolen fabric. 3. Carry out stitching on the sides and shoulders. Attach the bottom of the face to the front of the jacket, sweep them. At the top of the bottom, make a landing, stitch from the shelf, while you need to retreat from the edge of seven tenths of a centimeter. Then divide the shovel into 2 sides, iron and sweep.
  4. The lower part of the jacket and its sleeves should be bent on the wrong side and swept. After that, the sleeves can be swept into the armhole itself. Wrapping the sleeve, it is worth making a small landing along the line of the sleeve otra. Then sharpen the sleeve. 5. The lower part of the collar should be folded with its upper component with the sides, carefully combine all the slices, sweep, thus it is necessary to plant the top part of the collar in the corners. When grinding, you should retreat by half a centimeter from the edging edge. The corners of the collar must be cut to avoid seals. Shovchik straightened and ironed. Next, the collar should be turned to the front side and swept along the edge with a roll, starting from the top collar. The completed collar needs to be swept into the neck. Stitch the collar on the side of the lower collar. 6. Prepare the lining parts for connection to the upper part.
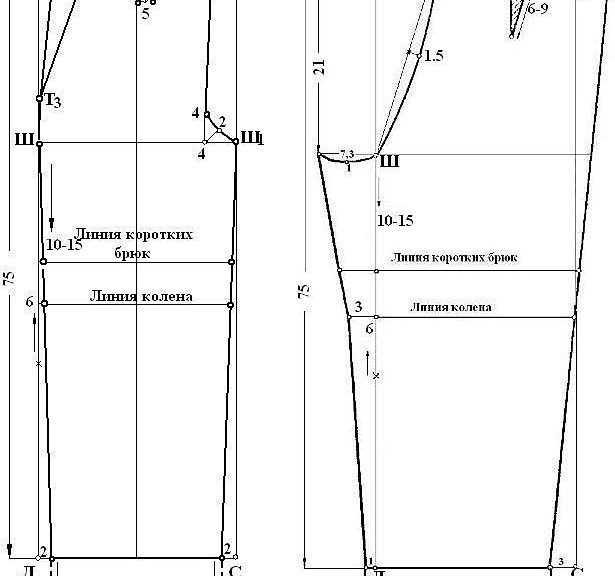
  After the lining is attached to the product,it is necessary to attach the shoulder pads, attach the lining to the sleeves of the jacket, then use the hidden stitch to sew the underside of the underside of the product. On the left shelf, make the eyelets, and attach the buttons to the right side of the shelf. In the end, the jacket should be ironed well. We turn to the manufacture of trousers for the school suit of the boy. To determine how much material you will need for trousers, you need to consider the desired length. Taking a cloth width of 1.5 meters, its length is determined by the length of the product plus another ten to twenty centimeters. To build a pattern, we make the following measurements: waist circumference (thirty-four centimeters), product length (seventy-five centimeters), semicircle of male hips (thirty-eight centimeters.
  1. Create a drawing pattern. 2. Measure the front side and the back along the waistline of the boy, over the hips, knees, bottom, and then check the length of the product with the results that you originally envisaged. 3. Make sure that the step and side lines along the length front and back correspond to each other. 4. Check the mating of the front and back sides of the trousers on the sides on the waist line and the bottom line. 5. It is necessary to check whether the waist line with closed darts and wrinkles is correctly formed. We pass to a pattern of trousers from a fabric. Fold the fabric in 2 layers. In this case, the filament thread of the fabric material passes along a pressed straight line. To ensure the correct connection of slices and other pattern elements after you have cut them, you need to create small incisions to help determine where the beginning, and where the completion of the pockets on the sides.
 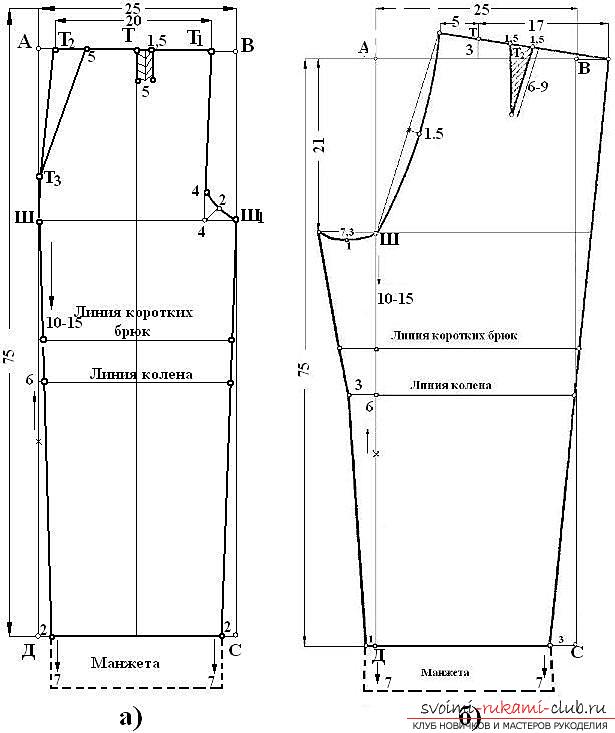 Pants need to be cut without leaving a stock on the seams,because these allowances have already been taken into account when they built the drawing itself. The silks have to be laid along the pressed straight line, darts, pockets on the sides, on the knees and the trouser hem. Each seam that is inside must be carefully ironed on 2 sides. And the seam, passing on the seat, we advise you to stitch twice, to provide him with additional strength. We sew pants of a school suit of the boy. 1. It is necessary to lay the silks along the lines of the folds in the front, and the recesses, which are located behind. Smotyvaem folds, obmytyvayem side seams, as well as the seams of the step and seat. Next, you must carefully iron the dart. 2. We carefully work the lining and attach it to the front of the trousers. 3. You need to do the processing of pockets. 4. To spend grinding the breeches with a seam, the width of which is about one centimeter. Then iron the shovchik. 5. Carry the trousers on the step seams, combining the incisions. In this case, the width of the shovchik will be about one centimeter. Then iron the shovchik. 6. To process the bow of trousers. 7. Spray the seam of the seat of the trousers. We advise you to stitch it twice to provide it with additional strength. Stitching the seams, the seat and the steps are the same. 8. With the help of corsage braid, the belt should be treated. It consists of 2 parts (the left and right parts separately). 9. We sweep the lapels to the front part of the upper line of the trouser details with the front side. We put the waistband face down, then we need to sweep it and attach it seven millimeters from the cut line. 10. Process the bottom of the trousers. Attach a trouser strap that will help them last longer. 11. Create a loop on the belt and attach a button. 12. Press the finished trousers along the pressed line in front and behind. All! Our school suit for the boy is ready!
Comments
Related posts:
 We build a pattern of a knitted dress for the full woman by own hands, using a step-by-step description with free photos.
 Make a simple dress pattern for a girl with her own hands, using a step-by-step instruction with a photo and description
 How to tie a lamb with an amigurum crochet: a master class with a detailed description and a photo
 Pattern of a man's sports suit with his own hands with a description and a photo.
 We knit hats with knitting needles for the boy according to the scheme with the description (photo)