
Crafts by September 1 with their own hands to school and kindergarten (38 photos)
Every year before the start of September 1, everyone startsfuss and get ready for the holiday. This day is significant not only for teachers, but also for the children themselves, whether it be a school-age child, or one who goes to kindergarten. For parents, September 1 is a difficult date, because many have their child going to school for the first time on this day. 


 In order to create a festive mood and plunge into the atmosphere of the day, we offer to arrange joint DIY crafts with the children.


 Content
Bookmarks September 1 for kindergarten
The most basic way is interesting and useful.to spend time is to make colored bookmarks together with your own hands. They are done quite quickly and simply. To get started, we need the following materials:
- Colored double-sided cardboard.
- Plain colored paper.
- Paper cutter.
- Scissors.
- PVA glue.
- Additionally, you can buy beads for decoration.
 Bright bookmark for a book with our own hands. When we have prepared everything we need, the progress will be as follows:
The bookmark is ready. It can be made of different shapes and sizes, as well as use your favorite colors and animals.
Crafts from stones by September 1
It's no secret that children love to collectvarious trinkets, which include pebbles. In the future, they can be used as a decor, after working a little on ideas, using ordinary watercolor paints and a brush.  A smiley stone painted with paints. On them you can draw various faces, make them a funny little animal, or just an abstract picture with all the colors of the rainbow.
  Strawberry-stone is painted with their own hands. Such crafts of kids can be used as decor in a children's room. You have no idea how much they will cheer up the child during the work process.
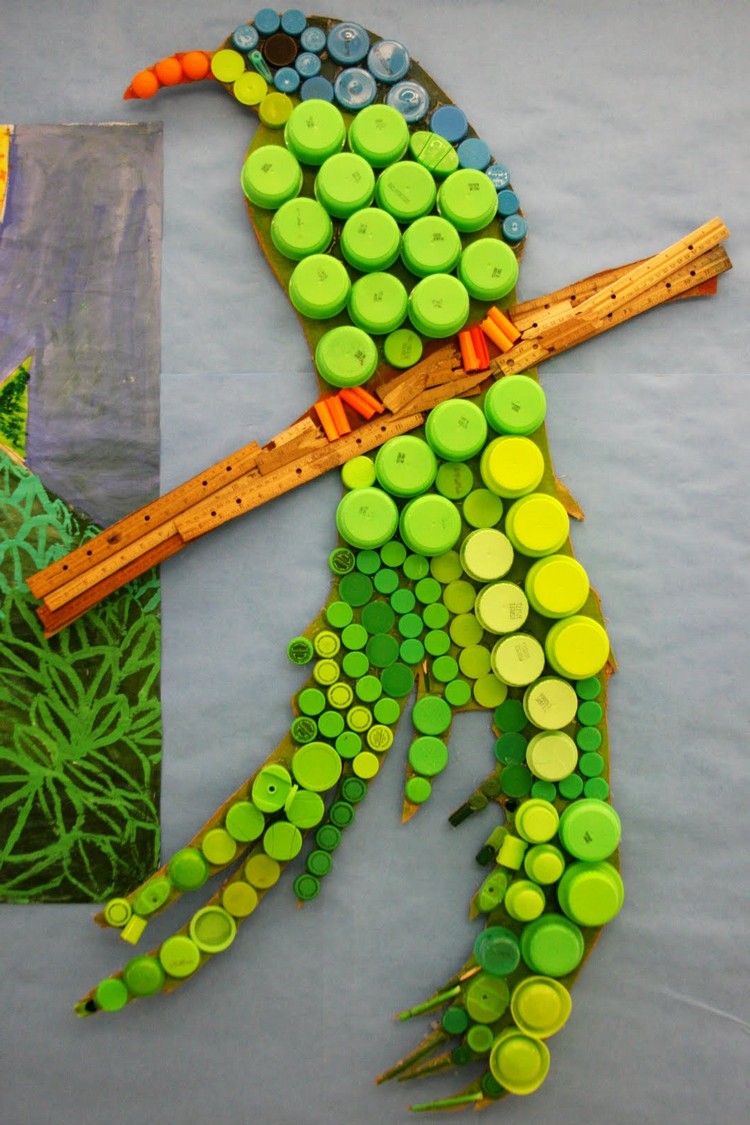
Crafts from plastic caps in kindergarten
Agree that at home there will always be such trifles as a plastic bottle and a lid. Do not rush to throw them away, because it is from them that you can get a great DIY craft.  Crafts from plastic covers For work we need:
- Cardboard.
- Colored paper.
- Plastic caps.
- Paints and glue.
- Various decorative ornaments.
 Children's application of plastic covers With the help of these materials we can create with our children the images of unique animals with our own hands.
  Beautiful animals from the lids with their own hands
Pencils by September 1st to school
A fairly practical and uncomplicated thing that is quickly done and in the future it can be functionally used to store pencils and pens.  Yellow pencil can
Our pencil box is ready. As you can see, it is done quickly and fun. And most importantly, in the future, your baby will definitely come in handy during the school year.
Bookmark for a student
Each of us knows that at school we usemany books and textbooks, through which our knowledge is replenished. For convenience in reading books, a child can independently make a bookmark for himself. There is nothing complicated in this process, you just follow simple step-by-step instructions.  DIY bookmarks We will need:
- Cardboard and pencil.
- Scissors and glue.
- Ruler with felt-tip pen.
- Beautiful decor for the finished product.
Progress:
 Using a ruler, draw three smooth squares
 Hatching the side triangles in the figure
 Carefully cut off the shaded parts BThe end result should be a square that has adjacent triangles. What we have will be a template for subsequent bookmarks.
 According to the template, transfer the drawing to cardboard. After that, carefully draw the lines along the edges of the triangles that should adjoin our square.
  The line marks the triangles
 Glue the square cut out of cardboard to our blank
 Need to fold the triangle inward
  Apply glue to one of the triangles and glue
  The triangle that remains is glued on top
 DIY bookmark
The bookmark is ready and can serve its purpose. Such an artwork will not take much time, but the result will be quite interesting and practical. Here's another .
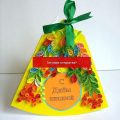
Greeting card "Bell" for teachers on September 1
On the day of September 1, thematically will make a card in the form of a bell. Moreover, in the middle you can stick a photo of the class and write a wish. So, to get started, prepare:
- Thick enough paper in white, yellow and orange. At will, you can choose colors individually.
- Scissors and office knife.
- Glue and stapler.
- A small piece of red ribbon (you can use any other color) to create a bow.
- Ruler and pencil.
 The necessary materials for the work Progress:
 Print the finished pattern to get started
 Attach the pattern and carefully cut the pattern
 Correct the edges of our postcards
 Fold the orange paper in half
  Glue the orange paper to the yellow
 Prepare a maple leaf
 Ready-made beautiful postcard by September 1 The postcard is completely ready, just arrange it in the middle. Alternatively, you can compose a beautiful rhyme by adding it with a small thematic pattern.


 As you can see, there are many crafts by September 1 toschool and kindergarten, which you can do with your own hands, while not spending a lot of time and effort. Each of them will become not only a beautiful creation of your child, but also a practical thing that you can use every day. We also recommend viewing:
Do you like the article? Share on social networks!
Comments
Related posts:
 How to make a postcard in the technique of quilling on September 1 with your own hands: photo-lesson
 Ideas of crafts for September 1. A gift to the teacher with your own hands.
 How to make your children funny crafts for September 1.
 Crafts on the theme of spring with their own hands. Spring day in kindergarten.
 Children's crafts, handicrafts for the school with their own hands, crafts made of natural materials, autumn crafts, crafts made of dough with their own hands, how to make a grassy little man, a school pencil case with their own hands.