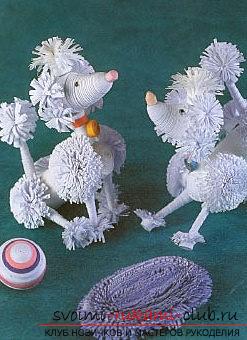
The lesson of creating a poodle with the help of quilling techniques for beginners - a master class
Making a dog poodle is extremely simple. You can change the size of the strip for quilling, to make a poodle smaller, or more. For work, you will need to use wide strips.
The lesson of creating a poodle with the help of quilling techniques for beginners - a master class
 A poodle consists of a bowl - which is made bya tight coil in diameter by 2.5 millimeters, which is prepared with a strip 3 mm wide in the circumferential coil. For the bone it is necessary to use four cup-shaped loops, each of which must consist of a strip of the whole composition for a width of 3 millimeters. Of these, we will form two versions of the balls. They will be connected using a tube, using a quarter of the strip at a width of 70 millimeters.
 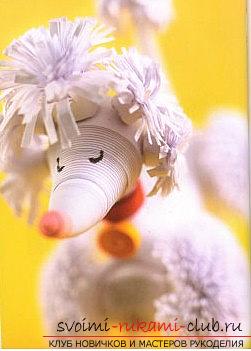 Materials for a poodle For work you need:
- Strips of white in the number of three pieces (width - 3.5 millimeters)
- Stripe by 15 millimeters - twelve strips per 10 millimeters
- Strips of 8 mm.
- Strips 5 mm. (3 pcs).
- 5 strips per 3 mm. (wide, dark green)
- 3 mm strips (scarlet color)
- 3 mm strip (pink color)
- 2 mm strip (dark yellow color)
- Gel pen with a black stem
- Straw
- PVA
- Scissors
Head and neck 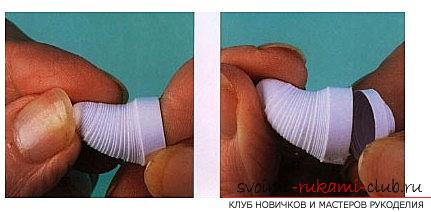 To form the head, we need to take threestrips 5 mm and make the shape of a curved cone with a height of 25 mm. Next, using three tapes to 3 millimeters, we form a coil in the form of a cup image. We paste this coil for a curved cone. The nose is done with a pink tape, using a width of 3 millimeters. We form a cup-shaped version of the revolution. We attach to the head.
  To get the neck, you need to fold the strip inwidth of 15 mm until the diameter of the strip itself becomes equal to a parameter of 7 millimeters. It is necessary to trim the remains of the strip and glue the tip of the nose. Then, to form a collar, you need to wrap half the strip of scarlet color with a width of 3 millimeters around the neck, retreating at the same time 2 millimeters in the upper row. Medallion, trunk
 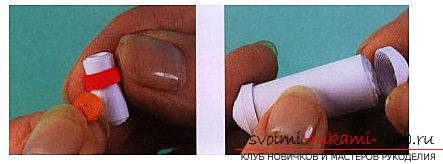 The locket must be tightly folded outdark yellow tape at a width of 2 millimeters. Supports to the neck, under the dog and her collar. Next, do the trunk. for this it is necessary to take strips in width by 3.5 millimeters and wrap them around the handle. At us the variant of a ring coil on a diameter of 1,5 centimeters will turn out. We make a coil of a cup-like type with the same diameter of strips, the width of which reaches 3 millimeters. It is necessary to glue our turn to the other side of the tube. The same turn of glue on the other end. Tail, ears and pom-poms
 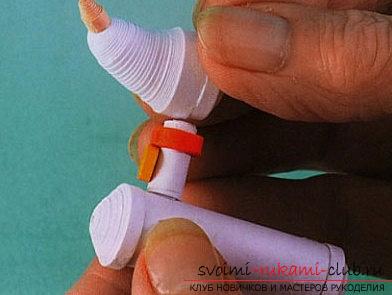 It is necessary to glue together the elements and then proceed totail. Here it is necessary to take a fourth of the strip at a width of 10 millimeters and prepare a long version of a thin, conical coil in a height of 3.5 centimeters. The stem for such a revolution is a straw. Such a straw is also applied glue inside the tail and its surface. The ponytail is attached to the trunk. In the same way, make four legs for the dog, cutting off the edges in the diagonal, so that they are better fixed to the trunk. We cover the fringe tip. Cover the foot of the foot with an adhesive backing. We distribute the fringe evenly for the four legs and glue them to the trunk.
 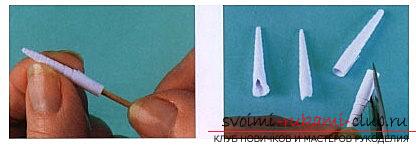 Make ears from fringe by strip with a widthin 10 millimeters, dividing it into four pieces. We form each part as a pompom, glue on both sides to the head. Also, we make such pompons for the tail part in an amount of two pieces. Then, we make a fringe on the strip and make another pompon to fix the shoulder of the dog. Each shoulder is decorated with a single pompon. Then, we form two more pompoms to fix them to the back of the trunk.
 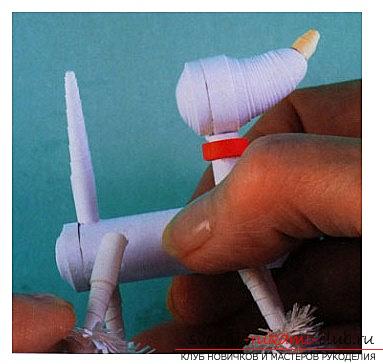 End of our poodle Next, you need tocut the fringe, using a strip in the width of 15 mm, along the way tightly folding it. We glue the turn for the top of the product, slightly swirl our fringe. Draw the paint with a gel pen.
 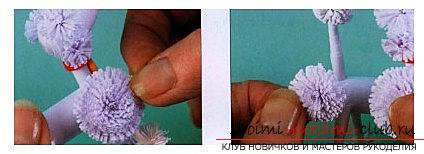 Our poodle is ready!
Comments
Related posts:
 Weaving baskets for beginners step by step. Baskets own hands the master class
 Turkish tourniquet from beads master class video knitting equipment
 Marigolds from beads master class creating a bouquet (video)
 Herdan bead workshop creating unusual decorations (photo)
 Mimosa from beads master class creating gentle colors (photo and video)