Create an amazing owl of cardboard with your own hands
Surely many of us after the weeklytrips to the dacha are empty cardboard boxes, it is very difficult to find a destination. Many use them as fuel for a dacha oven, while some even discard cardboard boxes that have become unnecessary. In this article, we will tell you how to use fantasy to give a second life to a seemingly normal and time-consuming box. First of all, stock up on all the necessary materials for work. We will need:
- Cardboard from boxes (the more, the better)
- Old spoons
- Buttons
- Scissors (or knife)
- Pencil
- Glue
- Rope
So, let's go directly to the processmanufacture of hand-made articles. 1. Take one sheet of cardboard and divide it into parts, leaving for further work the graphic part (put the rest of the cardboard aside and do not do anything with it). 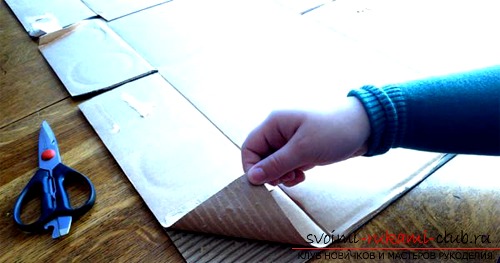
 2. Cut out several strips of graph paper (if you are going to make a big owl, cut out strips measuring 4 * 140 cm, 2 strips measuring 4 * 45 cm, and one strip 4 * 6 cm in size, if you are making a small owl, cut one strip 4 * 45 cm, two strips 2 * 20 cm and one strip 2 * 3.5 cm). Also prepare two pieces of cardboard (large if you are going to make a large owl, and small if you are going to make a small toy), two buttons and one spoon corresponding to the dimensions of crafts sizes. 3. Apply to each of the strips PVA glue exactly in the middle, and then start to form the cylinders - for this, twist the strips and leave them to dry until the glue dries completely.
 4. How to make a beak? Yes, it's very simple: before twisting one of the cylinders, insert a spoon inside it, having bent its end 90 degrees, as shown in the figure.
  5. After the adhesive has completely dried, you can proceed to the final stage - gluing all the parts. To begin with, attach the beak with the PVA glue to the trunk (the largest cylinder), as shown in the photo below.
  6. Glue the eyes-cylinders, after attaching the pupils-pupils to them.
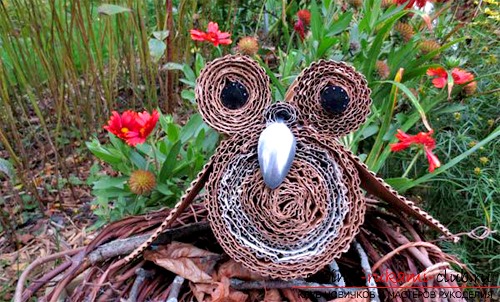
  7. Cut out the remaining cardboard or take pre-prepared pieces of cardboard and attach them to the sides of the craft - now our owl can fly. So the finished article looks like: Here is an original owl we got from cardboard. It is not difficult to make it, but it looks very funny. Good luck with your creative ideas!
Comments
Related posts:
 Create funny hand-made cardboard for children with their own hands
 How to create crafts from cardboard with your own hands
 How to sew an interesting pillow toy owl. The process of sewing an unusual pillow with your own hands, the result of you will be very surprised
 We create a mouse-tilde with our own hands
 Create a beautiful snowdrop with your own hands