How to create handicrafts in technology, detailed instructions, diagrams with figures and photos of work, lessons on the creation of postcards for the New Year in technology to be eliminated
You like paintings, but do not know how to draw? And maybe you adore handmade embroidery, but there is not enough time for a big project? For you there is a great solution - to isolate. This needlework is also called nitcrography, thread graphics or thread design. This kind of decorative and applied art is basically a graphic technique for obtaining images on various solid bases, for example, cardboard. The prospective date of his appearance is the 17th century. There are several variants of the name in different languages. "Embroidery on paper" in English means embroidery on paper. You can also meet "paper embroidery", or sometimes "Form-A-Lines", which can be translated as a form of lines. In French, this needlework sounds like "broderie sur papier", in German - "pickpoints", which in translation can be called a dot pattern. According to one version, this weaving variant was invented by weavers in England. With such an unusual method, they created sketches for new patterns of patterns for fabrics. On the carnations, which were driven into the planks, the strings were tightened in a certain way. In this way, wonderful crafts were produced, unusual and elegant, well suited for decorating a house. Over time, the technology has been improved, it has become increasingly popular, and instead of boards, more convenient base options have been used - cardboard or thick paper with pre-made holes. In addition to very beautiful and original handicrafts, the isoniti technique develops an aesthetic and artistic taste, contributes to the formation of a creative look at the surrounding things. These exercises have a positive effect on the development of assiduity and motor skills of the hands, the latter is very important for the development of children. This kind of creativity, such as the creation of artifacts of isonics, will contribute to the diversified development of kids, because you will need to use not only pens. They can choose the form of the craft, the colors they like and think about their combinations. In this technique, both children and adults can create as large products, for example, panels, landscapes or even portraits, as well as miniature handicrafts: postcards, bookmarks or covers for notebooks and many other options. Materials and tools for creating products in technology
- Immediately the basis for embroidery. This can be a sheet of cardboard or special velvet paper.
- Required subjects for work in this techniquethere will be an awl or an English pin. The choice of the tool depends on the thickness of the base, if you choose a thick cardboard, take an awl, for more thin materials, English pins (for a bead at one end it's very convenient to hold).
- Scissors. As in any other needlework, the main requirement for them is sharp sharpening.
- Compass. Helps draw a circle for circuits.
- Pencil. Its shades or hardness are not particularly important. The main thing is that it must be sharpened. This will leave even, thin and clear lines.
- Ruler. Lengths of 15-20 cm will be enough to work with children or to create small crafts. If you want to create a large canvas painting or a panel you will need a ruler with a length of at least 30 cm.
- Needles. The choice of needles will depend on what thread you choose to use.
- Thimble. It will be needed if you plan to engage in technology with children. With it, children's gentle fingers will be protected from needle pricking.
- Glue or narrow adhesive tape. After the completion of individual parts or motifs, the thread must be secured on the wrong side.
- Clip clerical. It is very convenient to use to fix the pattern on the base before starting work (piercing holes). Such tools reliably fix the pattern and material of the base and do not allow it to move.
- Substrate. It is necessary to protect the work surface. Creation of hand-made articles in technology is very inconvenient to carry out on weight. In order not to scratch the working surface with needles, you can put a piece of thin polystyrene or thick linoleum. You can use a cork tile or a towel folded several times.
- Threads. You can use materials such as mulina or iris.
As for many types of needlework, for crafts inThe technique of isoiniti all begins with a basis. Cardboard used in children's art is very suitable for this type of needlework. It is painted in different colors (one side is gray, the other is red, blue, green, etc.). The density of this material allows you to make accurate punctures at a minimum distance from each other, and pulling and tightening the threads will not break through the holes. Products will turn out even, neat and beautiful. For the background color, you can choose not only the finished shade of cardboard. Very unusual will look colorful pictures or even wallpaper, pasted on a cardboard. If you want to add luxury to your work, use velvet paper. For the convenience of work, it is also better to glue it to the cardboard, because it is quite current. Another important component of the beautiful work will be the thread. They can be shiny or matte. The first option is the most popular. One of the most popular threads are the mulina. They are bright, have many shades and are easy to handle and work. It is important that the threads are evenly colored and have an equal thickness. The needlewomen also use iris for such crafts. Woolen threads do not have the proper characteristics. They shake and do not have bright enough shades. They are better used for training. Although, perhaps your creative idea will find use and such materials. Those who want to learn how to create artifacts in technology, it will be enough to master 2 techniques - "filling the corner" and "filling the circle". All other forms in the form of an asterisk, a square, a triangle, an oval, a spiral, an arc and a petal (otherwise called a "drop" or a "tear") will be derived from these two .
The basic methods of working in technology to eliminate
Below are the schemes, where tsiferki show in what sequence to make punctures and stitches. Fill the corner On the wrong side of the base we draw an angle (the angle of inclination of any). 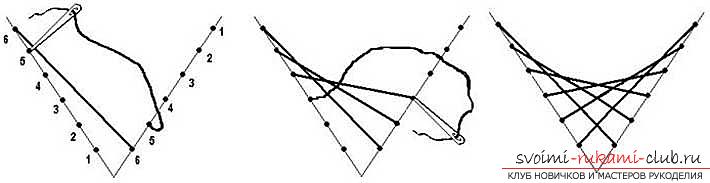 Each side is divided into 6 identical parts. Use the ruler. The width of the step can reach 5 mm. We denote the vertex of the angle by 0 and number the remaining points, as shown in the figure. We make holes with an awl or a pin at all points, without affecting the zero point. Now we take a needle thinner than the tool that made the punctures and, following the scheme, fill the corner. We begin work from the wrong side. In Figure 1, the arrows show the filling of a straight, sharp and obtuse angle. All angles are carried out the same way: on one side the thread runs from the edge to 0, on the second from 0 to the edge. Figure 2 shows that even if the sides of the angle are not equal, the number of holes should still be the same.
 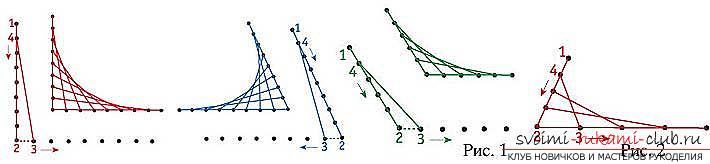 If you want to make a part without lines,limit the contour or avoid a straight-shaped element, make the first stitch (from hole 1 to hole 2) with a shift to one hole forward from the corner.
 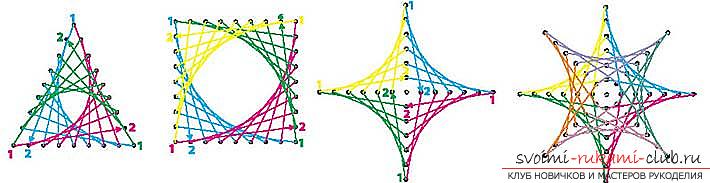 Fill the circle. Draw it. For training, a radius of 5 cm will suffice.
 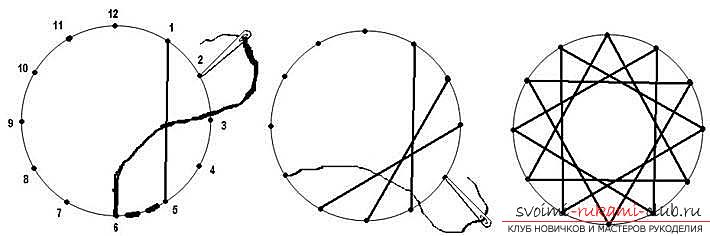 Now divide it into 12 identical intervals. When you master all the tricks, you will be able to make more holes through equal parts. It is important to observe only one condition - the number of points must be even. Than there will be more, the work will be more interesting. We number the points, pierce the holes. Fill the thread circle, as shown in the diagram. The length of the stitches can be different. The longer they are, the circle will look more complete, and the empty space in the cents will be smaller.
 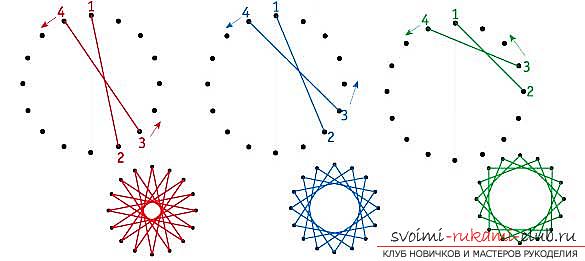 The procedure will be the same as inthe previous case. Output the thread at point 1 on the front side. Then make a stitch and go through the haze to point 2 on the wrong side. Now, from the inside to the face, draw the needle at point 3 and make a stitch at point 4 on the front side. Then we proceed similarly. From each hole, as a result, 2 threads exit. On the reverse side there will be only short broaches, and on the front side a beautiful star with lots of "rays". The figure shows how the shape of the "rays" depends on the width of the step (the number of points between the stitches). To create an additional accent, any closed contour can be embroidered in several approaches, by selecting stitches with different lengths for them. Those. at each such stage the step length will be different. In the figure below, these approaches are indicated by Roman figures.
 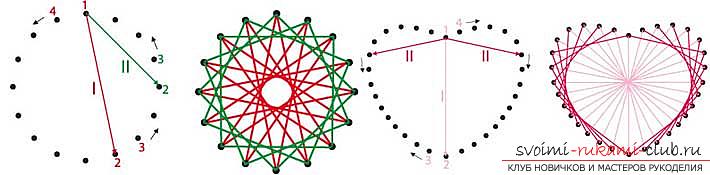 You can combine the rules for embroidering corners and circles, dividing the latter into sectors. The vertex of each corner is the center of the circle.
 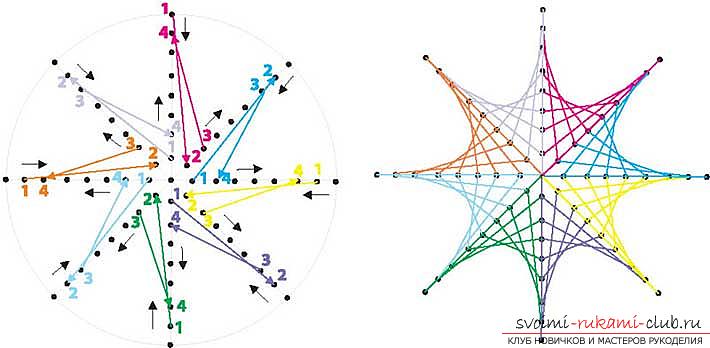 But the option, when the top of the corner is the holes around the perimeter of the circle.
 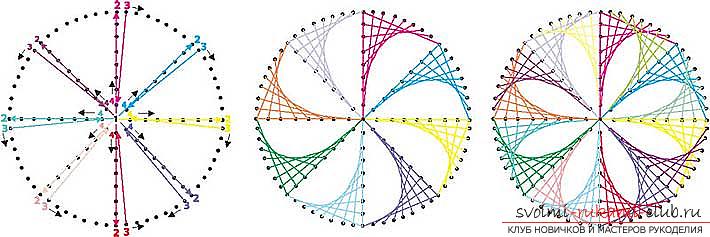 You can stitch it for 2 visits. First, every first sector angle, and then every second corner. Fill the arc, spiral and petal They are filled in the same way as the circle. For the arc, the pitch of the step must be less than half the arc. The smaller the width of the step, the thinner the arc will be.
 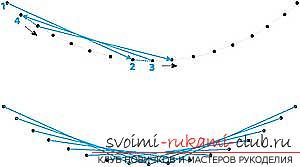 The spiral is filled, moving towards the end in one direction (in the figure indicated by arrows). We begin work at the first point of the revolution. The length (step) of the stitch will be from 3 to 5 holes.
 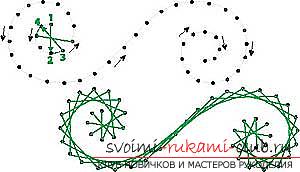 Petal. We start and finish work from an acute edge. The length of the stitch is best taken along the length of the tangent to the bottom of the element.
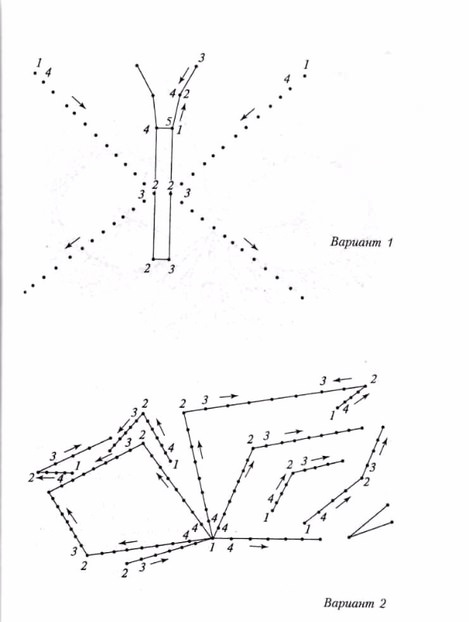
 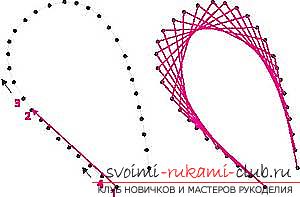 If it is necessary to embroider a fan (so the flowers, their petals and buds are stitched), then "triangle stitching" is applied.
 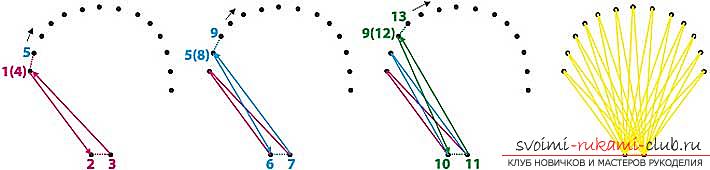 A few tips for beginners To lengthenthread, you can simply attach a new thread from the wrong side or tie a knot on the wrong side to the old thread and bring it to the front. For convenience, do not choose long threads. This will avoid its entanglement. And in the beginning of work and in the end it is necessary to fix the thread carefully. This can be done with the help of PVA glue or narrow adhesive tape. Similarly, it is necessary to fix all the nodules when adding threads. In order for the pattern to be clear it is necessary to pull the thread, try not to overdo it. In this case, you risk deforming the cardboard. Upon completion of the work, the handicraft can be glued onto the white cardboard of a larger format with the wrong side. This will hide the wrong side and at the same time create a frame that can be decorated and turned into a frame. Postcard with a snowflake in technology to fade away
 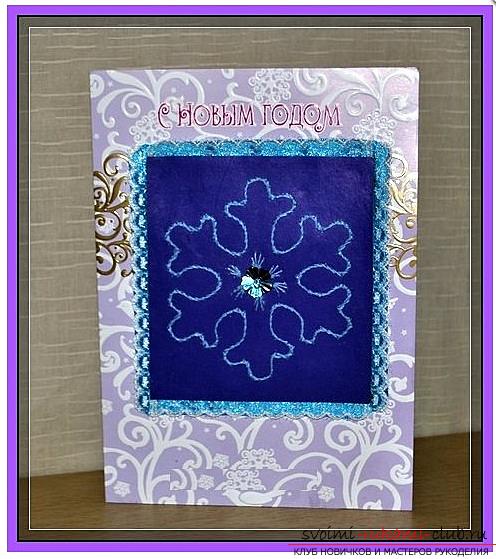 It will take:
- A blank for a postcard made of cardboard;
- The basis for embroidering snowflakes (in this lesson cardboard blue);
- A thick pin for making holes;
- Needle for embroidery;
- Threads of blue color;
- Scissors;
- Glue;
- Elements of decor for decorating postcards.
This simple embroidery scheme will be evenbeginner needlewomen. The direction of work in the figure is indicated by arrows, and the beginning of the work is highlighted in a blue circle. We embroider all elements in steps of 1-4. This means that the stitch will run along the front side from point 1 to point 4 (through three holes). First, print or draw a snowflake pattern. After that, having combined a color basis and a template, fix them, that during drawing holes according to the scheme the drawing is not displaced. 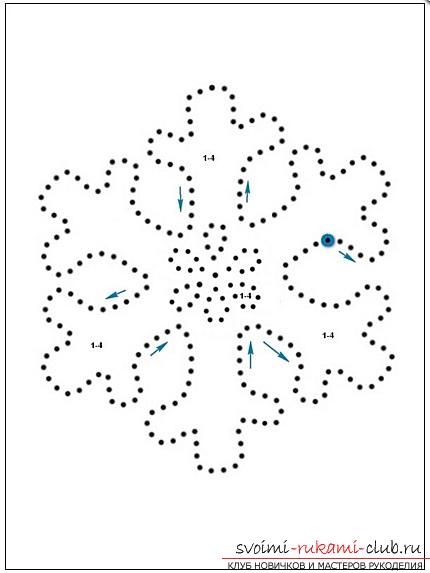 After that, we embroider a snowflake with a blue thread, using the information obtained above.
 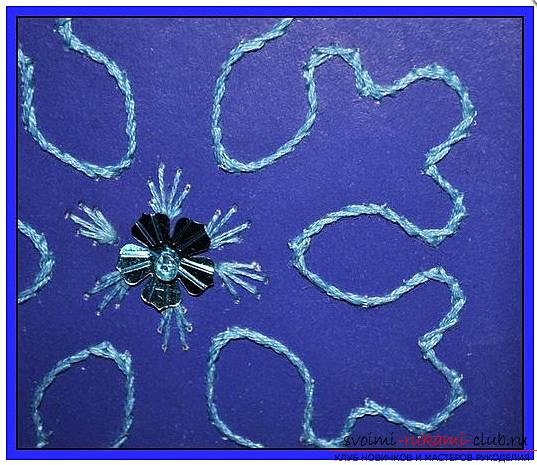 It remains only to paste it to the base of the postcard and decorate it. A postcard with a snowman in technology is easy to remove
  You will need almost the same materials and tools as for creating a snowflake.
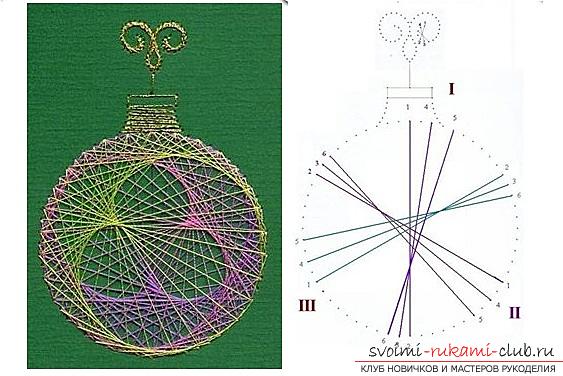
 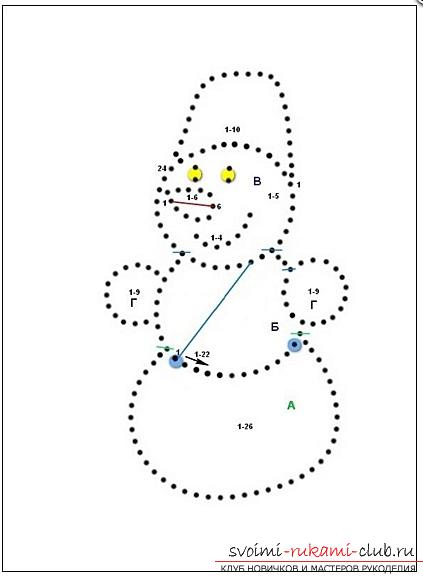 We begin by embroidering the largest ball. It is indicated on the diagram as A. We perform the embroidery in 1-26 steps. The diagram shows two points in green. At work we skip them. For the middle ball of the torso of the snowman, we use step 1-22. It is designated as B in the figure. We start the work from the mark 1 and finish at the point marked in blue. We cross all crossed out marks. The last ball is the head, we embroider with step 1-5. It is indicated in the diagram with the letter B. The pens are embroidered separately from the trunk, using step 1-9. We embroider a bucket according to the scheme, like a petal. Start at point 1 and end at point 24. Use step 1-10. For the mouth, use step 1-4, for the spout 1-6. In the diagram, the eyes are indicated in yellow. They can be made from half-beads, beads or sequins. Now it remains only to decorate this pretty snowman with a postcard. Christmas ball embroidered in technique Several bright shades of threads are used for the next craft. The diagram details the sectors for embroidery in different colors.
Comments
Related posts:
 Schemes to isolate: lessons for beginners (photo)
 Isolate outlines with numbers for beginners (pictures)
 Isolate for beginners a scheme with the numbers heart for the holiday
 Isolate for beginners a scheme with numbers of flowers step by step
 Izon for beginners scheme with numbers butterfly (pictures)