
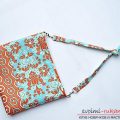
How to create an original fabric bag with your own hands?
 So, we will need:
- beautiful textiles of dense texture;
- lining fabric;
- a piece of satin cloth;
- cushion matter (you can use pellon);
- fastening on magnets;
- tools in the form of a sewing machine, iron, scissors, threads, candles.
We make a pattern:
- two outer parts 40x28 cm of textile;
- two similar parts from lining and cushioning materials;
- three elements 18x7.5 cm: one of them is made of textiles for the outside, the second - satin, the third of the cushioning material;
- three elements 6.5x60 cm: two of external textiles, the third of the lining base is for the future belt;
- three 13x18 cm pieces: one of the cushion base and two of the lining (inner pocket);
- three elements 25x12 cm: one of the cushion base and two of the lining - this is a future double pocket;
- two elements in the form of a trapezoid with sides 43x20x35 cm from satin (ruches)
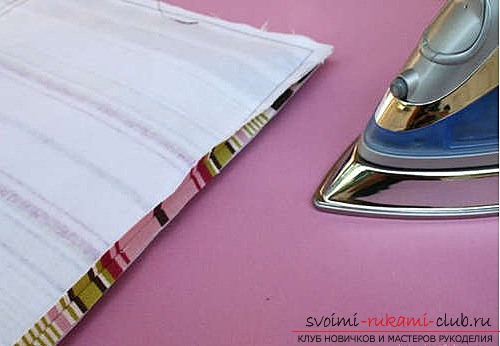
Sewing bags step by step  1. We release the desktop from all unnecessary. 2. We connect to each other one piece from external textiles, from cushioning fabric, to a belt, inner and double pockets. We'll iron them all together on the wrong side.
  3. We light the edge of trapezium parts with a lighted candle. 4. We fix a long stitch on the sewing machine and we scribble, stepping away from the edge on both sides of the parts by 2.5 cm. Both at the beginning and at the end the thread must remain long, as it will be pulled together.
 5. We pull the thread, taking hold of its beginning: so the assemblies are obtained. 6. On the elements of the outer textile we make the pin-holes of the middle of the long top and bottom, and the elements of the gasket base must also be attached. We put ruches from the satin on the textile so that their bottom is in the middle of the pin.
 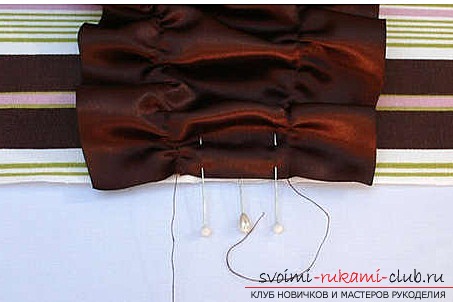 7. We put ruches along the length of the part, then fix them with pins so that they do not move out of place when stitching. 8. Sew the ruches closely located two lines.
 9. We put both external elements together on the face, fix it with the help of pins and sew on all sides, except for the upper part.
 10. Iron the seams and corners. 11. After making 5 cm from the corners, make bottom marks and sew them.
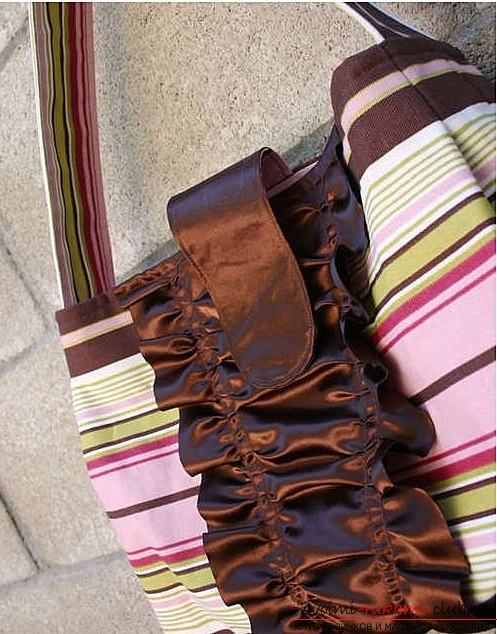
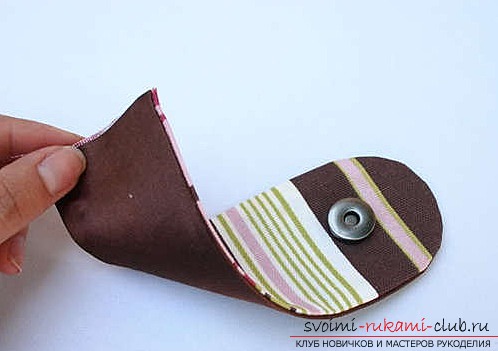
 12. We retreat from the top of the front side 8 cm and fix the place of the fastener. 13. Make a neat cut, into which we insert the clasp. 14. For the Khlyastik, we connect the details from the satin, outer textile and cushion material (at the location of the fastener) to the front side, sew them all together, leaving the underside unscrewed, through which we turn and then scribble the hood on the face.


 15. Belt parts are folded all together and ironed. Folding together the wrong side and bending the edges, ironing, and then we sew the long sides of the belt.
 16. Apply the details of the main pocket to each other and scribble, leaving the bottom unclosed, turning it over your face. Also sewn a double pocket.
  17. Both pockets are fixed with pins in the center of the lining and are double-stitched, while the top remains free.
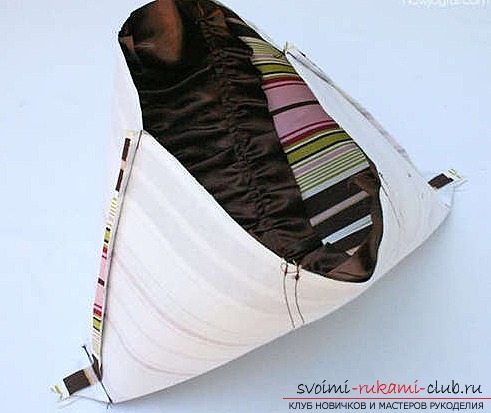
  18. Both elements of the lining are stitched together, leaving a gap of 15 cm for eversion. 19. Zigzag we scribble the corners of the lining. 20. Apply the hood at the top of the product and fix it. 21. Sew the straps. 22. Sew the lining with the outer part of the bag.
  23. Approximately 2 cm bend, make an indentation of 5 cm from the seam and a line of 7 cm 24. In the left gap of the lining we turn the bag.
  25. Lining we put inside and we sew the top of the bag on all sides. The product is ready.
Comments
Related posts:
 We make a fabric bag with our own hands
 How to make a blanket with your own hands in the patchwork technique, as well as decorating the dresser with the help of cloth.
 At any time and in any place you can create funny crafts from potatoes yourself.
 Learn how to sew a laptop bag with your own hands, you can by reading the article
 New Year's snowman with their own hands, how to make a snowman, New Year's crafts with their own hands, a snowman made of polymer clay, a snowman made of cloth, a snowman made of light bulbs.