
We create an original hairdress shell with our own hands. Quickly and efficiently
A shell is a classic hairstyle for long hair. It does not go out of fashion for many centuries and always looks great, if it is, of course, done correctly. Stacking will never dissolve at the most inopportune moment, but will remain in its original form before returning home from the solemn event. If you naturally straight or wavy long hair, haircuts with your own hands are completely capable of changing your style. Even if in the daily life a preference is given to a sporty or daring image (with naps, a slight "mess" on the head), one can always surprise the people around with a classic shell, leaving an indelible mark in their minds. Master Class on the creation of the shell It will be required:
- Several combs of different shapes (for combing and combing individual strands on the crown)
- Pins of invisibility
- Hairpins are black so that they are not noticeable in the hair
- Hairdressing terminals for fixing individual strands
- Mousse or hair for medium fixation hair
- Varnish for fixing the result and durability of the hair.
1. Begin the creation of a seashell's cocktails with combing hair. Pre-washed and dried strands are treated with foam, which also needs to be dried by a hair dryer. 2. All hair should be divided into two zones. First you need to separate the necessary part of the hair on the vertex and pin it with clamps. Strands will not interfere with the creation of the basis of the hairstyle. You can immediately make a haircut. 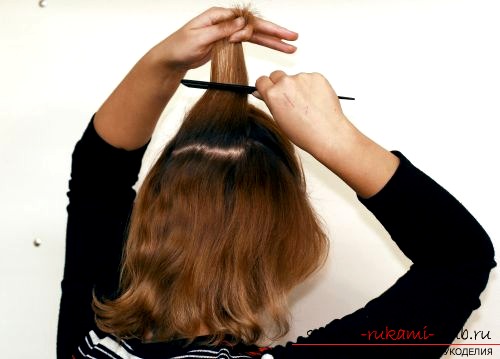 3. The right strand should be carefully combed before any manipulation with it. It is necessary to pre-sprinkle with varnish to remove all protruding hairs and make our shell perfectly smooth. Strand is thrown to the left side and pinned by invisibles. In some cases, after this, it is necessary to re-sprinkle with varnish.
 Hair must be stuck in such a way that all small pins are located strictly along the strand.
 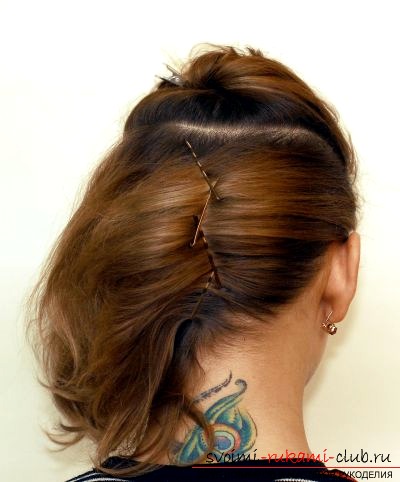 4. Now take the left strand, starting from the left temple, and lightly twist it inside. Should get a soft and not too tight roller in the shape of a shell. If the hair is tightened very tightly, the hairstyle will cause discomfort until you just release it. No laying is worth the sacrifice.
 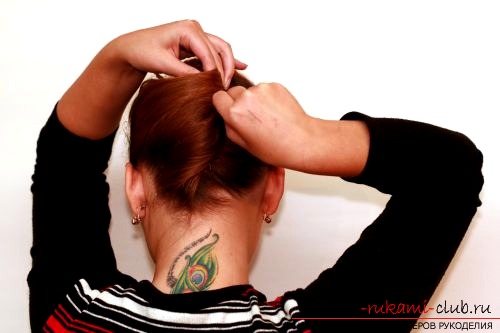 5. After completing all the manipulations with the spiral turn, you should get about this result.
 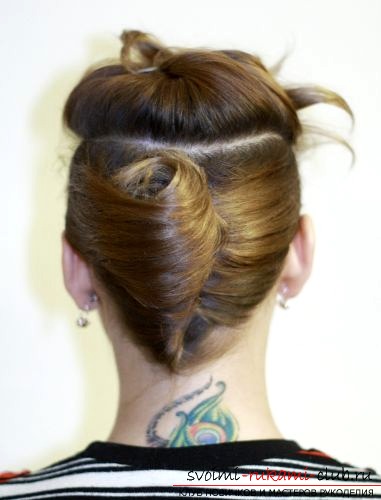 6. Now you can proceed to the locks located on the crown. Make a light haircut to give the top of the hairdo volume (if you have not done a preliminary haircut at the beginning of creating a hairstyle). 7. The tail obtained as a result should be twisted with a light flagellum and try to beautifully lay it on top of the shell. The tips of the tail are pressed and refilled inside the shell, being fixed by invisible ones. The strand is carefully combed and sprinkled with varnish to avoid the appearance of protruding short hairs. 8. This is how the "cockleshell" hairstyle should look like in the end. True, it was not difficult? The shell can be modified, depending on your preferences, to change the side of the curl of the spiral, starting not on the right side, but on the left. If there is a bang, it can be smoothly combed along with the rest of the hair, and can remain free, without destroying the habitual image. In any case, if you have long hair, hairstyles will give you a lot of pleasure and the opportunity to turn creative thoughts into reality. Every woman can make a stylish lady, with a little effort and a little patience.
Comments
Related posts:
 Learn how to quickly and qualitatively make a beautiful and soft toy heart with your own hands.
 A simple and quick hairstyle for medium hair, how to make a quick hairstyle on your side with your own hands.
 With our own hands, we create an original casket for Victory Day
 Quickly and without additional costs we create fashionable clothes for dolls by our own hands
 We create an original tandyr oven for your house with your own hands. A simple device for cooking eastern food is easy!