Create original birds in a cage of paper with their own hands
It's no secret that all people like beautifulcrafts, especially made by own hands, and not bought in the finished shop. We buy a lot of materials for needlework, such as colored paper, beads, colored pencils and much more, but there is always a question, but what can we do from this?  Today we will make paper birds in a cage,which are ideal for both decorating a children's room, and as an original homemade gift to any person. Agree, well, who does not like birds?
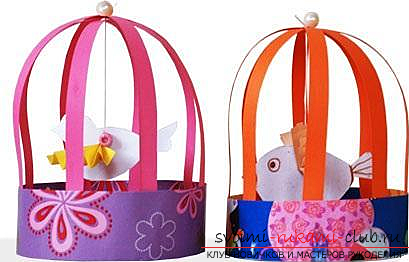
  So, for the manufacture we need: • bright colored paper of several colors; • awl or very small puncher; • Plastic or cardboard round caps (for example, from packing tennis balls), this will be the diameter of our cage; • Fastening materials, such as: yarn or dense thread, small nails, adhesive tape (always two-sided); • conventional scissors, a paper knife is also desirable. The whole process of manufacturing will take about 20 minutes. 1. First of all we take one sheet of colored paper and cut it out using four scissors or a clerical knife with the same narrow long strips. The thickness of the strips is about 5 millimeters. The length depends on how large the lid you have taken. For example, if you took a lid from a package with tennis balls, the length should be 25-30 centimeters. 2. Using an awl (or punch), we make a small hole strictly in the center of each resulting strip. 3. From the thick paper of a different color (also from white) or from cardboard, we will produce the bird itself. If there are no dense materials at hand, you can gently glue together several sheets of ordinary. Draw the outline of the desired bird (you can also find it ready on the Internet and print it, then paint it) on a sheet of paper, then carefully cut out with scissors or a clerical knife. If desired, this piece can be painted. On the top of the workpiece, make a small hole in the center. One of the blanks for printing:
  4. We take yarn or a dense thread, we measure the length of 30-35 centimeters and cut it off. We thread the thread in the hole in our bird, make a knot at one end. Then we make one more knot at a distance of 3-4 centimeters from the tied end. Thus, our bird should be on one end of the thread, bounded on both sides by knots. The other end of the thread is threaded into the holes on all four cut strips of paper, stretch them to the knot on the thread, and then fix this construction with a small stud. 5. It's time for the lid we've saved. Its side should be wrapped with a double-sided tape. We use a strip of Scotch tape with a width of about 2-3 centimeters, depending on the diameter of the lid. We paste on our scotch our workpiece from the cut strips in such a way that the cell with the bird inside turns out. Since there are only four strips, respectively, 8 ends need to be glued. The distance between them is 1/8 of the perimeter of the lid. 6. From paper of any other color (either from the printed drawing, gift paper, etc.), we cut out the rectangular part. The length should be slightly longer than the length of the side of the lid, so that the edges can be fastened. The width can be chosen any, if desired. The width of the detail is the height of the base of the cell. Then we take this part, as well as the cap, and glue the part onto the already existing scotch over the "rods" of the grate. Now your cage is ready, and the bird is sitting in it, it remains only to hang this craft for the free end of the thread! If you still have time and desireto do something even more original, the work can be continued. Next we will make a kind of garland. To do this, we do the following: A) We make several such cells (you can have different sizes and colors), repeating all the steps described. B) We take a strong thread, yarn or rope, measure the length, sufficient for placing on it a certain number of cells (as much as you made) and with a margin for fixing the garland. B) Tie each manufactured cell at such a distance that neighboring cells do not touch each other when they are hanging. When you bind each cell, you also make nodes on the main thread from both sides, so that the cells do not roll to the center. Thus our gift became even more beautiful, original, and also unique and unforgettable!
Comments
Related posts:
 Knitted covers for mugs Birds on the contest Spring 2016, original gifts ideas with their own hands
 Create an amazing chandelier of paper with your own hands
 Create original handmade crafts for your home and garden yourself
 Original and beautiful snowflakes from paper with your own hands
 We create original and practical holders for jewelry, from hand-made materials by our own hands