
How to decorate a tree with quilling technique? Christmas Decorations for Beginners
New Year Euphoria is driving us tocreate new masterpieces! Often craftsmen find new ideas in those moments when the period of Christmas holidays comes. In the New Year's Eve, when the whole family is busy with the important affairs of organizing and preparing the holiday, and the children are diligently preparing for their school or kindergarten matinees, unique solutions come to mind that can help solve one of the domestic problems.
How to decorate a tree with quilling technique? Christmas Decorations for Beginners
Often the most important issue for the organizationNew Year's holiday is the preparation of Christmas decorations and creating a special atmosphere inside the apartment, at home. Ways to make your home even more magical - very much. All these methods can be used in our sections, and special techniques will tell you about the most interesting decorations for a home during this period. Work with New Year's ornaments Special attention should be paid to the quilling technique. After all, crafts made of paper will be in vogue for a long time! First, they are extremely easy to learn and do not require special resources. Secondly, this is a very cheap article and it will allow you to cut down your expenses for necessary things in favor of gifts or other necessary things. And of course - space for creativity. Paper products can be deformed and create a variety of forms that we can take full advantage of. In this article we will try to consider the most actual Christmas decorations, which are in demand all over the world and are made by absolutely any craftsman without extra efforts. In addition, this unforgettable creativity can be attached to the child. After all, anyone can make quilling in the technique of quilling. This will help create a new family tradition and keep the holiday atmosphere in the family for years to come. Snowflake on quilling technique - how to do? 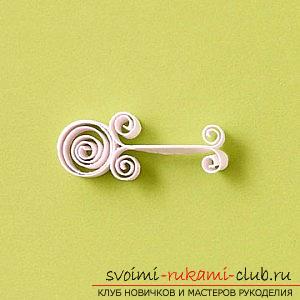 Our first master class is a variant of making an airborne snowflake using the quilling technique. For it, we need a set of strips of paper and special tools for processing on technology:
- Take one strip of 15 centimeters for a spiral in the center
- It will also take eight strips of 75 millimeters for the snowflake beams
- Four strips of 15 centimeters we take for a spiral shaped like a heart
- Also, four strips of 75 millimeters will be needed to create a drop shape
- Let's take four more strips of 50 millimeters for the shape of the eye
There are five strips of 15 centimeters, 12 strips of 75 millimeters and 4 strips of 50 millimeters. 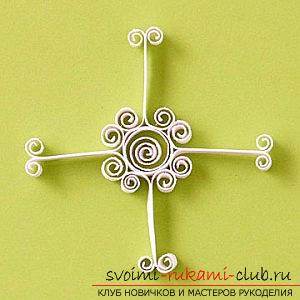 Initially, it is necessary to form a centralpart of a snowflake. To do this, you need to make the shape of a free spiral using a tape of 15 centimeters. To do this, take and twist the tape and then, remove it from the needle. After the spiral ribbon is untwisted a little, fix it with glue. After, a ray for the snowflake is formed - here you need a strip of 75 millimeters and at one end we form 2 curls, and on the other hand we make more turns so that between the turns there is a distance of no more than 25 millimeters from the ribbon of a direct view. Thus, one beam will combine two strips, which are glued together with the backrest. When we glue its rays to the center of the snowflake, we get the shape of a cross. Continuing work on the snowflake
 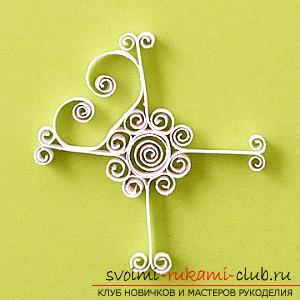 After, it is necessary to make four spirals onheart shape. To do this, we need our strips in length by 15 centimeters. They need to be folded 2 times and then, tighten both ends towards the center. Then, the spirals are glued in accordance with the diagram. Also, we make the form of drops using strips of 75 millimeters. The drop should be glued to the center of the heart in a straightened form, and then - to fix the ends of the curl with a drop and heart. Curls should be deployed more in the event that the ends and their sizes will be missed!
 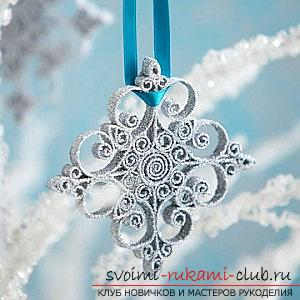 Next, you need to form four elements in the formEye, using strips of 5 centimeters. Further, they need to be fixed on the tops of the beam products. Snowflakes can be left in white. Also, as an alternative, you can cover them with an aerosol can of sparkles of silver color, for efficiency. A snowflake is suspended with a simple tape made of satin, or using a conventional fishing line without color.
 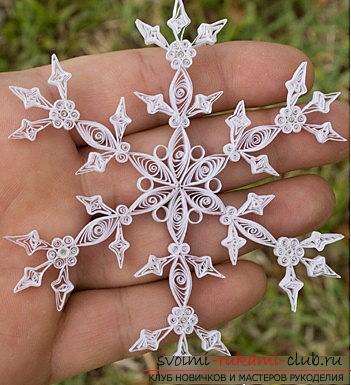 Penguinchik for the Christmas tree - Quilling technique Now,when we got acquainted with the spectacular solution of the New Year's snowflake with the help of quilling technique, it's time to start a more complex crafting - creating a toy for the New Year's tree. As a beautiful sample, we select the idea of a New Year penguin, which you can do yourself. This lesson will be a bit more complicated than the previous one, but the figure will turn out to be more interesting:
- Prepare the paper tape for a length of 29.5 centimeters (width of 7 millimeters) white
- Also make paper tapes for a length of 29.5 centimeters and a width of 3 millimeters of red, white, green, gray and black
- It will also require ribbons for a length of 29.5 centimeters and a width of 1.5 millimeters to make white and yellow shades
- To process the material, you will need a pair of scissors
- For fixing you need sticky substance PVA
- Also we take on "arming" the glue in the gun
- Prepare a quilling tool
- Tools for corrugating
- Ruler of officer type
- Tape of pink color for a width of 7 millimeters
- A pair of toys for toys
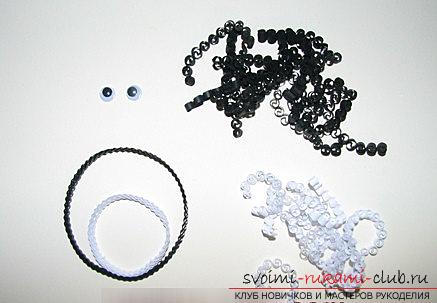 Initially, we need to determine the sizecircle, or - the size of the penguin's shape. Then, you need to take four strips of black paper and skip them with the corrugation tool. After this manipulation with the paper, we glue the elements into one version of the long tape, then twist it with the quilling technique in the form of a "circle" at a diameter of 65 millimeters. The same method is required for white tapes. A circle is formed 43 millimeters in diameter. So we fixed the size of the breasts. The shape of the future penguin After this, for the black circle (its middle), we glue the base of the white circle. The white ring must be filled with white quilling elements in the form of a meander or infinity at a width of 3 millimeters. Then, the space that remains unfilled - between the edges of the black and white end, we also fill with meanders, but correspondingly - black color of the same width. After our circles are filled with the necessary details, we will glue the underside by means of PVA throughout the area. This is to ensure that the elements do not crumble. Next, use the upper part above the breastsyou need to glue your eyes in the form of blanks bought in the store. Further, the beak can be made with a quilling element of the triangle type, which has a diameter of 6 millimeters. We will use for this exactly half the tape yellow in width by 1.5 millimeters. Then, glue the necessary element on the bottom, just below the eyes. We use wings in order to make a penguin present. To do this, take 5 ribbons of black color by a diameter of 17 millimeters. We form wings based on the appropriate shape. The roll will need to be clamped in three points. Then, the wings are glued using hot glue. We connect them with the rims of the black circle. Skates for pingvings After - an element of skates is formed. It can be done with the help of a "tight eye" shape on a diameter of 15 millimeters. Then, to the bottom of the skates, you need to glue half of the black paper tape to form the sole. Then, the blade itself is formed using a gray ribbon. You can do sha proceeding from the principle of quilling technique along the line. It will take two lines for a length of 3 millimeters and one for 30 millimeters. Next, two small tapes need to be glued with ribs to the bottom and then, using a distance of 10 millimeters from each other. Use the ends of the ribbons in gray to glue the gray tape of large format. At the end of the sock it needs to be wrapped. And then, to form the lacing with a quarter of the tape in the width of a half millimeter. We use the "eye" element with a diameter of 5 mm
Comments
Related posts:
 How to decorate Christmas tree balls with the help of decoupage techniques, two master classes with step-by-step photos
 Ornaments on the Christmas tree with your own hands - crocheted Christmas balls for the Spring 2016 Competition, Christmas balls at home
 Christmas decorations on the bottle - crochet for beginners chart video lessons
 Decoration for the New Year, how to decorate the New Year window yourself, ways to decorate the windows for New Year's holidays, templates for decorating windows, decorating windows with PVA glue.
 New Year's crafts, Christmas decorations made of paper, a Christmas tree of paper with your own hands, various variations of creating flashlights from paper, tips and recommendations for work.