
Decoration and decoupage of toys on the Christmas tree with their own hands - a master class of New Year's Decoupage
Decoration of a Christmas tree on New Year's holidays - a stepvery important and we can say, family. Children are very fond of decorating a Christmas tree, and the process itself is like creating a holiday with your own hands. We, decorating the Christmas tree, impregnate the apartment with the atmosphere of love and magic. Therefore, the period of the New Year and Christmas celebration is so popular all over the world. In order to decorate the Christmas tree, you do not have to run to the nearest gift shop in search of a new Christmas tree toy. It can also be done with your own hands!
Decoration and decoupage of toys on the Christmas tree with their own hands - a master class of New Year's Decoupage
 Creating a Christmas tree is a painstaking process,but real. Make your own drawing on the toy, as well as find the right composition for the bright decoration of the Christmas tree, we can use special tools and techniques. Decoupage is an opportunity to make a painting of any object, regardless of the composition of the material and the shape of the parts. The procedure of decoupage is to process the surface of the material and impose on it a beautiful figure from the decoupage card, or with a napkin. The results exceed all expectations and the drawing looks like a drawn one.
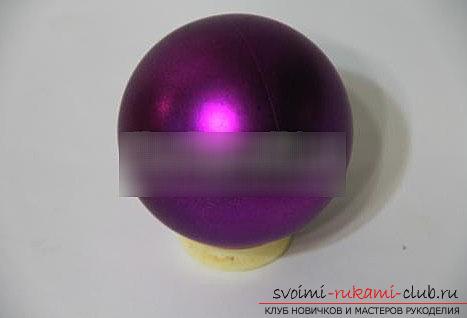
Materials for decoction of a Christmas tree ball
Decoration of a Christmas tree toy - painstakingprocess and requires from you a maximum of diligence, knowledge. Such a master class will introduce you to the standard approach to decoupage toys, as well as talk about simple methods of processing a Christmas tree ball, its decoration with their own hands. What materials might be needed during the work? What should I know about decoupage for Christmas toys? How to make a shiny toy? The list of materials is presented below
- For degreasing - ethyl alcohol
- For decoration - a napkin or a card (decoupage)
- For processing - brush and sticky substance PVA
- Glitters - for decoration
- Acrylic lacquer - for shine and preservation
- The ball itself is the basis
Basic subtleties 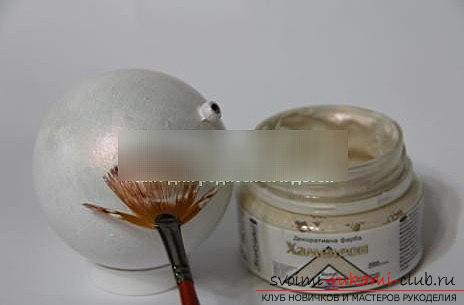 To conduct this master class weYou will need paper napkins based on the "Vintage" technique, using the New Year theme. Decoupage of decoupage toys - just a matter even for those who are just beginning. In the beginning, it is necessary to carry out the degreasing procedure for the ball, using the composition of alcohol and rubbing it with a sponge. Then, we need to choose a beautiful illustration of the New Year's drawing for our work. It is very important that the thematic element of the image is relevant for the Christmas tree toy. Preparation of the ball
 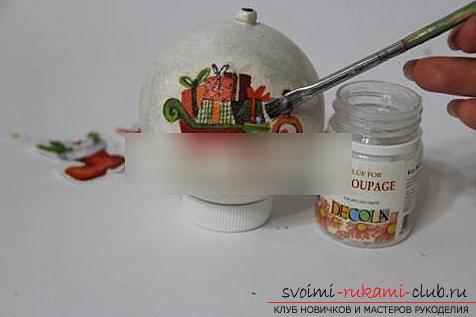 After, the ball must be dyed with whiteacrylic paint, preferably using several layers of this primer. This will get rid of the old toy color. The paint should be applied with a sponge or sponge. This will make our product more colorful, without divorce, or unnecessary stripes. After you cover your artwork with a uniform, white color, you need to put a layer of silver paint hue "chameleon". It is on this shade that we will put our drawing. We take a napkin in order to make tears in the necessary images for the subsequent decoupage. Work with the ball is difficult to call difficult, but nevertheless - the process is very painstaking. We use glue for decoupage to paste fragments of napkin on our product. Figures should be located opposite each other. After the glue dries - the white layer from the napkin disappears completely, becomes invisible. Images will also shine through the use of silver chameleon paint. It is necessary to apply one more layer of this paint aroundof each fragment using a sponge. With a more dense layer, the ball will shimmer and shine. When the light hits the surface, it will distort it in every way. Decoration of toys Also, you need to remove various pimples, or uneven markings. To do this, we use sandpaper. We use glitters in order to make each element of the toy design more brilliant. New Year's overflows of your crafts will be markedly improved. We use a brilliant glitter to paint colors of bright variations: green, red, silver. Seams of the hemispheres should be masked with the help of curls, which are also drawn with glitter. The pattern is made along the seams. It will look like two pieces of the toy connected a chain of silver composition. Also, you can add a version of the New Year pattern, using an option of silvery snowflakes. Draw a few variations of snowflakes on both sides of the decoupage work. After the basis of the glitter material dries, you need to cover the whole product with acrylic lacquer. Further, we attach a loop to the Christmas tree toy, and then attach a bow in the appropriate color combination. Thus, the decoupage of our toy is completely completed. Very simple and easy!
Comments
Related posts:
 Master-class on making by own hands a New Year's fur-tree toy in the technique of reverse decoupage
 Decoration and decoupage by shell - master class of decoupage bottles with their own hands
 Decoration of the New Year's table with their own hands, a master class on creating a central composition for the New Year's table of candles and cinnamon sticks with their own hands.
 The master class will teach how to make a Christmas decoration - a Christmas tree - in the technique of decoupage
 Decoupage of housekeeper with their own hands - master class and photos for decoupage