Decoupage on the fabric on the example of a knitted stand for hot
 Recently, particular popularity in the worldneedlewomen purchased. They can be sewed, made of felt, knit and crocheted ... These functional things quickly took root in everyday life and many people no longer imagine a cup of morning coffee for news or a favorite blog without a pretty stand. We offer you a simple master class for making such a stand. Its highlight is the subsequent design using decoupage technique on fabric. Familiarize yourself with the basics of this technique - and in the future you will be able to decorate any textile surface - from jeans bags and jackets to woven shoes.
For the manufacture of stands and decoupage on the fabric will need:
yarn (cotton); hook; decoupage glue on fabric; three-layered napkin with a pattern; brushes with synthetic nap; golden paint for fabric.
Knitting stand and decoupage on the fabric: master class
Dial a chain of 5 air loops, connectlast and first loop - to close in a circle. First row - 9 tbsp. b / n 2nd row - 15 tbsp. b / n 3rd row - add columns in 3, 4, 7, 8, 11, 12, 15, and 1 p. 4th row - 6 tbsp. b / n., one vozd. n. - repeat 4 times. 5th row - 8 tbsp. b / n., 1 rev. n. - tie on each side. The 6th row and the following ones are knitted similarly to the 5th row, increasing the number of loops in the corners of the square. Link thus a total of 14 rows.  In the last row on one side of the square = 26Art. b / n., in the corners of 1 ev. n. Binding: first row - art. b / n., 2 rev. n. - repeat to the end of the row. 2nd row - “lush” column link into the arch of two air. p., 3 rev. P.
 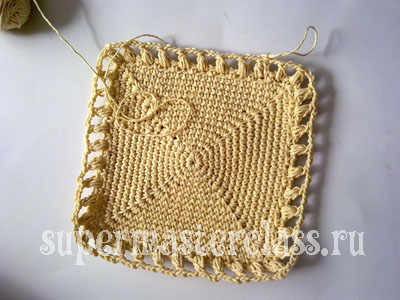 3rd row - columns b / n. in each loop, in the corners knit 3 tbsp. 4th row - tie the "crawfish" step.
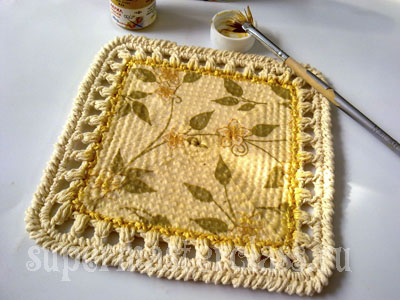
 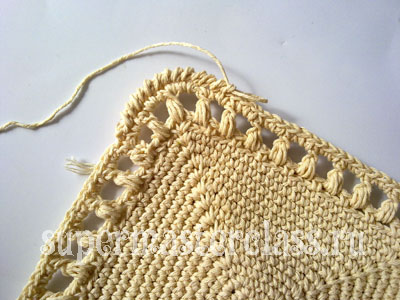 Bake a co-steamer - this is important fornext stage! Technique decoupage by fabric. Wash the stand with decoupage can be without fear: the glue manufacturer promises that he will withstand up to 15 washes! Choose a napkin, the design of which you liked and harmonizes with the texture and color of the surface that you are going to decorate. Trim the napkin to the size of the inner square (it can be a little bit smaller). Peel off the top layer.
 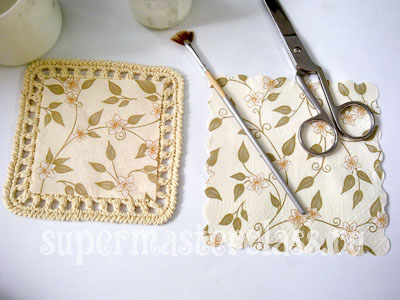 Using a textile glue and fan brush, gently glue the napkin to the knitted surface without entering the contour of the fragment. Leave the napkin to dry completely.
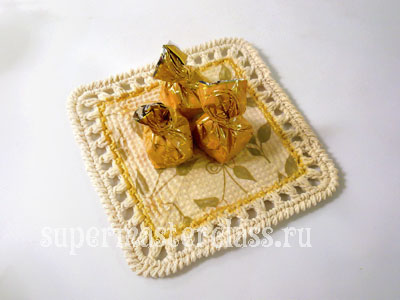
 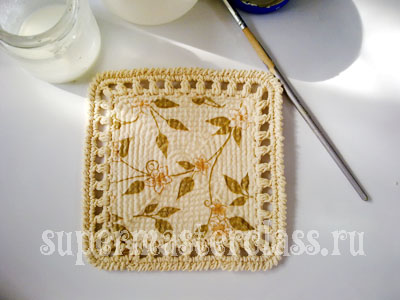 From the seamy side, iron the product hot.iron (2 minutes). Gold paint for fabric go around the edge of the glued motif in the following way: lightly dab your finger in the paint and transfer it to the surface with a small pad of your finger. Or gently with a tip of a brush, apply to the knitted edge, then smooth and blend with your finger. Wait for the paint to dry. Such a cute home accessory will be withpleasure to be used for its intended purpose and will give your home even more comfort. Anna Dranovskaya specifically for the site Previous article: Next article:
Comments
Related posts:
 A lesson on knitting the cradle under the hot crochet "Elegance". Detailed description of the procedure for working with photos
 Description of the process of knitting a beautiful and useful napkin-stand under the hot. An easy way to tie the stand under your own heat with a hook
 Stands under hot. Works of Tamara
 Knitted coasters are hotter. Works of Tamara
 Master class on knitting napkins-stand under hot on knitting needles