
Decoration of New Year cards in the technique of scrapbooking: 3 popular postcard versions
The approach of New Year's holidays makes usthink about how we can decorate or give New Year's joy to others, close people. To do this, there are many ways and methods, but the most popular is still the way to decorate and create gifts, using scrapbooking techniques.
Decoration of New Year cards in the technique of scrapbooking: 3 popular postcard versions
Make a gift card using the servicesthis technique is extremely simple. To do this, you must use the usual materials of needlework and, of course, have a couple of ideas in stock, with the help of which the implementation will not suffer. But, New Year cards became popular due to their creativity. Therefore, each work must be approached from its own, author's point of view. This master class will introduce you to three positive and interesting ideas for working on a New Year's card. New Year's card with own hands 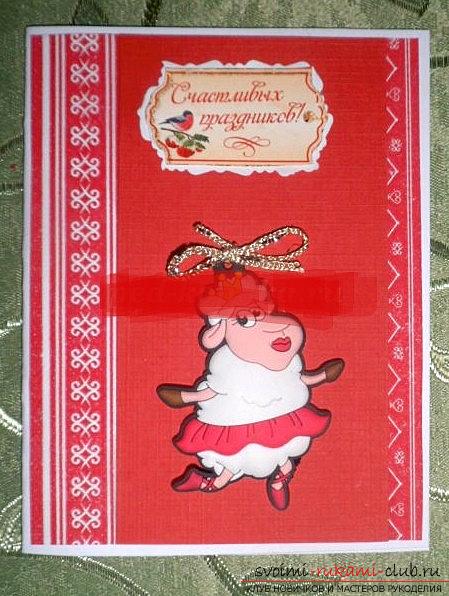 A postcard can be supplemented by a thematic animalon the basis of the future holiday (Let's say one of the Chinese signs for the year, or the animal of Stag, a popular assistant of Santa Claus). Also, you can use thematic pictures of popular things or holiday attributes. In particular, many make beautiful postcards, using variations to create and decorate their own Christmas tree toys for a future postcard. Scrapbooking technology combines and supplements the ideas of the masters, allowing them to form a completely new version of the postcard. And we will prove it! Before you will be presented three popular ideas for the formation of postcards. They can be modified, but for all of them you will need material of the same type. Thus, to recreate or form a beautiful postcard will be extremely simple:
- Take a paper napkin on the theme of the new year
- Prepare for work scissors
- Take a ruler, as well as a pencil
- It will take a paper of designer type
- Adhesive tape on both sides and PVA glue for processing
- Also need a thermo-gun
- Take and prepare various decorative ornaments
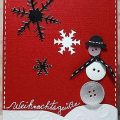
The first postcard  First, you need to take A4 paper anddivide it into two parts. Then, take and divide this sheet again twice. After using a paper napkin, we make a thick version of a sheet of paper. To do this, you need to make a landscape version of a sheet of white paper, you need to put a film (food type), and put a napkin with our illustration on top of the product, freeing it from the layers of paper. With the help of a red-hot iron, our product should be ironed. Then, the edges of the product need to be cut off to get the finished paper. A piece of paper will be completed. Next, you need to choose an option for a single-colored sheet of paper, using the paper's tone, as in the figure. Further, the combined workpiece in the sides should have 5 millimeters in size smaller than the blank of the postcard itself. After, it is necessary to decorate the postcard. For this, everything that you want can come up. The main thing is not to do nalapisto. In our version, we included a variant of lamb. Using old cards, or printed out inscriptions, we attach the inscription. The second postcard version
 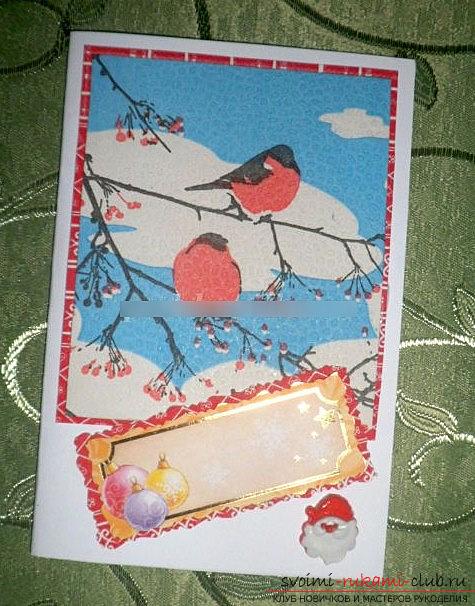 A postcard with bullfinches will require two kinds of suchnapkins, of which we make a paper product. The picture with the bird will be on the upper plane. The card must be issued with the help of a label, as well as buttons (we have with Santa Claus). We draw up a postcard in the image and likeness of the past. The third option
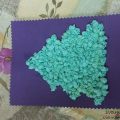
 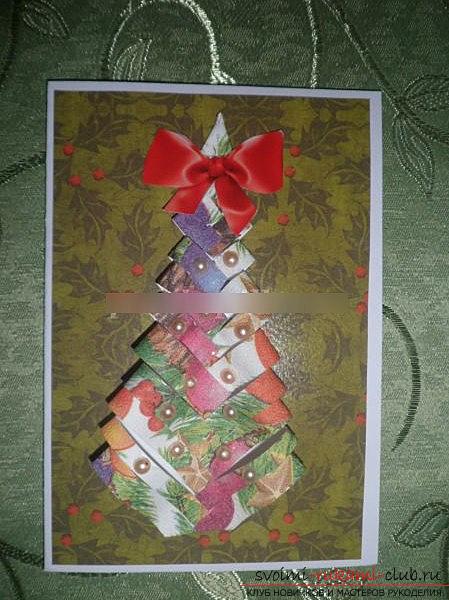 In order to make a three-dimensional herringbone, you needtake a napkin with paper. Using the rectangle A-5, we need to make a square shape. It is necessary to cut the shape of the paper as a strip. We get the shape of a right triangle, which will have two legs, as well as a hypotenuse, which will be directly opposite the angle of the direct view. It is necessary to draw a line that will be parallel to the hypotenuse in width by 5 millimeters. Next, it is necessary to draw the lines from the side, using a drawing of a line with a transverse view. The distance of the strips reaches 5 millimeters. To work it is good to take a triangle. Next, the strips must be cut using a drawn line. Next, you need to open the cut piece. This will be the side of the facial postcard. Next, you need to turn the image on the wrong side and after, glue the stripe branches. With the help of each strip, we take turns to produce a sticker, work from the bottom rows. For the lower part of the tree, you can also crop, based on discretion. Next, using the preparation of the workpiece, we glue it with double-sided scotch tape for the Christmas tree. After, we make the decoration of the postcard. You can also take another herringbone. Strips should be equal to one centimeter. Using a weaving, an openwork Christmas tree can be a pendant, or a toy on a Christmas tree. The card will be ready!
Comments
Related posts:
 Greeting cards with your own hands, how to make a New Year's greeting card in the technique of scrapbooking, rules and tips for making postcards by yourself.
 Greeting cards with own hands, creating Christmas cards with children, two free master classes for making light cards with preschool children.
 Modern New Year's decoration of a card with own hands - scrapbooking and technology
 Decoration of a gift card for a girl - a scrapbooking technique with her own hands
 Greeting cards, creating New Year cards with preschool children, how to make a greeting card with a snowman from napkins.