
Decoration of a patterned snowflake with the help of quilling technique - master class and schemes
One of the best times of the year iswinter. Basically, thanks to its popular New Year holiday. A slow dance of snowflake crystals gives rise to special feelings in each of us. It seems that the magic is somewhere nearby and it is only necessary to touch, how miracles will begin to happen.
Decoration of a patterned snowflake with the help of quilling technique - master class and schemes
But when we return home, we still feel the samea terrible, gloomy state of autumn that deprives us of all desires. No problem! We just need to return the atmosphere of the holiday from the street to our house. It's very easy to do it - but you have to work yourself. We are sure, each of you in his distant or not very childhood, formed snowflakes from paper. Materials will not change: you need all the same paper, the same scissors. But, the paper will be special - for quilling. In addition, that a couple of new tools will be added - the shape of the snowflake itself will be substantially updated. If earlier it was similar to a conventional craftsman, which did not stand out in the least among others, this time a completely different kind of work is waiting for you. Materials for a new snowflake 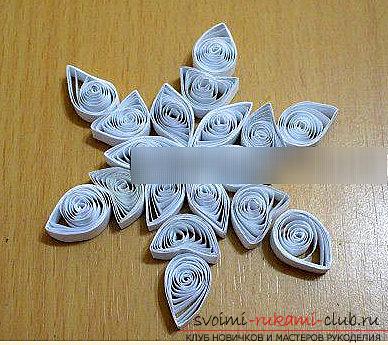 How can you show your talents andto form a real art of needlework? This master class will tell you about the modern way to improve the snowflake and create its three-dimensional, full-fledged 3D-shape. The master class is very simple. Registration of such snowflakes will not be difficult and ordinary students will be able to learn the principles of work, regardless of their skills in needlework. The introductory part will tell you about the intricacies of working with quilling and answer all questions of shaping beautiful snowflakes with your own hands. Open-work snowflakes will not make difficult. In addition to home decoration, where you can use these snowflakes without much difficulty, you can also use this technique to decorate your own crafts, for example, postcards. We need a small amount of material, perseverance and the desire to perform every action, step by step!
- Take the usual quilling paper
- Also need glue
- Take a pencil for marking
- Take the line - officer
- Needle with broken ear or toothpick
- Patience and the desire to do something new
Work on the snowflake - modules 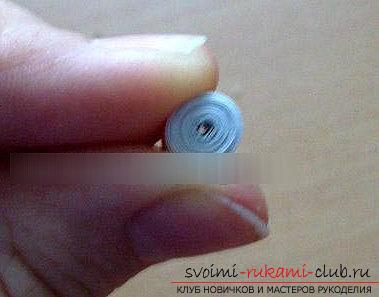 First, you need to take the paper and with the help ofrulers with a pencil measure the long sides of paper 8 millimeters, 5 millimeters or 3 millimeters. Cut off the desired segment and get the desired version of the strip. It is necessary to form 18 pieces of such stripes.
 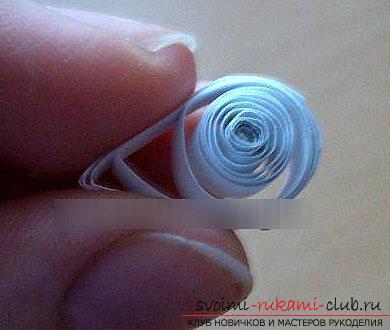 In order to simplify their own work,use the tool. Its analogue can serve as an ordinary toothpick with a pointed end divided in two. A dvuh is an element where we will place our workpiece to scroll through the paper. To begin with, you need to bend one of the ends of the strip, and then - to produce a twist crafts. Further, we curl up to the end and after, we get a tight spiral. Next, you need to insert it in the ruler in order to then release, the spiral will unwind itself and create a free form. Next, it is necessary to take the outside of the end of the spiral and then, to drop a sticky substance onto it, glue the element. Thus, we will make the first procurement for our work. In order to form a snowflake, we have to do this procedure 18 times, for example, to make 18 copies of blanks. Forming the drop After we have made the blanks, we form a new element for it. Take six pieces and create a drop shape. For this, it is necessary to flatten one of the corners of the craft with the fingers, on one side. Forming a glazier To make this mold, we also need to take six pieces. Each of them must be flattened on both sides, so they both will be narrowed at the corners and a shape similar to the eye will be obtained.
 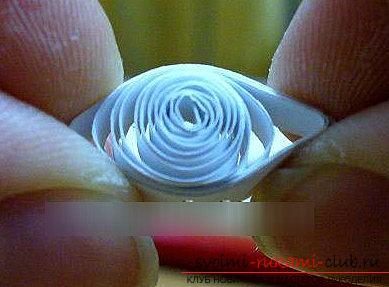 A half-month element To make a crescent element, you need to make grooves inside the roll with two outgoing borders. Form a crescent in the picture that will be offered for work.
 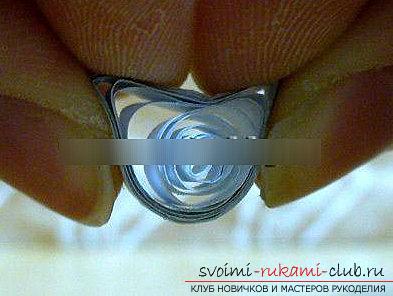 Preparing the assembly
 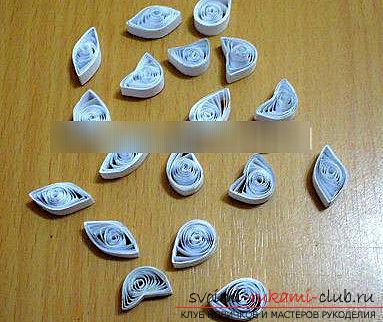 We start to collect a snowflake. For this, we take our workpieces and form different snowflakes. A little later, you can create more elements and of course, implement any variant of your snowflake. We propose to take the option where you take six peepholes and make their gluing in such a way that they exit outward with sharp ends. Then, we attach crescents to them, and then add our drops to complete our snowflake. Of course, in this case, you have complete freedom and fantasy, what your own snowflake will come out, therefore, it will be only a standard variant. In the subsequent work with snowflakes, form your ideas and combine them in another way. Modules should be glued together, then, on it, fix the thread and hang it in the right place!
Comments
Related posts:
 New Year candlestick with the help of quilling technique - master class with own hands
 We make a beautiful Christmas decoration of the snowflake with our own hands with the help of the "Quilling"
 Quilling butterflies - loop quilling and master class with their own hands
 Making a Christmas tree snowman from paper - master-class crafting quilling techniques
 The lesson of creating a poodle with the help of quilling techniques for beginners - a master class