Detailed schemes of weaving exotic animals from beads, photos of finished products.
One of the most popular materials for needlework- this is the beads. This name comes from the Arabic "bucer" and means in translation "false pearls". Tiny pieces of the rainbow have a rich history. At different times, the beads were made from bone, wood, porcelain, gold and silver. The development of glass making has become a real breakthrough in the history of beadwork. In the glass mass began to add copper, manganese, cobalt and other chemical elements, which gave the beads a green, magenta, blue and other colors. Everyone knows about the beautiful Venetian beads, which cost a lot of money. The secrets of its manufacture were strictly protected and passed on by inheritance. Glass-makers lived on a separate island and had a lot of privileges. In Europe, even held special "beaded fairs." Venetian seed beads were exchanged for expensive fabrics, spices and gold. However, with the development of navigation, new sea routes and countries are opening, more glass factories are being built, and the main competitor to the Venetian is the Bohemian (Czech Republic) beads. Now the beads are made not only from glass. A great alternative was plastic. In any case, the main thing in beads is its quality. It should have an excellent calibration, if the beads are not the same, this will cause the product to skew. If, suddenly, such beads were found in a pack, they can be postponed and used for decorating, for example, candlesticks. About this there is an article of our Club, dedicated to decorations from beads. Well, here will be offered master classes and schemes for weaving exotic animals from beads. Turtle from beads and beads.  Such a lovely turtle can be used as a keyring or create a composition with it in an aquarium (preferably dry), along with fish, which can also be weaved from beads. It will take:
- 4 dark green beads (8 mm);
- 4 green beads (5 mm);
- Beads 8/0 of green color;
- Beads 11/0 yellow and brown;
- 2 black beads 8/0;
- The line.
Work begins with the torso of the turtle. String 4 large beads on the line. Then weave 8 mm beads between the beads, 5 mm beads, and the next circle on top of them 4 beads 8/0. Act according to the scheme (points 4, 5, 6). The upper part of the shell was obtained. A cross from the 4 beads on the top of the shell can be pulled off by threading the fishing line once again.  To create the bottom of the shell, usepoints 7, 8. The direction of work is indicated by an arrow. After completing it, you need to wear 5 more beads for the turtle's head. To pass a fishing line along the whole shell to attach the tail and legs. These are points 9 and 10. The turtle is almost ready, it remains to weave the head.
  The line of the stretch to the additional place is low fromfive beads. The line leaves the first bead of the bottom chain of 5 beads. Pletelyatsya around the mosaic technique. These are items from 11 to 13. The first and second rows of 6 beads, 4-th, 5-th, 6-th series of 4, 7 and 8 of the three. The third row is the eyes. Pass the line through the last circle of the beads and tighten.
 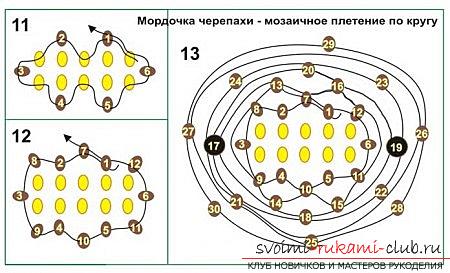 The turtle is ready. Another great plus of such needlework as beadwork, for children - the development of fine motor fingers. You can draw them to create, for example, a mammoth, a panther or a saber-toothed tiger. The child with pleasure will be engaged in weaving these little animals, in addition, will develop care, concentration, assiduity, vocabulary will increase, because weaving can be supplemented with a story about these unusual animals. The development of fine motor skills also has an excellent effect on memory and imagination. Below are detailed schemes and job description.
 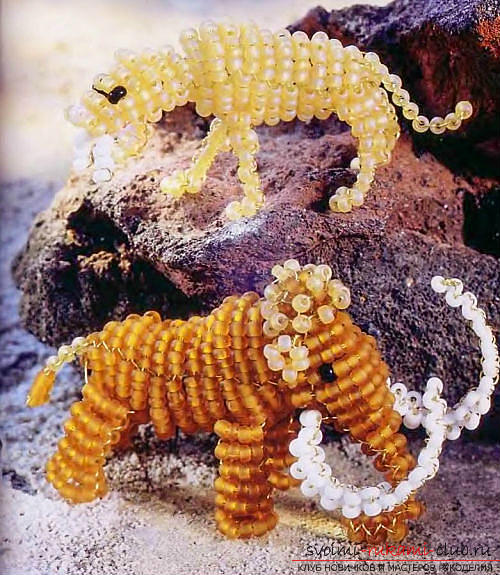 Beaded mammoth.
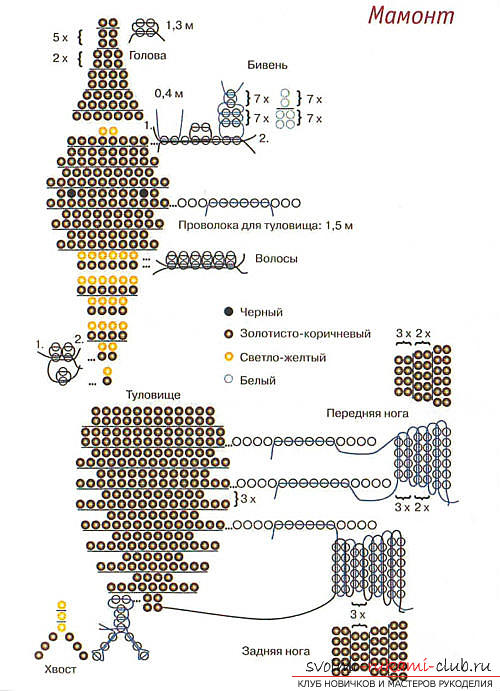
- Black, white, golden brown, light yellow beads 10/0;
- Wire 0,3 mm;
- Scissors or nippers.
Head mammoth begin to weave from the trunk. It will take a piece of wire 1.3 m. Start the mouth note 2 pcs. light yellow beads. Put them along with the bottom low on the tail of the wire and pass it through the beaded row in the other direction. Separate 2 pieces of wire to pass for the tusks. They are weaved by alternating lows up and down. Weave a row with a bead eye. In the next row, drag a piece of wire 1.5 m. This will be the body of a mammoth. For weaving hair, draw a light yellow bead on one tail of the wire, pass the second tail in the other direction through the entire low and twist the wire tails. Then cut them and hide them. The trunk is weaved in the technique of parallel volumetric weaving. Separate pieces of wire to pass for the feet according to the drawing. They are weighed together by volume. Back weaves from the wire trunk. For the tail take an extra small piece of wire and weave it according to the drawing. The beaded mammoth is ready. Next is a saber-toothed tiger made of beads. 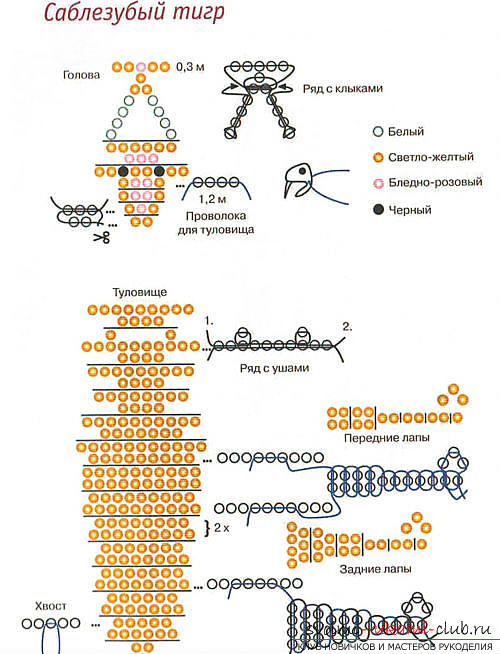 It will take:
- White, light yellow, light pink, black beads 10/0;
- Wireworm 0.3;
- Scissors.
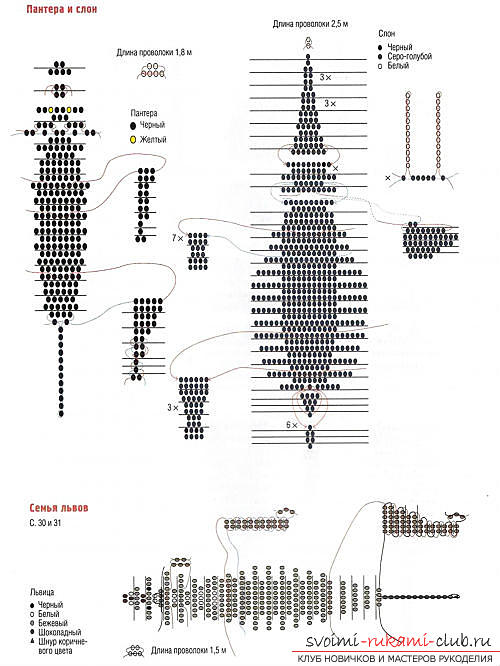
The head is weaved from a piece of wire 30 cm. Make it voluminous. After the muzzle is woven into the tail of the wire with the "fangs" detail and again cross the tails of the wire inside the double row. Through the bottom of the beads, stretch one more piece of wire for the body. Weave three more rows in the technique of flat parallel weaving. This is the lower jaw. Torsions twist, cut and hide. Body weave according to plan in the technique of volumetric parallel weaving. For the ears to pass an additional piece of wire. The paws are weaved by additional wires. For the hind legs use the wire of the body. For the sole of the legs, thread 3 beads on the front wire, pass it back through the penultimate circle of the foot, twist, cut and hide the tails. For the tail, use a separate piece of wire, on it to string 9 beads. The saber-toothed tiger is ready. Panther and elephant of beads weave by analogy to the given drawings. 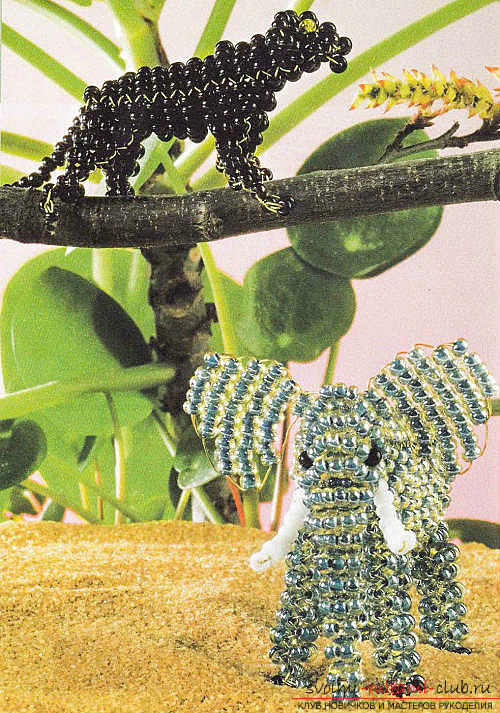
 The next exotic animals from beads will be a hummingbird and a parrot.
 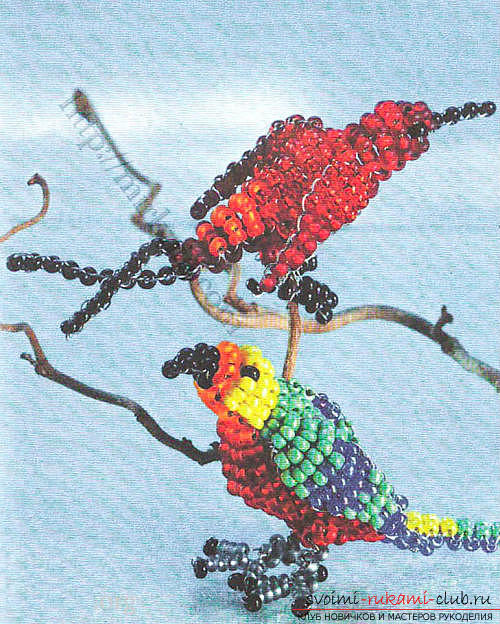 Hummingbirds.
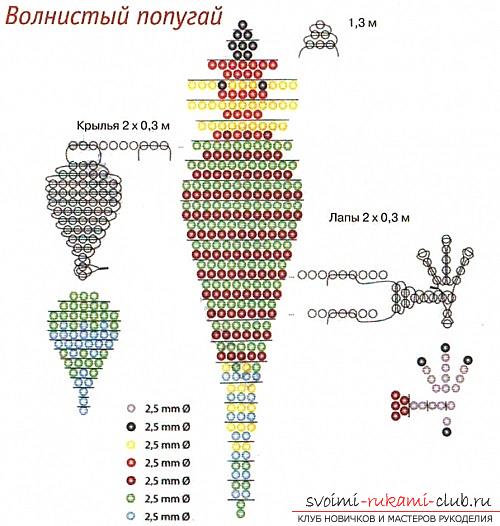
 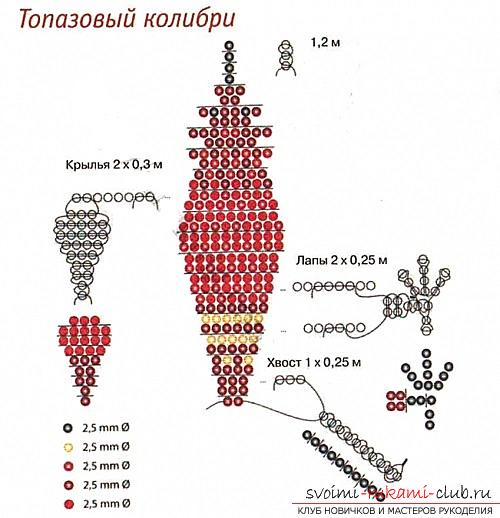 To create a wire piece 1,2m. The work begins with a beak in a flat parallel weave. Then the work continues in a voluminous parallel netting similar to the work of previous animals. For the wings to pass through the body two pieces of wire. Weave a flat parallel weave. For the legs, two more delays are needed. For the tail, hold one piece of wire through the last row of the body. Put beads on it with a flat parallel weave along 1 in a row. Torsions twist, cut and hide. Pass another wire forward through the last row of the foot. For the toes on the legs, you need to make low beads on individual wires. Start with a finger looking back. Twist the ends of the wire and hide. Budgie. For its weaving, take a piece of wire 1,3 m. Work begins with a beak. The first three rows are performed by a flat parallel braiding. The fourth and all the following are voluminous. For the legs and wings to pass through individual pieces of wire. The first row of legs is weaved by volume, the others are flat. Fingers make like the fingers of a hummingbird. Wings to weave a flat parallel weave. After the work is completed, they are slightly bent to the back of the parakeet, like real birds.
Comments
Related posts:
 Free schemes of weaving roses from beads, master classes with photo and description of work.
 Schemes and description of crocheting female summer cardigans, photo of finished products.
 How to tie children's crochet hooks, schemes and detailed work description, photo of finished products
 How to tie a summer plaid from the crochet motifs for children, a scheme and a description of the work, photos of finished products
 Schemes and detailed description of knitting of summer openwork blouses for women, photo of finished products.