A detailed lesson of drawing a sea wave will help you learn how to draw constantly moving objects
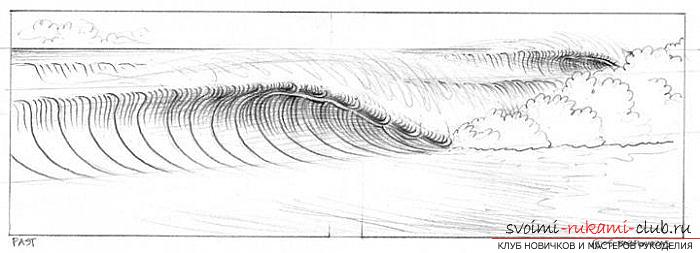
The lesson of drawing a sea wave will allow you tolabor in the future to depict seascapes, to transfer onto paper the character of this, all the time moving object. Having mastered the basics, you can easily draw not only the sea, but a river, a lake with waves of water. To correctly display such an extraordinary object, to fix it, you need to know several rules and small secrets, which we will try to tell you today in the materials of our article. As you know, the ability to draw is absolutely not difficult. It is not necessary to be a great talented artist to portray the landscape you like, draw a kitten or a flowering field, picture a favorite cartoon hero for the child, or draw a wave, resting somewhere on the sea. This requires only a great desire and, of course, certain skills and knowledge. Draw best to learn from early childhood. It is at this age that a person can absorb in himself, like a sponge, all the new information that comes to him. But, if it so happened that, as a child, you missed this moment, it's okay. A little patience and you will always succeed. Today we will learn to draw a wave, a constantly moving object that fascinates, attracts, calms, causes fear and admiration and many other feelings, but it never leaves you indifferent. The lesson of drawing a sea wave is not difficult, although it will require concentration of attention and patience, as not always everything is perfect from the first time. There are several ways to display this object. In the lesson we will try to learn how to use each of them. The main way, the most simple, is drawing waves. Initially, you need to depict the basic form, the basic, the future wave. 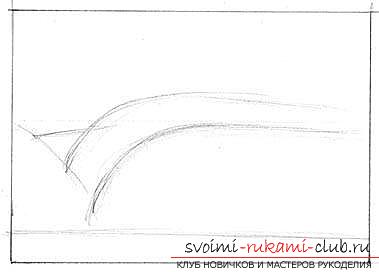 Next, you need to draw a line that determines the thickness of the wave or lip. This is an additional detail.
  Now you need to continue, dorisovat, the line of the lip downwards so that an arc is obtained, as in the figure. Thus, we get the shape of the whole wave as a whole.
 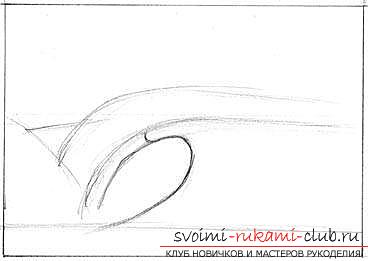 Next, we need to draw more lines as we see in the figure. We draw a steep wave and gradually the lines become more straight, untwisted. At the base they are similar to a pipe.
 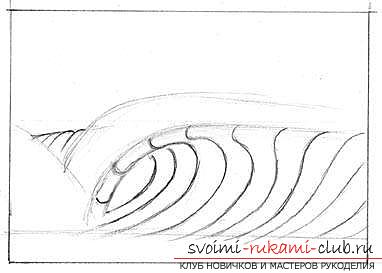 Over the drawn image you need to designatesplashes, constant companions of any wave. For this we need to use hatching or very thin lines. In the place where there is a collision of a wave and a water surface, we finish the foam. You can optionally draw it in and out of the wave, in the pipe. It is this detail that will make the drawing more vibrant and saturated, add a visual volume.
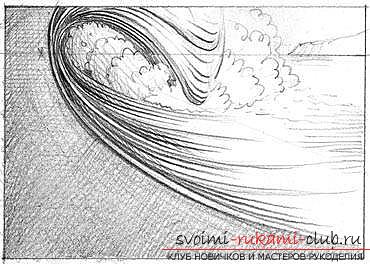
 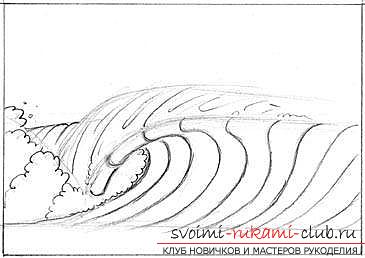 It remains to do the shading. It is light and shadow that are very important for the final result. To achieve the desired effect, you need to draw additional lines in a certain sequence, use the hatching, which we already talked about in the previous article. The figure shows that you need to apply not only parallel, but also perpendicular lines. In this figure, we need to make a shadow inside the wave itself (the pipe), as well as in some areas of the image that require expressiveness.
  Important. Foam during drawing of a wave can be represented as well as in our drawing, that is, schematically. Draw each individual curl and all the bubbles too long and tedious. The importance of perspective during the drawing of the wave. Perspective is an important, almost integral part of any drawing. It is this that makes it possible to create new images of the same object each time. This applies to drawing a wave. Of course, during the training you can apply only the first way to draw it. Acquiring practical skills, you can create a very good image of the wave, but they will be the same type and uninteresting, lifeless. In other words, there is a lack of perspective in such figures. In order to revive them, you need to draw an object from different angles. In this case, special methods are used. The first technique is to draw a low horizon. The figure shows that the line of sight of a person or horizon is too low. Thus, it seems that the wave is very high and seems to hang over the viewer's head.
  The second method is the drawing of the horizon linetoo high. In this case, the viewer has the impression that the wave is at the bottom, and he himself is on top, above the wave, on the shore, the pier or the ship deck.
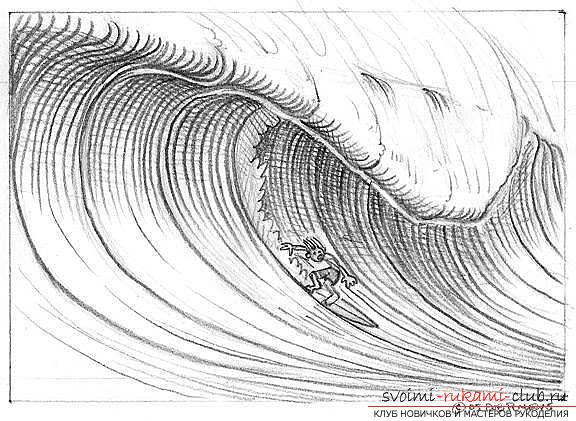
 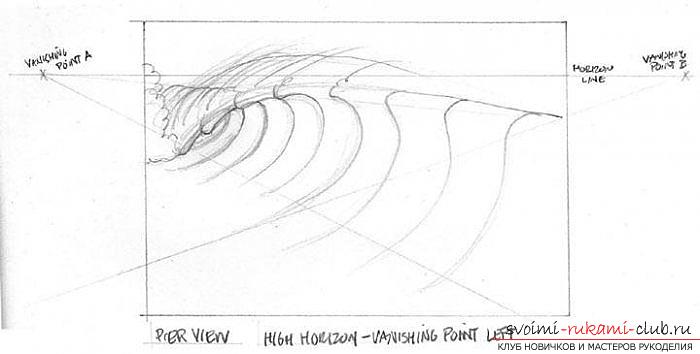 The third method is to create an effect, the viewer looksinside the wave (tube). How to draw this image can be seen in the pictures. It should be remembered that each separate effect, making the drawing unique and alive, is achieved quite simply. It is necessary to shift the horizon or the point of tension of the object, in particular the wave.
 The view from the wave (pipe) is an interesting solution to the drawing, somewhat fascinating. In the case of this drawing you can even see the elements of the landscape.
  In the following figure, we see a similar effect, only the wave is slightly shifted and the horizon is drawn somewhat differently.
 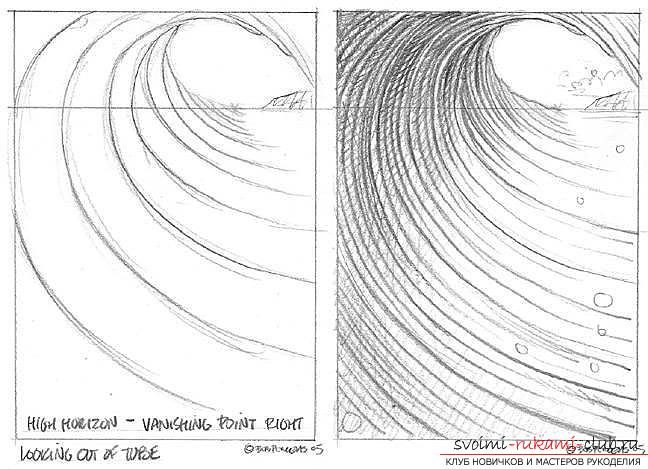 Display the view of the wave, for example, from the pier, you can and as in this figure. We see that the horizon line is drawn very high and it seems that the waves are below us or below us.
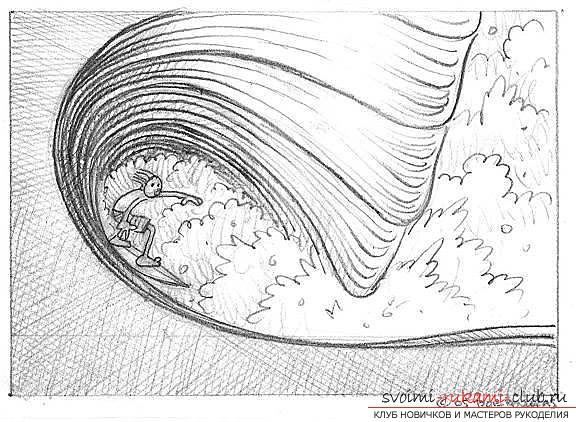
 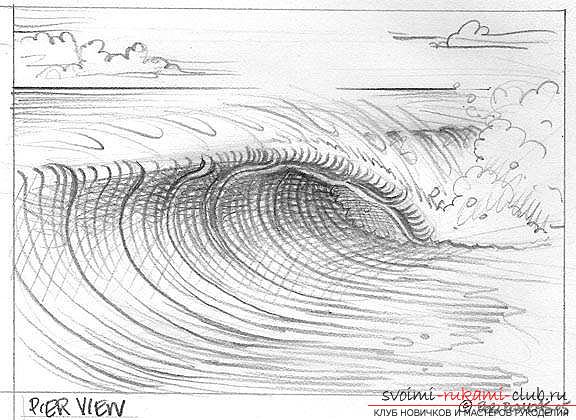 In the following figure, the horizon line is very low. The wave we see from the position of a person who swims or is engaged in surfing.
 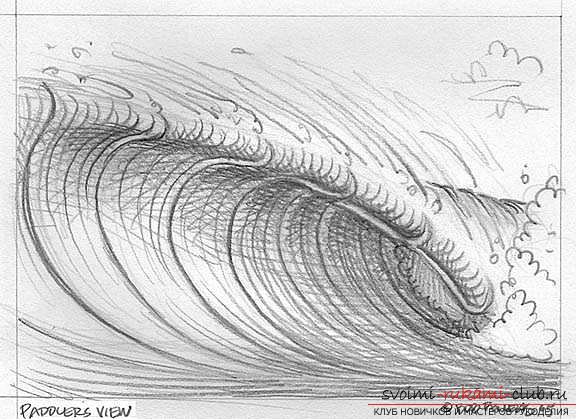 Using the principles of perspective already known to us, we can also draw a wave depicted from a bird's eye view.
 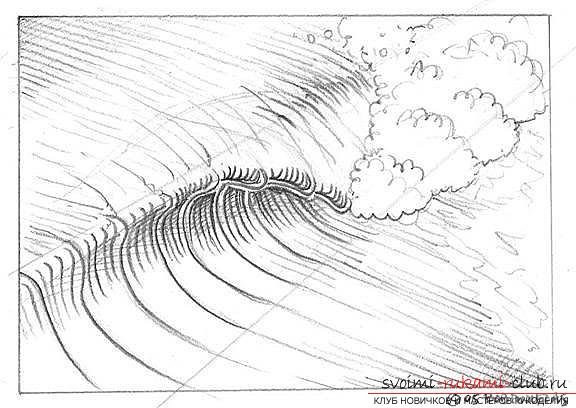 In this figure, we see another version of the depiction of the low horizon.
 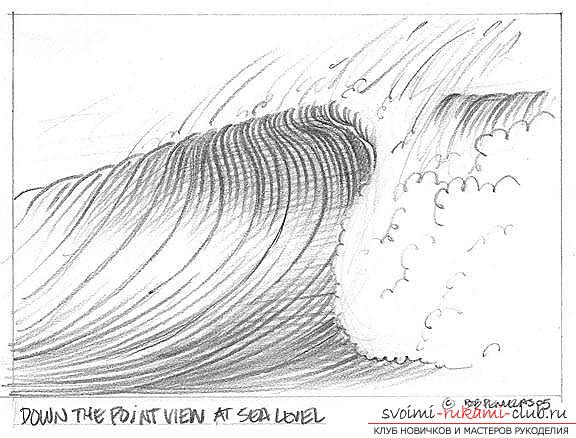 Drawing waves, different scenes Drawing a series of waves we need for one purpose - to learn how to draw an object from any angle and from any angle and clearly convey the meaning and depth of the image.
 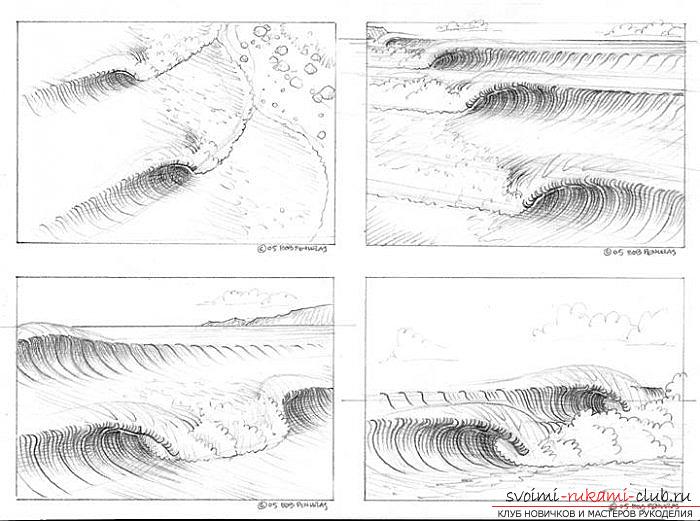 Types of waves The first type is the peak of a wave. First, you need to draw the side parts of the wave so that they eventually have a mirror image. After the done actions, you can start drawing and the peak of the wave itself - the top.
 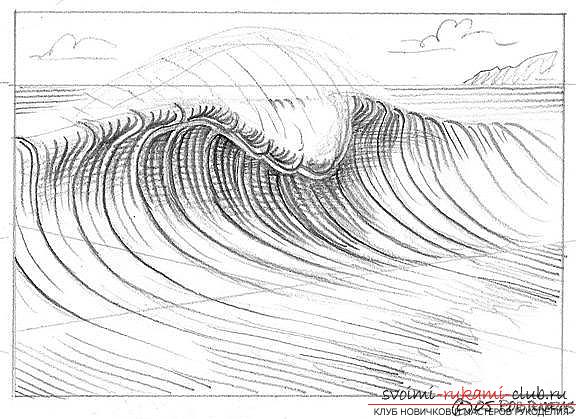 Variants of the object (waves)
 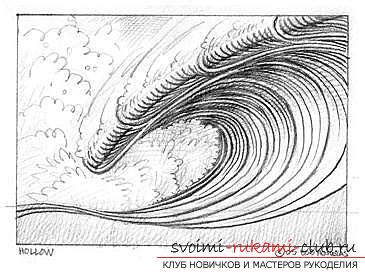 We can draw different types of waves. It can be very large, powerful, thrilling waves, or, on the contrary, small, thin and weak.
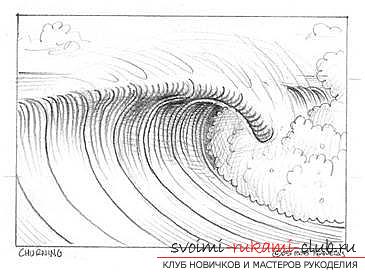
 Drawing surfers In drawing with a wave we canadd surfers. Here, the main thing is to place them correctly. The pictures clearly show the position of the surfers, therefore, having studied them well, we can easily improve our own masterpieces independently.
 The lesson of drawing a sea wave went to histhe final stage. I hope that the material provided in this article has become useful to you. But, remember, in order to achieve the best results, practice will be required. The more you draw similar images, the better they will be obtained from you. Good luck.
Comments
Related posts:
 To learn the child to draw the basic nonconventional drawing techniques in a kindergarten will help
 Teaching children to draw in the older group of kindergartens will help you to use non-traditional painting techniques
 Learning how to draw a person's eyes correctly can be done very quickly, if you do it step by step
 Teaching children to draw in an unconventional way will help the master class of drawings in the technique of grating
 An interesting master class on sewing a baby blanket from triangles will help you learn how to sew from shreds