
We make quality clothes for future mothers together. The design of a comfortable dress for pregnant women has never been so easy. Simple diagrams and photos
Your attention is offered a very comfortable andeasy dress for a woman at any time of pregnancy. In such a beautiful attire of printed viscose you will not feel any discomfort. The dress has a wide hem, asymmetrical cut. You can choose any color, but for a better mood recommend a bright floral pattern that gently covers your tummy, and you'll just be delicious. Details for tailoring dresses for pregnant women. The basic pattern of the dress is made very simply, it is necessary to use a classical basis for dresses. But in our case, you need to make a few additions, so that the future mummy felt comfortable in it. On our pattern it is necessary to close the dart on the chest and transfer it to the travel part. Adding to the flare at the bottom should be increased by six centimeters. Before you also need to increase by seven centimeters on the side. Separately draw a triangular insert, its length is AB, and the width is thirty centimeters. Round off very slightly from the bottom. The backrest model is created according to the example shown in the figure. Extend the lower back from the side to the middle of the part by ten centimeters. The bottom must also be rounded. We draw a line on the pattern and carefully cut the back on it. On the fold do not forget to postpone six centimeters. Separately reseat the obtachki for the armhole and neck of the back.  Now we begin to cut the rest of the dress. In total, we need to make the following parts:
- Two parts for passing the dress;
- Two more details for the back of the dress;
- To insert a transfer one detail is needed.
In addition, it is necessary to do a pattern of obtachkiarmholes and throats, both front and back. On seams it is necessary to leave one and a half centimeters of allowances, on a bottom - two centimeters. Gently duplicate the obtacks with warmth. 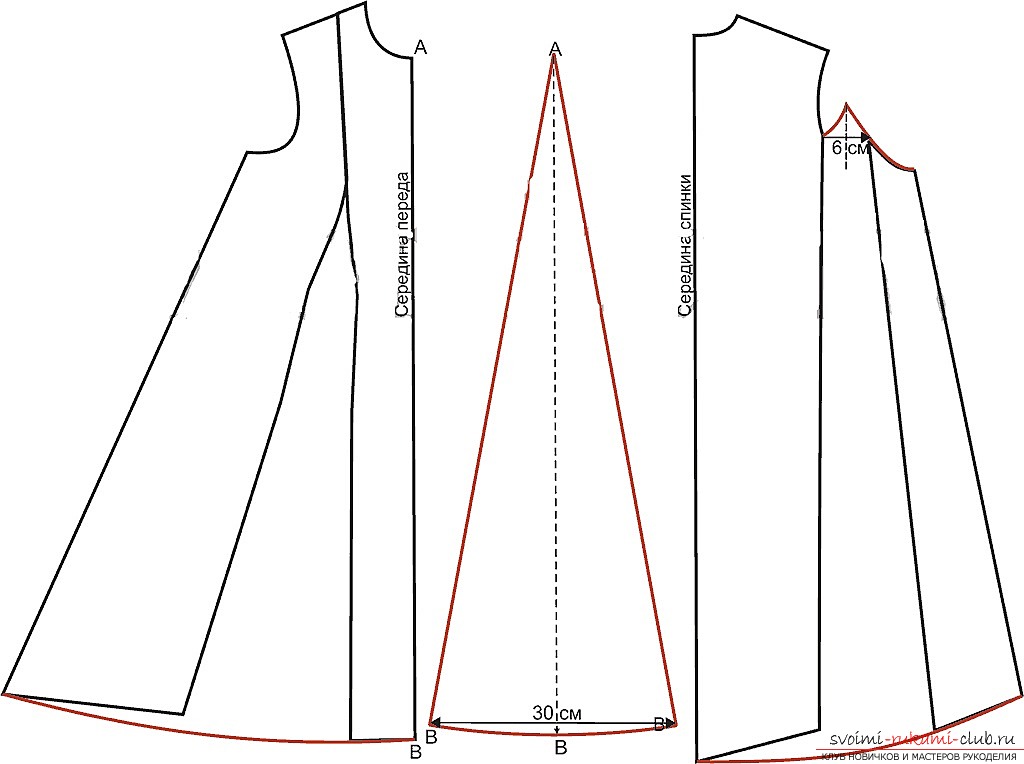 We turn to sewing our wonderful dress forpregnant woman. To the details of the dress, you need to pritach insert, all the allowances carefully handle. On the details of the back, lay the folds. Shoulder and side seams mite. On the back you need to sew a secret zipper. If you do everything right, then it will not be completely visible from the outside. Most often, a hidden zipper is placed in the middle seam of the back of the dress. Of course, you can sew it in the side seam of our outfit, but you should consider that in this case the side of the dress can seriously deform. This can happen if you incorrectly carry out the process of sewing lightning, or if our fabric is too thin and will not last. Therefore, for better reliability, sew a secret zipper in the middle seam of the dress. Follow carefully presented instructions, and your hidden lightning will not be noticed. Unlike standard lightning, our hidden lightning should be placed in the open seam. Before you start, gently walk over the seam of the part with an overlock. You can also apply a slanting silk bake. Using the tailor chalk, mark the line of stitching the zipper from the wrong side of the back of the dress. The allowances should not be more than one and a half centimeters wide.
  The allowance of the middle seam should be turned tothe wrong side, and after a while, squeeze it a little. Do not iron at all! Open our hidden buckle, put it face down to the dresses allowances. The clasp toes must coincide with the line of the middle of the back of the dress. This is very important, carefully check this point. Now it can be swept, having combined the top of the braid of lightning with the top of the neck of the back. Start from the top and, gradually sinking down, sweep the left and right sides of the secret zipper. For a sewing machine, take a special foot to attach the hidden fastener. Slightly bend the teeth of the concealed zipper with your fingernail finger so that you can see the place where the seam is fitted. It should be between the braid and the teeth of lightning. Swipe the line on the left side of the hidden fastener. The line should end where the foot rests against the "dog" of our fastener. In the same way, draw a line on the right side of the concealed buckle. Like the previous one, you need to start the row from the top. Secure the end securely with a double knot. Close our hidden zipper. Now it remains only to stitch the open seam of the back of the dress for the pregnant woman. The middle seam of the dress needs to be swept away, having previously combined the slices below the zipper. End the secret lightning slightly bend. Change the presser foot, and then gently stitch the seam. The ideal line is to perestrachivat our string vtachki clasp and is from her left to one millimeter. When doing this operation, hold the end of the hidden zipper a little. Reason the allowances. That's all. The concealed clasp is now completely invisible, but reliably holds the back of our dress. The throat and armhole should be carefully treated with undercut patches. This method is one of the types of obtachki, thanks to which you can very accurately handle the cutout of any, the most diverse form. Despite the complexity of the details, you will definitely get an excellent result, the main thing is to do everything right. We will engage in a tailoring obtachka. First, open the patchwork patch using our dress fabric. Obtachku will do for the neck of the front half of the dress, as well as for the neck of the back. Since, we have a secret lightning on our backs, we need to cut out two such details for the back. The presented obtachki are cut out in width four centimeters and should precisely repeat a cut-out of a mouth. Carefully transfer the pattern of the underlining to the tracing paper and cut it, not forgetting the necessary allowances. We duplicate the finished patterns using thermo-cloth. It must be cut, not including allowances for seams. Stitch the shoulder seams on our dress. Thread the color of the main fabric in a tone so that it is not noticeable from the side. Seam allowances are carefully processed and ironed. Shoulder stitches on the stitches gently mow. On the cutting edge, press the seam allowances, but do not process them yet. The outer side of the obturator is treated with an over-seam. Now you can sew our secret zipper in the back of the dress. Bend the fasteners ribbons. The face side of the undercut obtachka is placed on the front side of our dress neatly along the neckline. Using the pins, grind the parts and sweep them. Pull the obtach over the allowance securely to the neck.
  When you get to the braid of lightning, perestolichiteclaw teeth with several stitches. After this, turn the dress to ninety degrees and walk around the obtachka on the short side. The tape of lightning should remain inside, that is to the left of the seam. Gently attach the obtachki. Cut the allowances, leaving about 0.4 millimeters. At the corners cut, not reaching the line literally two millimeters. Cut off the allowances at the corners "to the corner", after turning the obtacle, iron and cleanly sweep it. Now spread out the obtacle with our dress in one layer. Make sure that all allowances have been turned to the obtack. Step back from our clasp three centimeters and draw a line very close to the seam. Pripuski stitched to obtachke. Obtachki need to be fixed in such a way that the cuticle obtachka in the ready-made dress lay beautifully and neatly and did not turn away. Now you need to manually grasp the tail piece to the braids of the zipper, and also the shoulder seams. Thoroughly and accurately tuck the allowances underneath our dress for expectant mothers. That's all. The work is finished, our pretty dress is completely ready. You can wear it with pleasure and always be the most beautiful.
Comments
Related posts:
 A new pattern of Greek dress. We make beautiful dresses together, prepare for a hot summer. Simple instructions and photos
 We make our wardrobe more diverse. We make a pattern of a simple dress base with our own hands. Simple diagrams and photos
 We are preparing for the summer heat correctly. We make a pattern of a light dress-sundress with our own hands. Simple diagrams and photos
 We are preparing for the summer heat correctly. We make a pattern of a fashionable dress made of chiffon with our own hands. Simple diagrams and photos
 We make beautiful and stylish dresses for the daughter on any holiday and celebration together. We make a real princess from a girl. Easy instructions and photos