We make beautiful cards for the teacher's day with our own hands
Teacher for everyone - part of childhood, laid downfor all life knowledge and wisdom is the bearer of spirituality and morality. Students remember that the teacher needs attention and support. A postcard to the teacher's day, the teacher will be especially pleasant. Such a small gift is an expression of attention, respect, and respect to the teacher. It's not difficult to make it up: a little perseverance, patience - and an exclusive congratulation is ready. 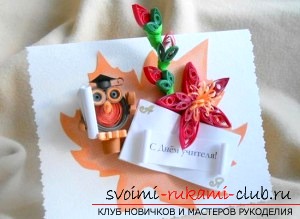 Materials: - paper, painted on both sides in a variety of colors; - cardboard and white paper; - Corrugated paper variant of green color; - wire; - PVA; - two-sided adhesive tape. Making an owl: 1. Strips of 5 mm wide are cut from two-sided paper of orange shades. The size of the owl will depend on their number. 2. An orange roll is rolled up with a toothpick. The edge is glued, a subsequent strip is attached to it. And again it twists. When the roll of serpentine reaches the desired shape, the winding ends. 3. Pasting brown strips, form the bird's body. 4. Black, brown, beige paper is cut into strips of 3 mm. They wind up as eyes in the following sequence of colors: black, beige and brown. 5. From the black paper cut into strips of 4 mm, from them the base of the owl cap twists. Another black square is cut out - the top part of the cap. 6. Beige and brown stripes are cut into 2 mm. Starting with beige, rolls from these colors are curled. Squeezing the rolls, six ovals are formed. From the ovals wings are made. 7. From the beige stripes in 2 mm a small oval is wound - the future beak.
  8. Papyrus twists a square of white paper - his owl can hold the wing. 9. From serpentine to 3 mm of brown paper owl eyebrows are made: eyes are wound, on them a strip is glued on top, which then must also be twisted.
  10. Collecting an owl: eyes are attached to the calf, then the beak. To the bird's head is glued a coiled black roll, on top of which is glued a square of black color. 11. Two wings are glued, under one - a roll of white paper.
  12. Cut beige strips of 3 mm, twist, of them spinning 6 ovals. They are glued together to 3, paws are obtained, attached to the calf. 13. Here's the sheep's ready.
 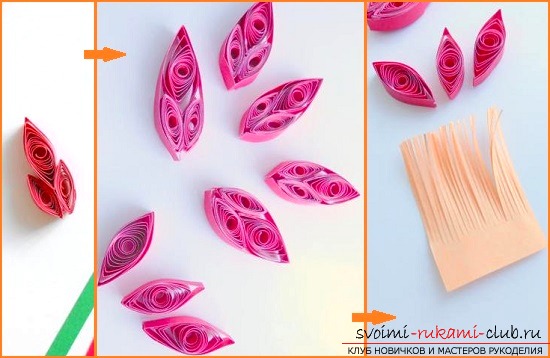 Making a postcard Now we need to makepostcard. To produce the flower will go greenish and bright crimson paper, cut into slices of 3 mm. Twine crimson rolls are wound: 5 - large, 10 - twice smaller. From rolls, ovals are made, then they are compressed until they get sharp corners. The petals of the gladiolus are made from 2 small rolls and one large roll. Gluing the part, you need to glue them with a crimson strip 3 mm wide. It is produced in this way 5 petals. By analogy, 3 circles are made in buds. The beige rectangle is cut - the flower middle. It cuts the notches, and abruptly twists. The edge of the rectangle is pasted.
 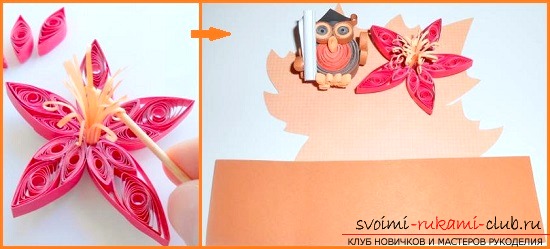 To make a flower, 3 petals are glued togethertogether, the middle is glued inside, the remaining 2 petals are stuck together. Formed pistils. From brown paper, a sheet is drawn and cut out, a pencil is made for an owl.
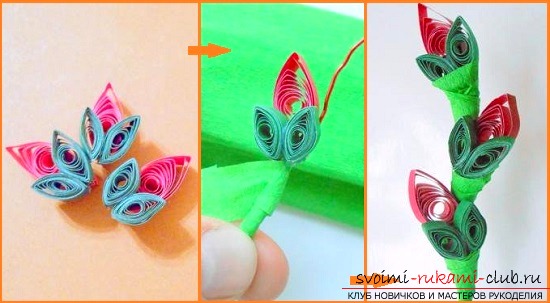
 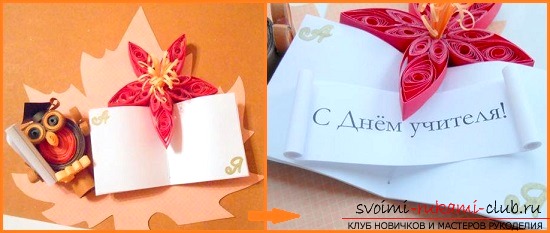 Making a book The cover of a book is cut out - a strip of brown paper. It bends in half, then the edges bend to the center. White paper is stitched or pasted into the cover of the leaf. Assembling the postcard The details of the postcard are collected: on the autumn leaf stuck stump, it is arranged for an owl. A book and a flower are fastened. Glued to the greeting cardboard-based postcard. A rectangle is cut out of a thick cardboard - the basis of a postcard. Of the green stripes of 3 mm, 6 leaves are prepared according to the technology of buds. 2 buds are glued to the buds. Buds are attached to a wire, disguised as corrugated paper. The bottom of the bud is also wrapped in paper. It is necessary to attach a leaf and a branch with buds to the base - the postcard to the teacher's day has been made with his own hands.
Comments
Related posts:
 Postcards with your own hands on your girlfriend's birthday.
 This master class will tell you how to make your own cards for Valentine's Day.
 This master class will teach you how to make your own beautiful quilling cards.
 Crafts by the day of the teacher. How to decorate a vase with your own hands
 The master class will show how to make valentines - simple cards with their own hands, such cards for children are light in performance, but very touching.