
Embroidery with beads, detailed master-class with diagrams, photo
Create beauty with our own hands: embroidery with beads In this article we will tell you how to properly embroider beads, and in detail we will show what is necessary for this. So, let's get started. Before starting the process of embroidery itself, you need to stretch the canvas with a pattern in a wooden frame, using the buttons. There is a variant of embroidery on rectangular embroidery frames. In the case when the hoops available at hand are too large in diameter, then you can attach fabric strips along the edges. 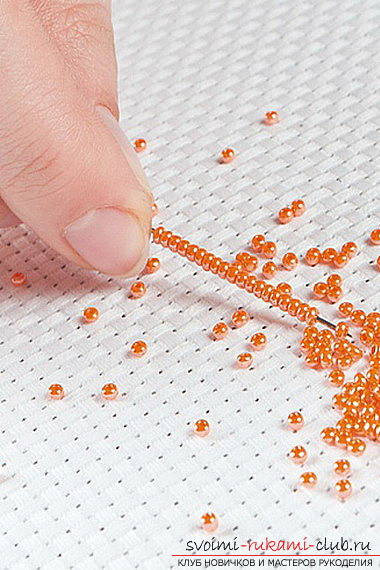 It is most convenient to do the embroidery at the table. The working surface is covered with a cloth of light shades. In this case, if the beads suddenly jump off the needle, you will immediately see it and pick it up. It is very important to work with a brightly colored bead, because working with it is very painstaking and requires good vision. The beads can be poured on the tissue itself in small portions or use a saucer. Beads can be poured in small piles immediately on the fabric, use a saucer in the work, a plastic dish with divided compartments or simple boxes of matches. The last option is one of the most attractive, because you can easily close this box if you want to temporarily postpone the embroidery.
 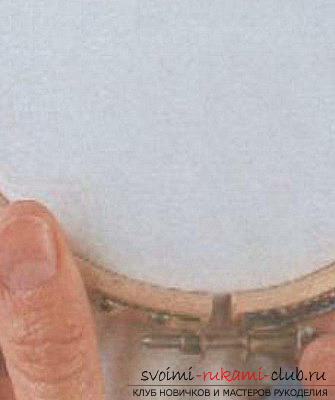 Threads for embroidery are advised to take from kapronmaterial or cotton, which should be medium in thickness. You need to embroider in one thread. White, light gray, and also beige shades are well suited for embroidery on light fabric, but for a dark cloth or single-color beads it is better to take a string of the same shade. Colored threads may have a substandard color. It is necessary to believe it before the embroidery process begins. In work with beads of gold color, gray threads are suitable. To prevent tangle of the thread during work, you can try to treat it with wax, but it is important not to exceed the permissible standards, otherwise the wax will dirty the fabric. A thread that is too long can twist and cause inconvenience when embroidered. When fixing the thread on the fabric, you should try not to make large knots. Start making a seam, you need to make a small knot on the thread, sew the fabric from the wrong side, turning to the front. then fix our thread with a small reverse stitch. Do this in such a way that the nodule does not pass to the front. You can also fasten the thread on the front of the canvas by sewing a few small stitches across one point, which you will then close with beads. The correct use of long and thin needles for working with beads. It is better to choose needles number 10 or 12. To make it easy to thread in the eye of a needle, it is better to take a needle with a long cut that replaces the standard eyelet.
  Types of seams for working with beads: The monastic stitch. According to the manner of execution, this type of seam is very similar to the technique of cross-stitching. Stitches are made diagonal, each stitch is 1 bead. From the inside out stitches of a vertical type. We attach a thread with a needle, then hold the needle and thread on the front part and string the beads of the desired color. (Scheme 1)
 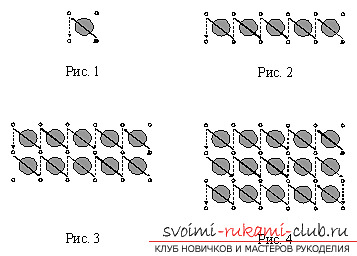 To go to the next series, you need toneedle on the wrong side to the top or bottom and bring it to the front part in the upper corner of the square (Diagram 2). We sew one bead and embroider this row, but only in the opposite direction (Diagram 3, 4). Carrying the transition to the next row, you need to draw a needle through the wrong side diagonally to the desired cell, and then pull the needle into the upper corner of the cell. Stitch "Line". Each stitch made must be provided with one bead (Scheme 5). We deduce a needle from the inside between the 1st and 2nd marks of the beads, string the 1st bead and hold the needle in front of the 1st badge of the beads. Then we remove the needle from the wrong side between the 2nd and 3rd marks from the beads, string the 2nd bead and draw the needle between the 1st and 2nd badges. We deduce a needle and from the wrong side between the 3rd and 4th signs, string the 3rd bead and hold the needle between the 2nd and 3rd beads from the beads. Then embroider, adhering to the scheme, displayed on the fabric.
 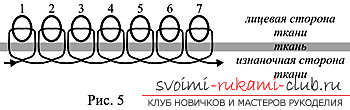 Stitch "Stemble". We attach the thread, pass the bead, pass the needle through the fabric and draw the needle behind the bead, we pass through the already attached bead (Diagram 6). String the next bead, insert a needle through the fabric behind a new bead and deduce between the final and previous beads. We pass the needle through the attached bead, then string the next. With this technique of embroidery the product comes out quite dense.
 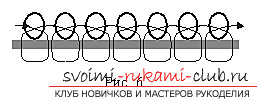 The "Arched" seam. Such seams are better to work when there is no need for a tight connection between the beads and cloth, or you do not want the product to have a hard look. All the stitches from the front are provided with several beads, but only one of the beads attached to the fabric is attached to the fabric, which is located at the intersection of the stitches (Diagram 7, 8).
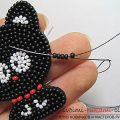
  In the diverse sets of "Butterfly" there arepaintings, the creation of which requires the use of circular embroidery. Creation of such canvases must begin with embroidery of a spiral, and then increase the size of the circle until its edge coincides with the edge of the canvas of the painting (Diagrams 8, 9).
 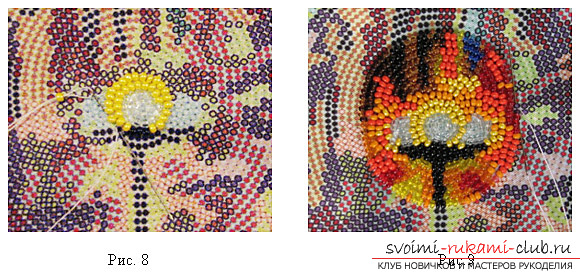 Then we embroider the picture in rows of half-bentcharacter, at the same time we fill the whole space of our product. With a circular technique it is better to use "line" or "stalk" sutures. Rows that look semi-bent, we recommend to embroider with a seam "arched" (2 beads). In the diagram 10, you can see the wrong side of the product, where the lower seam is used.
Comments
Related posts:
 Beadwork embroidery, detailed master-class with diagrams, photo, for beginners
 Embroidery with beads paintings or icons, detailed master-class with diagrams, photo, for beginners
 Beadwork of the flower "Field moth", detailed master-class with diagrams, photo
 Embroidery with beads on the skin, brooch "Kitten" from beads, detailed master-class with diagrams, photo, for beginners
 A lesson on the beadwork of icons, a detailed master class with diagrams and a photo for beginners.