
Extended information on how to sew a textile doll with your own hands
We represent the master class on sewing textiledolls, collected from different sources and corrected by our imagination. Such a textile doll will become a wonderful gift and a favorite toy for your daughter, or you can simply replenish it with your doll collection. 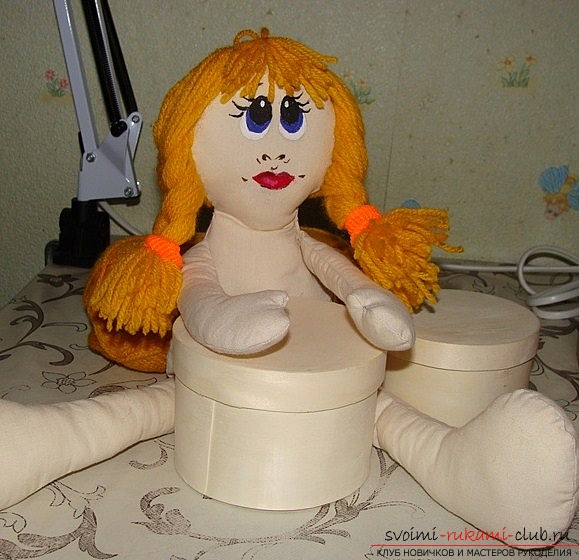 Used materials and tools for creatingtoys: 1. the pattern itself, which must be printed on a sheet of paper in A4 format; 2. a piece of cotton material of beige color; 3. scissors; 4. sewing thread, which will fit the hue of the doll; 5. material to fill the doll; 6. The sewing machine; 7. Yarn or toy hair mulina; 8. pencil, paints based on acrylic; 9. The thick book. 10. watering can made of plastic. Let's get to work! We fold a piece of cotton material in beige color in half (the outer side inward) along the share thread, then place the patterns of the trunk toys from the paper, which we previously cut out, and outline the silhouette with a pencil.
 In turn, pin the English pinsthe material so that it does not move away, we sew on the machine along the drawn lines without sewing a part of the top at the feet and hands, since we will need a hole to turn out the elements of the doll and fill it with a filler, for example, you can use a sintepon. Note that we do not sew the head and the body of the toy at all!

 Cutting the stitched arms and legs of the toy, it is necessary to retreat from the seam 5 mm on each side. Legs and hands toys, which we cut, you need to process the edges of the zigzag line.
 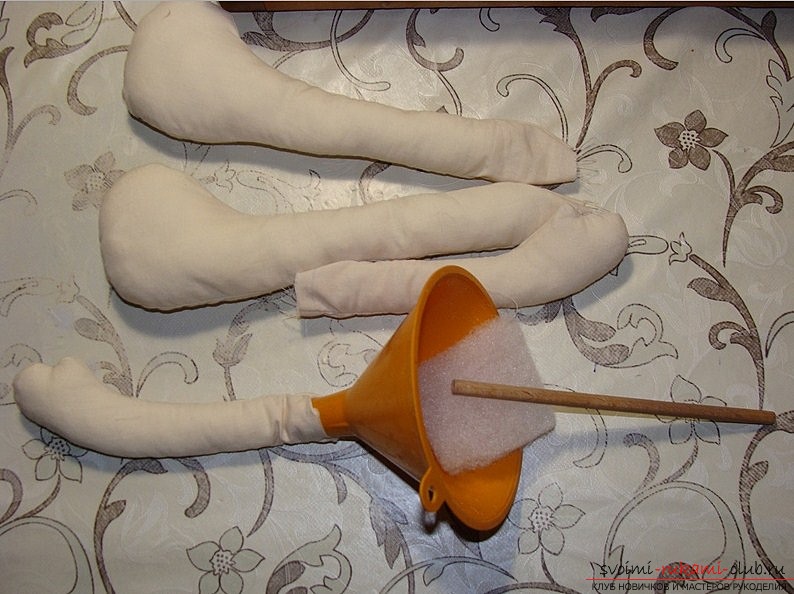 With the help of plastic watering can begin to cloghandles and legs filler. You can, first, cut the filler into strips about 50 cm wide, and then into the squares. It is not necessary to fill the doll very much, legs and hands must be soft, and at the edges and in general it is better to not lay the sintepon in order to keep the emptiness in details for the possibility of bending the arms and legs. Next, we need to cut out the two halves of the trunk of the pupa along the lines, the front side of the material inside.
  Also we have in the lower part of the body legspupae, we pay attention, that two legs "looked" in one party or side. Look closely at how to unfold the legs - up to the head of the doll, inside the trunk of the doll - from the outside of the material. Photo 8. We close the legs with the second part of the material and pin the pins, receding from the location of the next line. Securely fix the legs, you can even sweep.
  Then on the wrong side we sew the bottom of the body of the toy, spreading the legs.
  In this case, do not rush to turn the body of the pupa, first you need to pin with one hand on the side of the toy. To do this, you need to take your legs slightly to the side.
  Once again we sew on the typewriter the whole pupa, sewing it uphand. It is necessary to make a seam without interruption, start from the legs, walk along the side with the attached handle, sew the head and finish the seam on the other side of the pupa near the neck.
  We turn the pupa on the front side andwe get one not sewn side. In the non-sewn side of the pupa, we insert the other hand, placing it like the first, we sweep and we spread a small line on the outside of the toy to fix the handle. We do not flash everything - we still need a hole to fill the head and trunk of the pupa. But we will do this later. Now start painting the face of the toy.
  To draw a doll's face, we first makea sketch of the shape of the eyes, a cut of lips on a paper sheet in pencil. After selecting the necessary elements on the sheet, try to draw a face on the material. Now you need to try on an unnecessary piece of the same matter as the doll itself, and check the quality of colors and lines from the pencil. If there are problems with paints, then you need to choose others or sew just pushers or beads.
  Now after trying on the material, we proceed todrawing the face on the doll itself. With a simple pencil create the outlines of the eyes, lips, and nose. Using the finest brush, we paint the face with paints based on acrylic. While the doll's face dries we'll make hair. To do this, you will need ordinary yarn for knitting a bright shade.
  We make hair on this principle
  Binds the ribbon and attaches it to our doll. That's all! Our textile doll is ready! Now you can come up with an outfit for her. You can sew something, or you can simply wrap it up beautifully with a silk handkerchief.
Comments
Related posts:
 Information on how to sew a fabric bag with your own hands
 Make a soft doll with your own hands. The process is simple and extremely interesting.
 As for the pattern, sew a cute tilde doll with a hot-water bottle on the kettle by hand. Master class step by step will tell you about the main points of sewing
 Unique information on how to sew a soft toy to a horse
 A sailor's children's suit, how to sew a sailor's suit for a boy with his own hands, how to sew a cap and collar with his own hands.