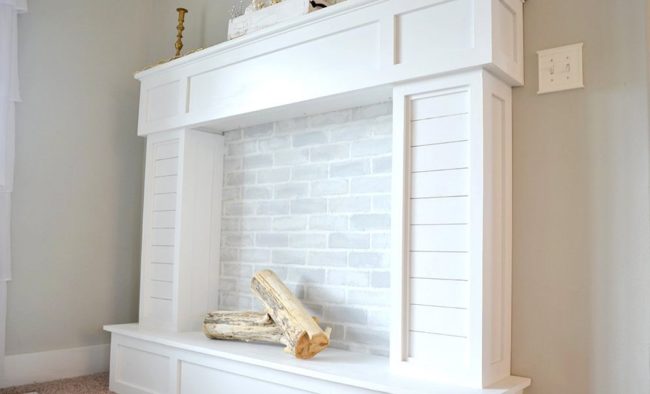
Falsh fireplace do it yourself - instructions with photos and drawings!
But the real fireplace is not cheap at all.pleasure, and often not allowed by safety. Therefore, here we present a detailed master class with photos and drawings how to make a false fireplace with your own hands. 
- At the same time, it is portable, that is, it can decorate your room constantly, or only during holidays, you can pick it up when you move, or donate to someone from friends or relatives.
- The design of a false fireplace is quite strong and reliable, so putting the fireplace to the wall, you can not be afraid that its children are overturned.
TIP: In the same way, you can make it out of durable cardboard and drywall! 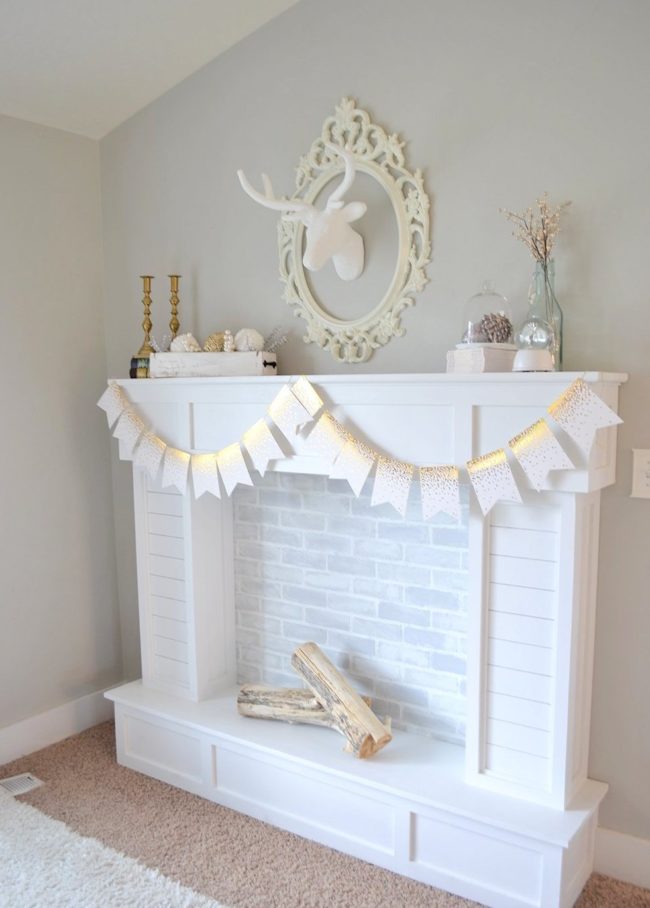 If you are ready to start work, let's start! The content of the article:
Necessary materials:
- 11 wooden bars 244 cm x 5 cm x 10 cm
- 1 wooden block with a size of 305 cm x 5 cm x 15 cm
- Panel made of artificial brick size 122 cm x 244 cm
- 2 MDF panels measuring 122 cm x 244 cm and 1.3 cm thick
- 1 chipboard panel measuring 122 cm x 244 cm and 0.6 cm thick
- Wooden plank size 244 cm x 1.9 cm x 1.9 cm
- Screws 3.8 cm long
- Screwdriver
- Screws, length 7.6 cm
- 2.5 cm screws
- Drill
- Drill
- Wood glue
- Paint and putty
- Brush and spatula
- Saw
- Sander
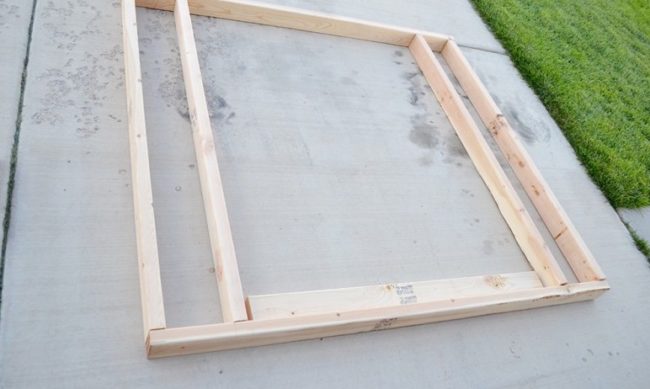
Step 1: Making a false fireplace frame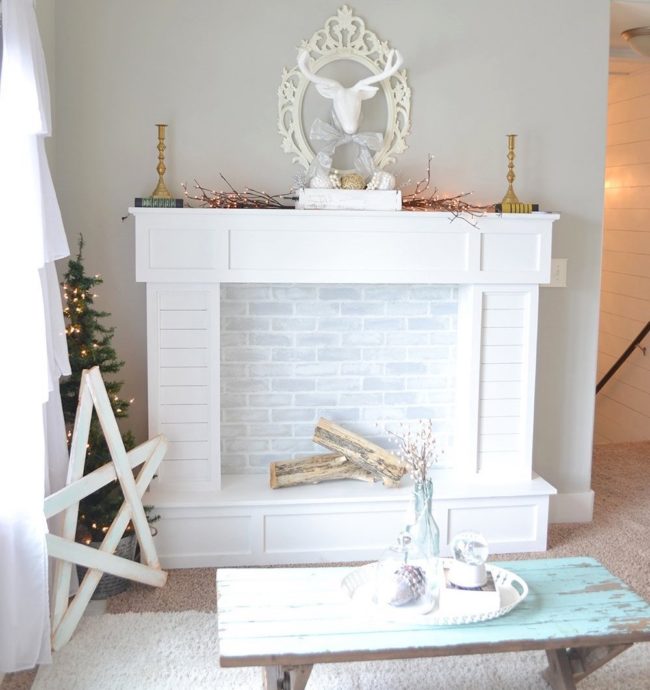
To begin with, we will create a frame - the “skeleton” of the false-fireplace design. It consists of three main parts: the back, front and bottom bases. Cutting:
- First we cut the parts for the back of the frame,which will be from the side of the wall. For the upper and lower parts, two bars with a length of 160 cm will be required, for the side elements, four bars with a length of 137 cm, and for the supporting part at the bottom one block with a length of 106.7 cm (see photo below).
- Then cut out the details for the front of the fireplace. To do this, you need (again) to cut two bars for the upper and lower parts with a length of 160 cm, 4 side bars with a length of 137 cm, a jumper with a length of 112 cm, and a front bottom with a length of 160 cm (the last of the bar is 5 cm x 15 cm).
- Now cut out the details for the bottom of the bottom. For the upper and lower parts, two bars of 160 cm in length will be needed, and for lateral joints, four bars of 19.7 cm in length.
 Assembly: To create the frame, we will twist it all together, using screws with a length of 7.6 cm and glue for wood (for extra strength).
  Let's start by assembling the bottom base:
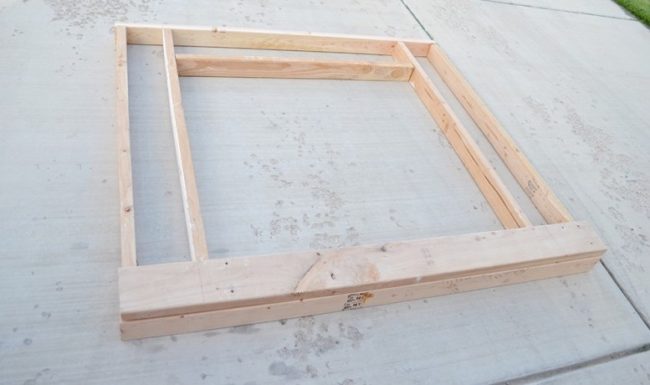
 Now we will build the back part:
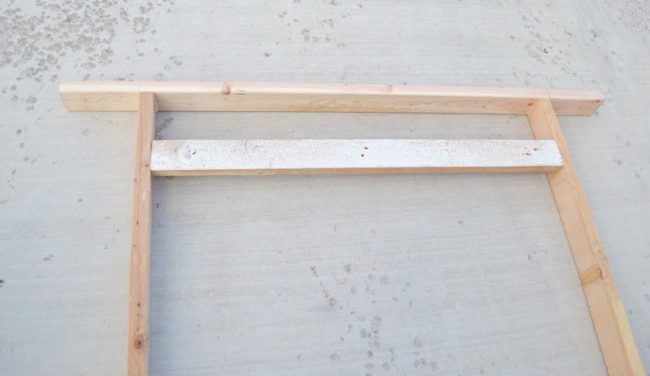
 At this stage, the back of the frame should look like this:
 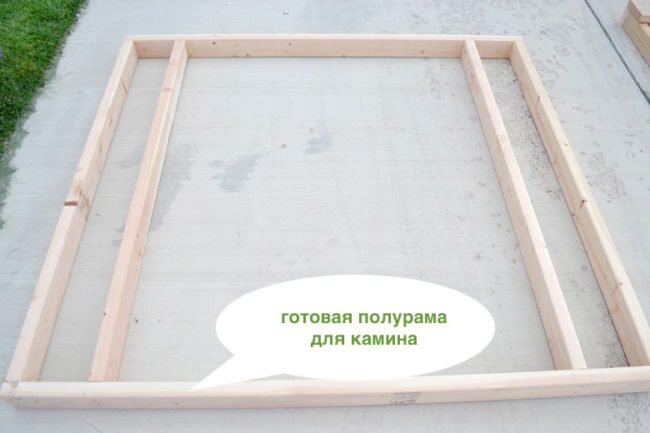 Now add a support bar (106.7 cm) at the bottom of the back frame. Center it to keep the same distance to the side bar, apply glue and secure with a clip so that the bar does not move. Then fix with screws.
 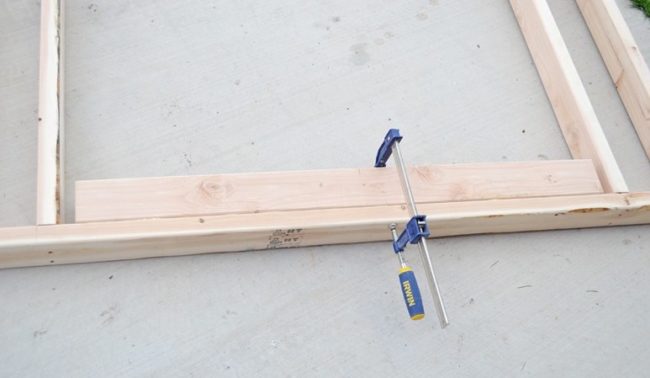 Now proceed to build the front of the fireplace.
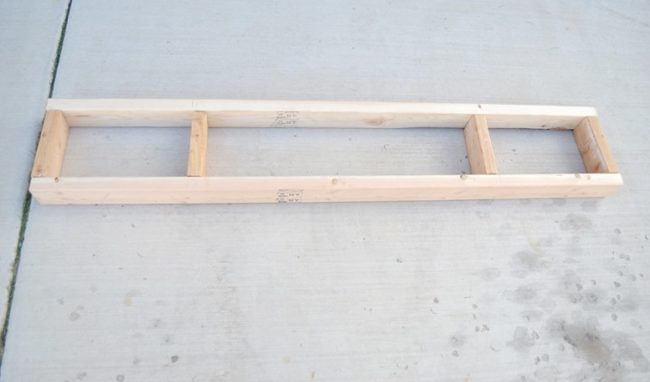
 Now fasten the two remaining side parts (as in the photo):
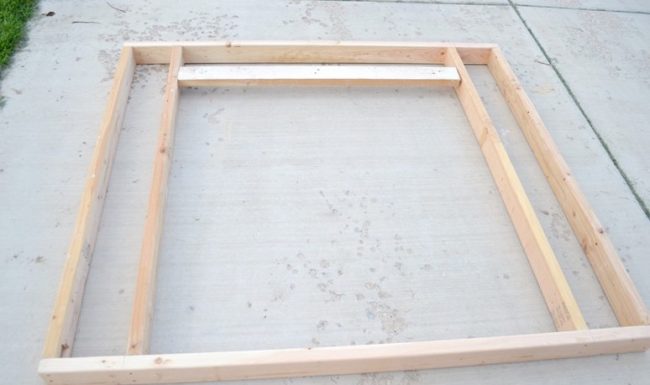 At the bottom of the frame you need to attach a bar measuring 160 cm x 10 cm x 15 cm. This is what happens:
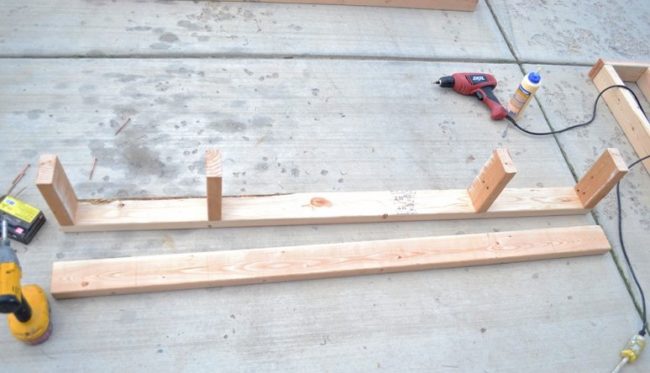
 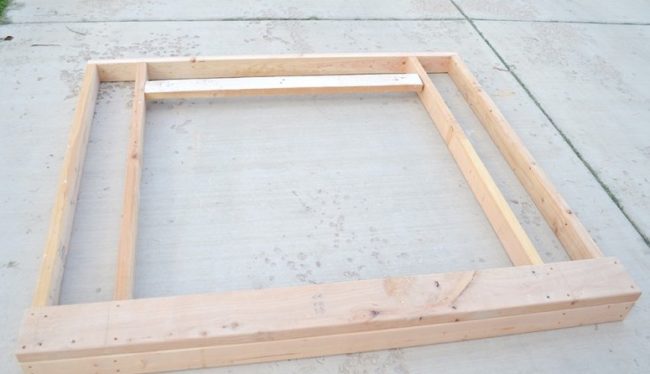 Compound: We have already made three separate parts, and now we need to connect them together. As connecting elements, we will need six bars measuring 30.5 cm x 5 cm x 10 cm, and one bar measuring 14 cm x 5 cm x 10 cm. They are presented in the photo below. And also a bar measuring 112 cm x 5 cm x 15 cm.
  Take the front and back of the fireplace andlay them on the ground so that the front is on top. Now take a 14 cm long bar and attach it between the wide board at the bottom of the front frame and the support board at the bottom of the rear frame. It should be located in the center, see photo.
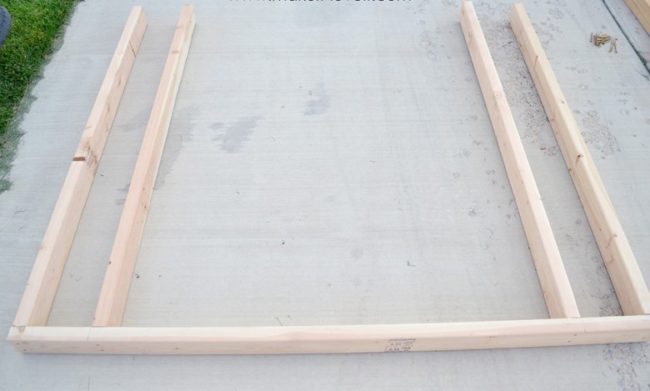
 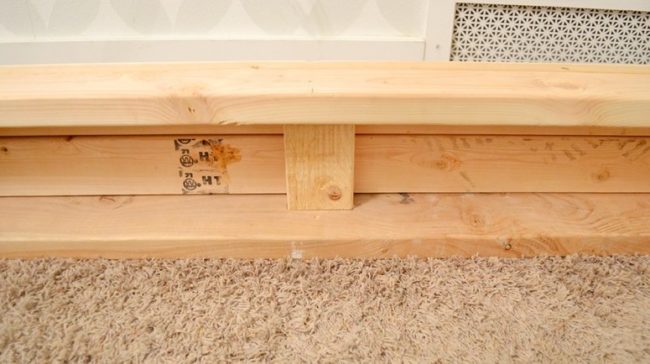 Now add the mounting at the bottom with the sides. To do this, we need two bars with a length of 30.5 cm. Since so far the front and rear frame are connected only in one place below, before attaching these side bars, make sure that the frames lie exactly on top of each other. Attach the bars, as in the photo (on the other hand as well):
  Take a 112 cm x 5 cm x 15 cm block and attach the jumpers on the front of the frame to the back side. Add additional screws through the side bars.
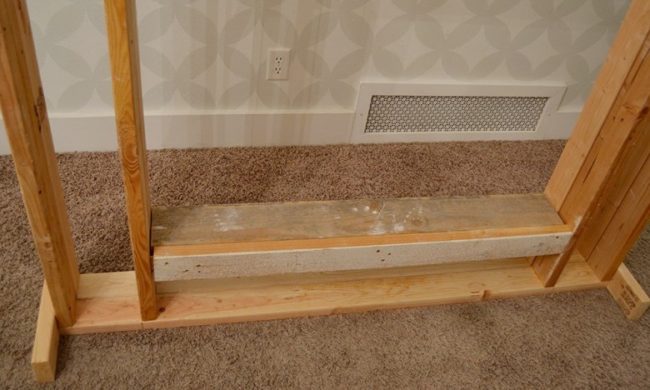 Now take the bottom base frame and attach it to the bars connecting the front and rear frames. In this way:
 Add two more connecting bars on the sides so that they reach the top of the base frame, as in the photo:
 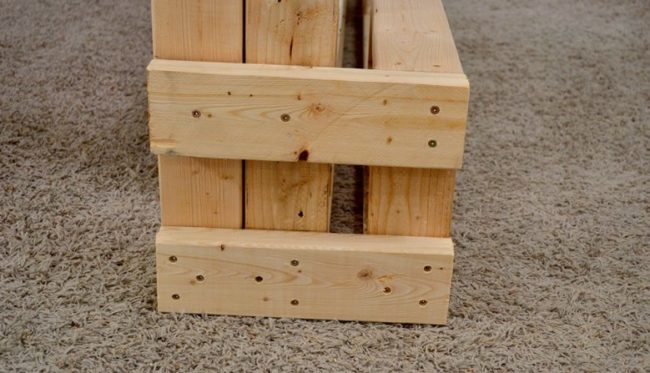 Now take the last two bars 30.5 cm long and insert them into the gap that was formed after fixing the frame of the bottom base (symmetrically on both sides). Attach the screws to the side.
  This completes the fireplace frame and can proceed to the next step.
Step 2: We do the fireplace trim
Now it's time to sheathe the fireplace with MDF or plywood panels. We will need pieces of this size:
- 28.5 cm x 170 cm, 17.8 cm x 115 cm - 2 pieces,
- 26.7 cm x 99 cm - 2 pieces,
- 17.8 cm x 99 cm - 2 pieces,
- 28.5 cm x 30.5 cm - 2 pieces.
 Now you need to cut the part to cover the top of the bottom of the fireplace. It can be made from MDF or chipboard (stronger). First you need a rectangle measuring 35.5 cm x 177.8 cm.
  Now this rectangle needs to be transformed as follows:
- retreat on one of the long sides from the edge of 9 cm and measure 24 cm from this point, measure 17.8 cm upwards from both points, it turns out a small rectangle (mark the same from the other edge).
- These two rectangles need to be cut to make this board:

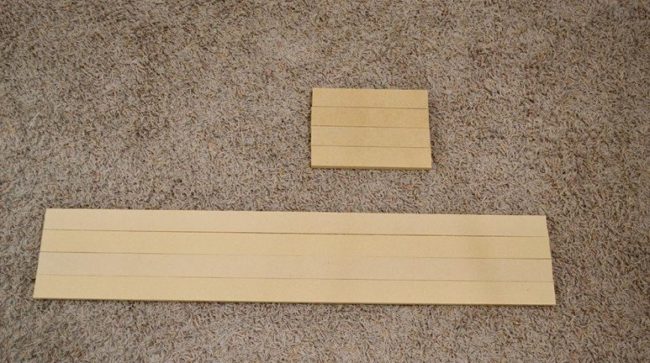
- Further from MDF, cut 6 cubes measuring 2.5 cm x 19 cm, and one 2.5 cm x 167.6 cm. Some of them are in the photo below:
 We also need a rectangle of 21.6 cm x 109.2 cm. This is for the bottom of the fireplace.
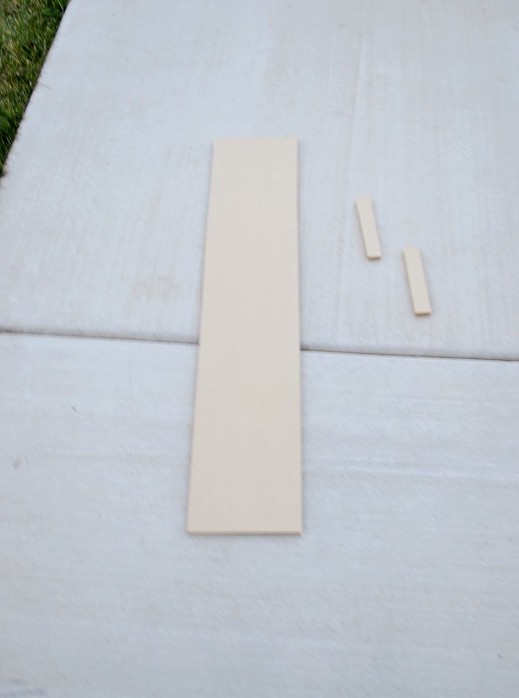
- Also cut a 170 cm x 28 cm sheet to cover the front and a size of 26.7 cm x 177.8 cm for the top.
- And 2 more pieces of 21.6 cm x 28 cm in size.
 Building a fireplace Now we will fix all this on the fireplace. Let's start with mounting the top to the bottom of the fireplace. Notch boards should be around the side columns. Secure the design with screws.
  Then take 2 pieces of 28.5 cm x 30.5 cm in size and attach them at the bottom along the sides. Then take a sheet measuring 28.5 cm x 170 cm and attach it to the lower front part of the fireplace. This is what happens:
  Column Mounting
- Let's start with the outer side and attach sheets of 17.8 cm x 115 cm in size to each of them.
- Then we will make the inner side using sheets of 17.8 cm x 99 cm in size.
- Finally, attach the front of the column using sheets of 26.7 cm x 99 cm.
Now your fireplace should look like this:  To cover a certain relief, we will add bars 2.5 cm wide.
- From the top of the fireplace, measure 26.7 cm and mark a line.
- Below this line, attach two 2.5 cm x 19 cm bars to the outer sides of the columns, to create a 2.5 cm high relief.
- Then take a 2.5 cm x 167.6 cm piece and attach it to the front so that it overlaps the sides.
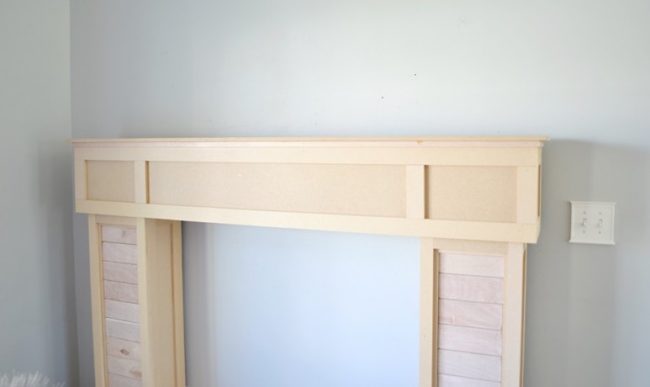
 Now we will use the other two bars2.5 cm x 19 cm in size and a sheet of 21.6 cm x 109.2 cm in size. The sheet should be attached directly above the relief strip, thus making a partition between the columns. And two small parts attach above the sheet to the inside of each column. Now attach the cover on top of the front:
  Take the last two pieces measuring 2.5 cm x 19 cm and attach them to the top of the columns, as shown in the photo:
 Then attach side covers of 21.6 cm x 28 cm on both sides:
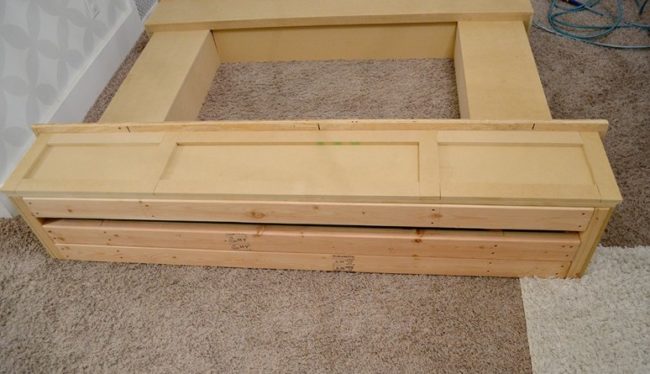
  And the last part of this stage - fasten the upper part of the coating with the size of 26.7 cm x 177.8 cm. Make sure that the coating on the sides extends by the same amount.
  The main fireplace cover is ready! Hooray!
Step 3: Finishing the fake fireplace
Now that the design of the fireplace is created, we willwork on his appearance. Add relief details of the fireplace, paint it, and in general, fully put in order. For further action, we will need to cut the materials into such pieces:

 Now cut a wooden plank with transversea 1.9 cm x 1.9 cm slit along at a 45 degree angle (i.e. the transverse slit is now triangular). The length of one piece should be 174.6 cm, and the other 24.8 cm. This is for creating relief.
 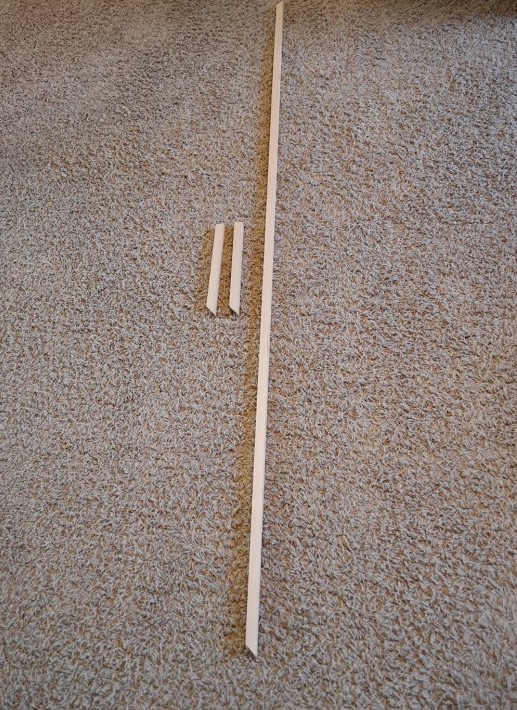 You also need to make one bar length 177.8 cm andcut off the ends in it at an angle of 45 degrees. Two short strips should be 26.7 cm long and in each of them only one end should be cut at a 45 degree angle.
 The panel that imitates brickwork should be 122 cm x 93.3 cm in size. In order for the panel not to be of a standard “brick” color, it can be painted white (here we will do so).
  Fastening Now that all the parts are ready, you can attach them to the fireplace!
- Let's start with the lower front part, we will fasten the details from left to right.
- Attach a 5 cm x 27.3 cm bar at the left end (it should extend over the edge by 1.3 cm, in order to fit well with the overlapping side bars).
- Then attach two bars measuring 5 cm x 39.7 cm perpendicular to the first bar.
- Now attach the next vertical bar measuring 5 cm x 27.3 cm and two horizontal perpendicular to it measuring 5 cm x 72.4 cm.
- Then another vertical bar measuring 5 cm x 27.3 cm, and again two horizontal bars measuring 5 cm x 72.4 cm.
- And finally, the last vertical bar measuring 5 cm x 27.3 cm.
 Now we will work on the sides. Take a 3.8 cm x 27.3 cm block and attach it vertically from the left side of the side. Then attach the top and bottom of the two horizontal bars measuring 5 cm x 23 cm, and another vertical measuring 5 cm x 27.3 cm. Repeat the same for the other side. Sheathing Columns Now we will sheathe the columns. Start by attaching a 5 cm x 87.6 cm vertical bar to the front left side of the column (it should extend 1.3 cm over the edge). Add horizontal bars measuring 5 cm x 19 cm at the top and bottom of the front of the column, and then another vertical (this one will also go beyond the edge).
 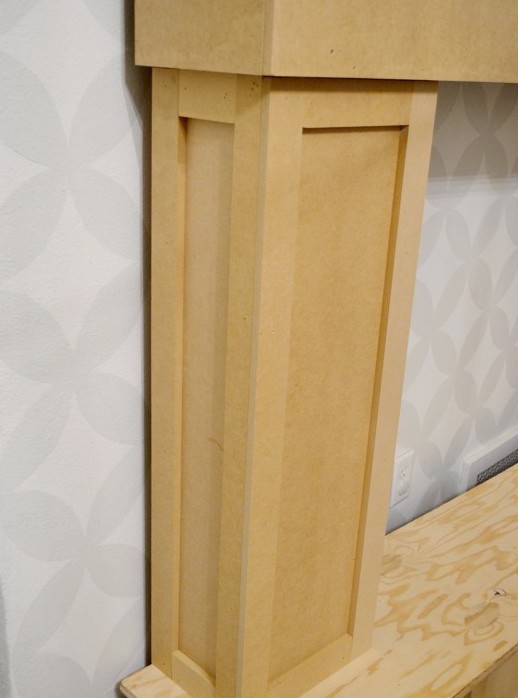 To sheath the sides of the columns, first attachon the left, a vertical bar measuring 3.8 cm x 87.6 cm. Then add horizontal bars 5 cm x 10 cm in size from above and below, and at the end another vertical bar 5 cm x 87.6 cm in size. Repeat this process for the outer and inner sides of both columns.
  Now let's do on the front of the columnsadditional reliefs. Attach two bars of 3.8 cm x 87.6 cm in size vertically on each side, and then add horizontal bars of 3.8 cm x 21.6 cm in size.
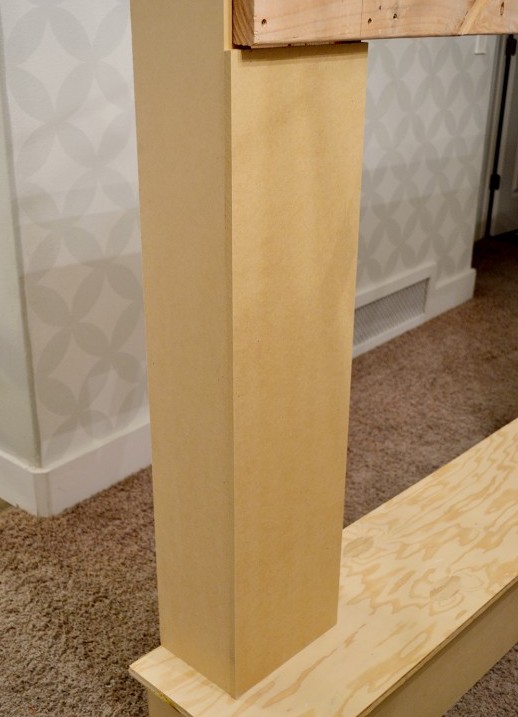
 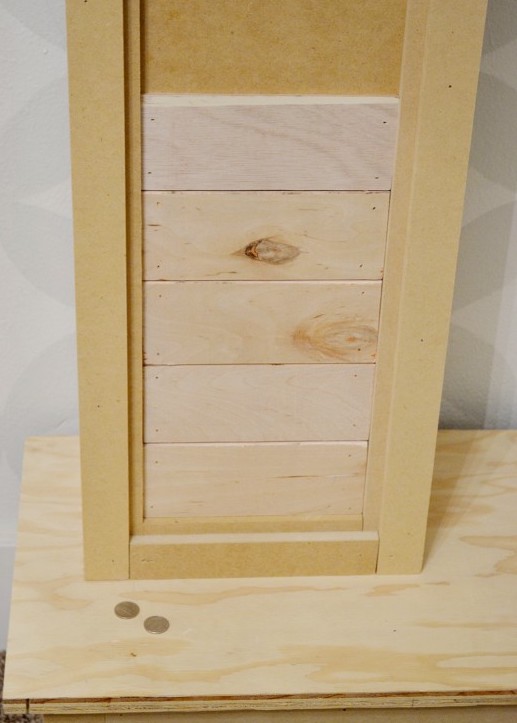 Now, to finish the front of the columns,You will need 20 boards with a size of 7.6 cm x 19 cm. You can start mounting either from above or below, it does not matter. In order to fix the same distance between the boards, you can insert 2 coins as dividers. You may need to trim the last board to fit. Do this with both columns. This is how it should look like in the end:
 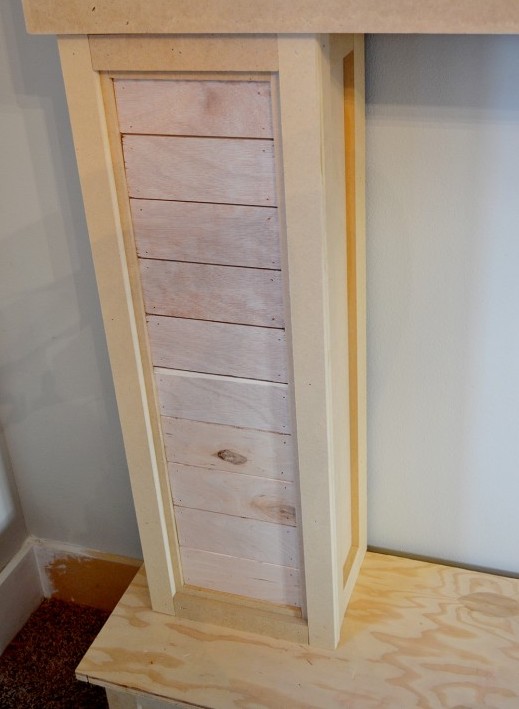 Now let's do the top of the fireplace.
 Then we need to sheathe the sides of the upper part of the fireplace.
Repeat on the other side. To complete the finish, attach the front and sides of the upper bars (those with a 1.9 cm x 1.9 cm cut) bars cut along a 45 degree angle (i.e., triangular cut). After you have attached all the details of the skin, you need to apply putty to seal all the holes, and then smooth the surface by polishing. Now the fireplace can finally be painted white! After the paint is completely dry, attach the faux brick panel to the back with 2.5 cm screws.
 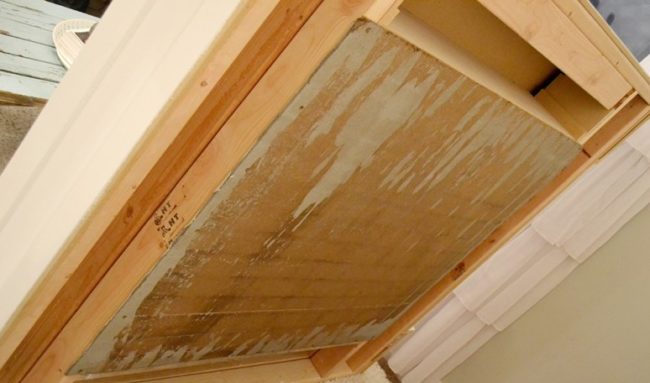 Remove any gaps you want to fill:
Step 4: Mounting
The design of this fireplace is quite stable.by itself, but the additional attachment to the wall still does not hurt. You can do this in several ways, here we use a homemade wooden bracket. We will need:
- 1 bar measuring 2.5 cm x 3.8 cm x 106.7 cm
- 1 bar measuring 2.5 cm x 5 cm x 106.7 cm
Connect these two bars together in an “L” shape, with the bar 5 cm x 106.7 cm to be vertical.  Attach this bracket to the wall. The height of the attachment depends on whether your fireplace is on the carpet or simply on the floor. When we move the fireplace to the wall, the bracket should touch the inside of the bottom board of the upper part of the fireplace, that is, be above the “brickwork”. Here the bracket at a distance of 120 cm from the floor:
  The fireplace with the bracket must be connected with screws from the bottom board of the upper part of the fireplace. Put a few logs of wood downstairs for decoration and everything is ready!
 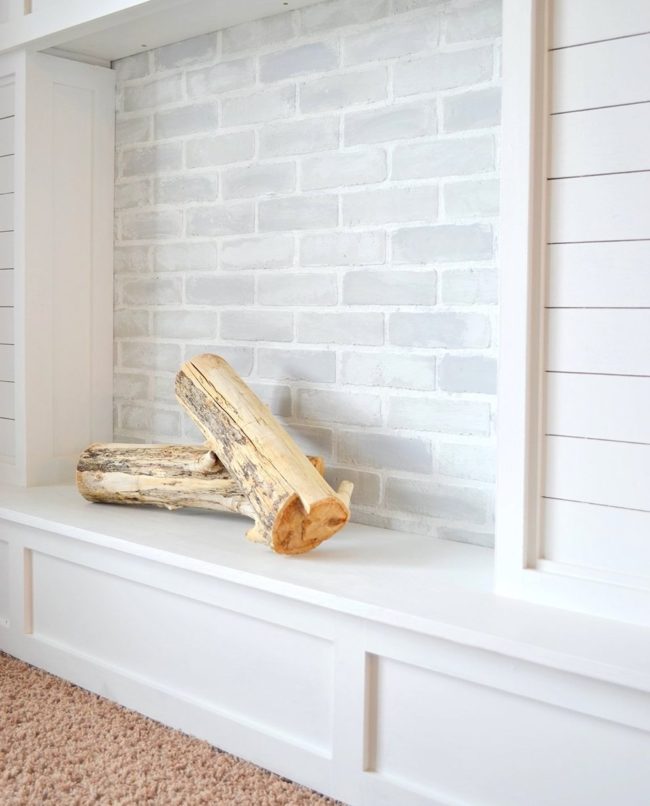 You can put several magazines and put figurines or candles on top of the fireplace for decoration. It turned out a wonderful decoration for the hall and the apartment as a whole!
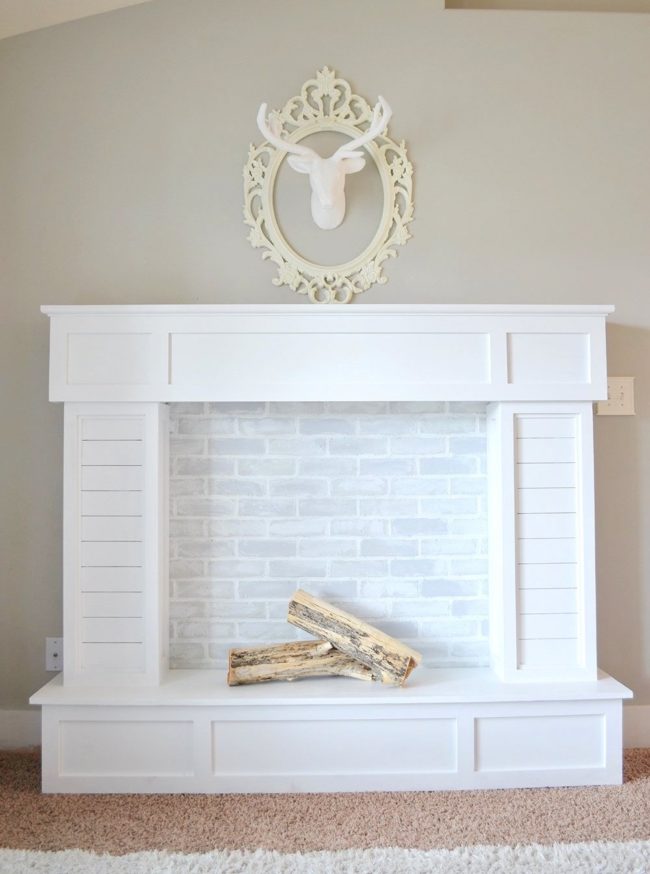
Comments
Related posts:
 New Year's fireplace with their own hands for the 2015 Competition, crafts for the new year 2016 with their own hands
 DIY outdoor fireplace, stove, barbecue and do-it-yourself barbecue 60 photos
 Christmas tree napkins with their own hands, photo, instruction / Toys with their hands, patterns, video, MK
 Furniture for dolls own hands, armchair, fireplace, ottoman / Toys with own hands, patterns, video, MK
 Christmas tree of plastic bottles with their own hands, photo, instruction / Toys with their hands, patterns, video, MK