Felting a creative gift in the form of a bunny with your own hands - a master class
New Year's bustle beckons with its fabulous anda special relation to magic. We all want to be involved in Christmas events, give warmth to close people and do something special. Someone buys gifts in stores, someone decorates their own house, others spend time visiting various fairs and events. But, one hobby will suit everyone without exception. It is well known that gifts made alone are worth their weight in gold!
Felting a creative gift in the form of a bunny with your own hands - a master class
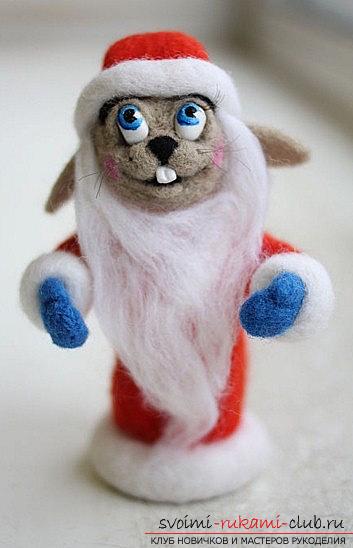
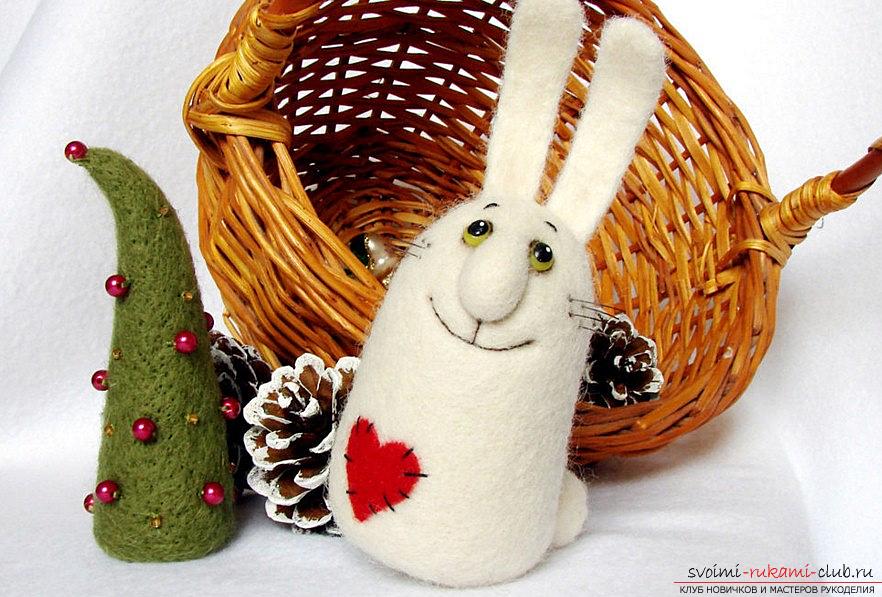 In this article we will try to discuss together withyou tempting idea of an independent gift made by yourself. To issue such a gift will not be difficult. We will try to make our own toy, which can be handed to a friend, a loved one or just a close friend. But, for starters, you need to familiarize yourself with the fineness of the design of such a souvenir. We will work on a real rabbit toy, which not everyone can make. But, this topic will seem especially interesting, if you find out that this toy will have to be made ... Of wool, the real wool !. So, let's try to master the technique of felting, in particular, methods of both dry and wet. Well, let's try! Materials We will define the materials that we will need in our work:
- Be sure to take the wool, from which we willproduce our future rabbit. It is necessary to take a set of several colors. In our case, the rabbit will be red with white reeds, a pink and black color for certain points will also be needed.
- Special needles, with which we will make felting. Thin needle, and middle needle.
- Take the sponge
- Take also a toothpick, or a small stick,soap (in liquid form), a bowl of water. You may also need a sewing needle and, of course, special threads that match the color. Do not forget about scissors!
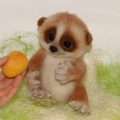
To begin with, we take a small amount of ouryarn, to roll it into a small lump. Then, you need to add a small amount of liquid soap to our palm, and also a little water. And continue to work on a lump until it becomes dense. Then, with gentle movements you need to rinse the ball, which will turn out, and after - continue skating. The ball must come out with the properties of the elastic element.  We will continue our work. It is necessary to take the ball and form the muzzle element of our animal. Be sure to mark the places where the mouth, nose, and eyes will be located (decorate the cavities for the elements). To do this, you need those same needles, in which there are special teeth on the surface. They confuse the wool and thus, they are easily removed from the inside of the product. Then, poke the needle until the wool is not compacted. We start with a wide needle, finish with a smaller one. Also, you can draw a contrast design for our future rabbit. Forming the front legs To make the legs for the transfer, you need to pick up the usual toothpick. On it you need to reel a small amount of hair, after - you need to remove the toothpick. The part should get a special shape using a needle, we make one of the edges thinner, the other edge wider. Thus, a small foot is formed. Then, do a few movements with the needle for one point.
 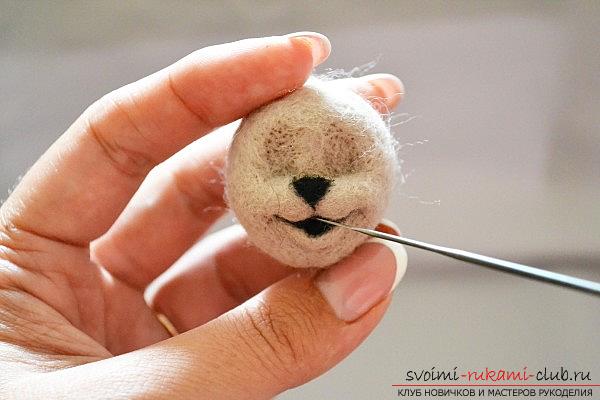 Hind legs. Everything is more complicated for the hind legs. Here you need to form them in a similar way, but the edge of the detail must have a roundish shape, the other edge - more elongated. It turns out something similar to the variant of a comma. If you are difficult to turn this manipulation, just make the hind legs look like the front, but larger. Ears Then, we work on the ears. It is necessary to form with the help of toothpicks small tubes, which with the help of needles, fall down on the sponge in such a way as to become more flat. The entire length of the ears should be covered with a small groove. We put a small strip on it in a contrasting version of the wool. Thus, we will form the back part for the abdomen Torso and oval Next - we work on the trunk. Here we need to take yarn more than 2 times than for the head element. It is necessary to make a small ball, which we dump in a technique similar to the head. But, ultimately, the ball needs to be rolled in the palms not in a circular motion, but in a progressive movement. Simply put, we make sausages. Also, you can wrap the wool on the stick element and, for example, form the cocoon element. After, the toothpick is simply removed. The workpiece is compacted with a needle, the edge on one side is reduced so that the shape of our product looks like a pear. Then, take the wool in contrasting color and form the belly. It should be made in the form of an oval, in the center, sticking with a needle to pin. After each detail has been formed, they need to be connected with each other. The details are best sewn, so that the toy lasts as long as possible. For this purpose, an ordinary needle for sewing and threading that will not contrast with the wool background is suitable. A neat seam will make them invisible. You can take a small amount of wool on top of the thread. Next, form a spout, eyes, lips for the animal. To do this, you need a small amount of wool, roll a pink ball for your nose, and make a white ball for your teeth. For the eye sockets, we roll black and then, white balls. We insert our balls and then, we put them in traditional movements. And of course - the tail! For the tail we need a small ball, which will need to sew around the back of the trunk. Thus, our bunny is completely ready!
Comments
Related posts:
 This master class of weaving from gum toys will teach you how to create your own bunny with your own hands
 Elven slippers with their own hands - felting New Year's costume and master class
 Felting lamb master class / Toys with their own hands, patterns, video, MK
 New Year felting of toys on the Christmas tree with their own hands: felting technique and a master class
 Dry felting out of panda wool, master class / Toys with their own hands, patterns, video, MK