Felting on the frame: Who is the master in the house? / Toys with own hands, patterns, video, MK
This charming dog is a noble Germanbreeds schnauzer is made in the technique of felting on the frame. The thin wire inside the toy not only provides the ideal shape, but also allows the puppy to move. Therefore, the dog can do everything: give a paw and do a "rack", stand on the hind legs and lie down on the back. Always and everywhere, he will guard his small master and even rest with him, comfortably sitting under a warm cask in a baby cot.  In addition, they can not only play, but alsouse as an ornament of the interior of a children's room, living room and even a study. There can be many ideas. To implement them, let's try to carefully study the master class and independently produce this nice little schnauzer.
Attention, master class!
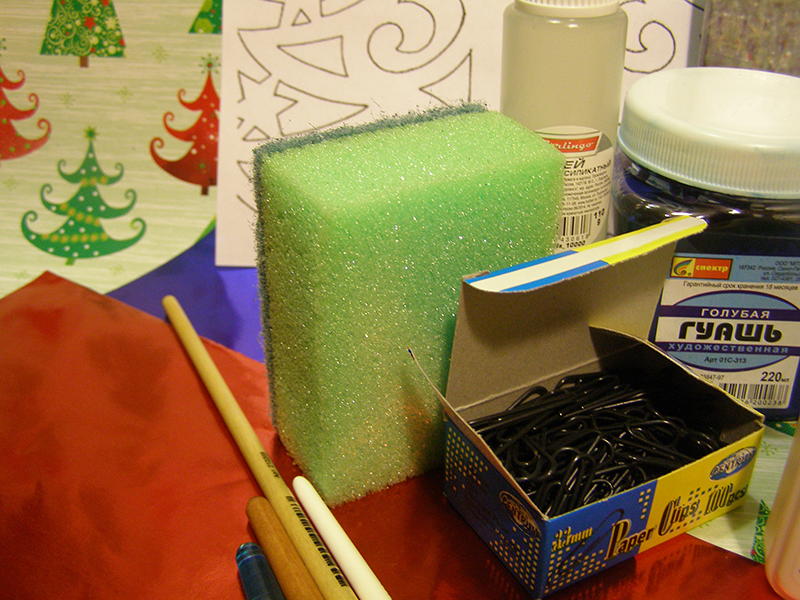
For work we need:
- thin and semi-fine wool harsh, gray and black, and also a little pink wool for finishing;
- sliver;
- needles for felting № 36, 38;
- brush for combing the wool;
- A small piece of paper for patterning the ears;
- plastic for making a nose and eyes or ready-made elements;
- scissors simple and for thin out;
- pliers and wire;
- glue.
 The production of the dog will require patience andtime. And in order to work faster, we must not forget to take a good mood! We start a master class with making a head. To do this, you need to take a plum and fluff it on a wool brush. Then we give it a shape in the form of a dog's head and with the help of needle No. 36 we start to dump. We remove the streaks, after which the plum coat is covered with the basic hair and carefully fail. At the next stage we pay attention to the muzzle. Well form the fleet and select them with the help of black wool. Then thoroughly roll the head almost to readiness, since it still needs to be designed.
Beastly handsome!


 Further we continue the master-class work on"Facial features." Our little schnauzer is a future watchman, so he needs good eyesight and sense of smell. To do this, we glue the finished plastic or glass eyes. You can make them yourself from plastic and paint with acrylic paints. Special attention will be required by eyelids. We take small pieces of wool and roll each of them on one side only. Now they need to be privatized. This procedure will take time and patience, because the look of the dog should be given an appropriate expression. To make the eyes of the toy more expressive, the inner part of the eyelids should be carefully brought in by the pastel.
I hear everything!


 A sensitive and curious nose puppy must be formedfrom self-curing plastic, then put it aside to dry, and for now, we take hold of the ears. Before making them from a small piece of paper, you need to make a pattern to avoid making a mistake and not "rewarding" the puppy with ears of different sizes. On the paper template, make two ears of gray wool and tie to the inside of the pink coat. Now you need to place the necessary accents with a small piece of black wool, which must be finely chopped or carefully cut with thinning scissors. The ready fur is tucked to the outside of the ears, and then we attach the ears to the head, taking out the corresponding shape of the skull. And in the end we remember the spout. It needs to be glued in place, neatly covered with varnish - and a curious nose is ready to poke it into the affairs of the owner!
And what's inside?

 Further, we continue our master class with work ontorso toys. Confirming the name of the technique of execution, we make from a wire a skeleton of the necessary size. The skeleton does not have to be whole - you need to make three separate parts: a spine with a neck and a tail, front and hind legs. After that, the details of the frame should be connected with the help of glue, and the points of contact wrap around with wool. Tip! To ensure that the wool does not spin around the wire core, it needs to be carefully glued with glue and wrapped around with wool. The next step will be felling the puppy's legs. To do this, take four pieces of wool and form the legs of the baby, gently failing each finger. Finished paws we put on a wire frame and we put it.
Give me a paw, my friend!


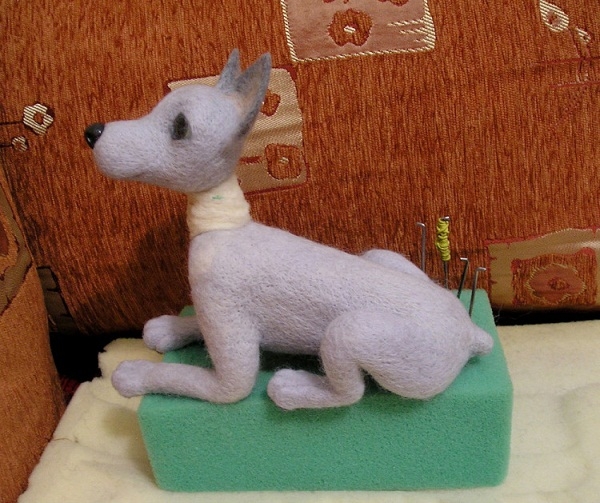
 Now choose the pose of our dog. A puppy can stand on all four legs, give a paw, sit or do a hunting "rack", but we'll let him lie down so that the young master can comfortably take a four-legged friend with him into the crib. After that, we will build up his "muscle mass", carefully tearing all the trunk. We need to increase the volume from the siver, and close it with the top coat. And, of course, we must not forget about the heels that need to be highlighted in black. Next, we glue the body and head and fix it with a slicker. If desired, you can turn your head slightly in any direction and use the same sifter to form a neck. In the final, the figure is covered with the main color wool and the "half-finished" toy is ready!
Fashionable breed

 We continue the master class with a wonderful transformation -we need to turn the toy into a real schnauzer, that is, make it more shaggy and fluffy. To do this, we take a semi-fine wool of black, gray and harsh color and with the help of simple and thinning scissors we carefully separate the thin strands. The hair begins with the tummy. The strand should be taken approximately in the middle and should be welded to the toy, after which the wool bundle should be bent and re-walked with a needle. So, step by step, we roll the wool in regular rows from the bottom up, neatly giving the scissors a certain length and setting the needle the appropriate direction of the growth of the wool. Similarly, we make all four legs soft, adding a mix of gray and black wool to the pair of the last rows.
The final touch to the portrait


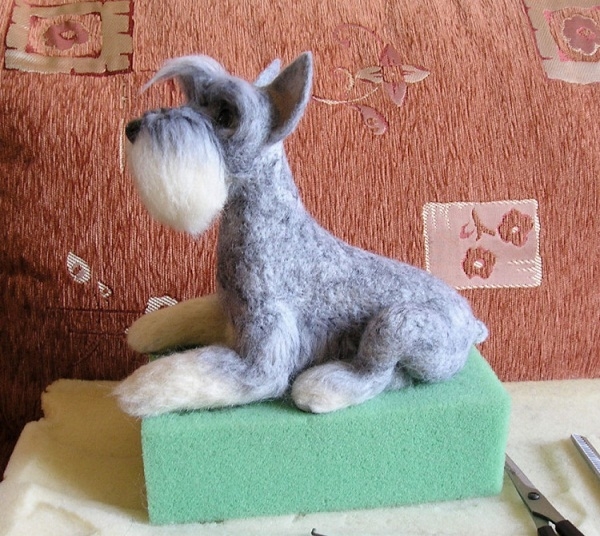 Now proceed to the design of the muzzle. All schnauzers wear beards. And our baby is no exception. Therefore, you need to seal his lush beard, then make a fluffy mustache, which at the top is finished with gray-black hair, and shaggy eyebrows. To the muzzle of the toy looked neat, the beard and mustache should be straightened with scissors, and the eyebrows with the needle on top should be set the right direction. Our master class is coming to an end. It remains to give the dog color. It will be "pepper and salt." To do this, mix black and gray colors and weld the resulting coat over the whole body and head of the puppy. A ready-made puppy can be decorated with a bright leash or medal, and you can leave it as it is - in any case, shaggy enchantress will delight the look and give only positive emotions.
All in our hands
Felting on the frame greatly facilitates the taskmaster and simplifies the process of creating the outlines of a toy. The wire frame keeps the form and at the same time allows changing the "pose" of the craft. Mounted on the wire legs, the toy will be more stable, frame pens will be able to hold something or just hug their friends.  How to choose a skeleton: for the whole product or for a separate part of it: the neck, paws, ears, tail, and so on - is not fundamentally important. The main thing is that the wire base should perform the task, and the proposed master class could explain in detail how to achieve the desired effect. Do not be wasting your time on making such a toy. Our detailed master class will help you make this handsome puppy of wool, and you will not have time to look back, how a funny dog will take place among the best friends of the child.
Comments
Related posts:
 Felting for beginners. Master classes Video / Toys by own hands, patterns, video, MK
 Felting lamb master class / Toys with their own hands, patterns, video, MK
 Felting out of wool: bullfinch, master class / Toys with their own hands, patterns, video, MK
 Dry felting out of panda wool, master class / Toys with their own hands, patterns, video, MK
 Cat, cat, kitten - dry felting out of wool, master classes / Toys with own hands, patterns, video, MK