Felting lamb master class / Toys with their own hands, patterns, video, MK
Felting out of wool is an excellent occupation for needlewomen. Today we have a master class to make a lovely lamb in this way. 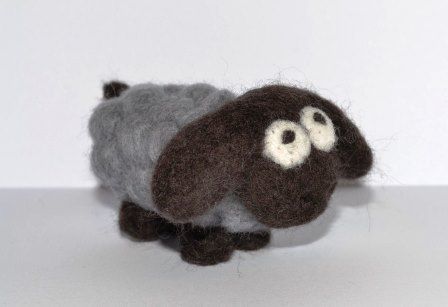 Consider two master classes: dry and wet felting. Dry is technically simpler, and the figures are more voluminous. Wet requires a little more jewelry work, but the texture of the wool looks very interesting.
Dry felling lambs
We will need:
- Merino wool gray, dark brown, white
- Needles for felting of different diameters
- Sponge or special brush for felting
- Adhesive moment
The master class begins with the felting of the trunklamb. To do this, you need to take a little wool merino gray. In itself, felting is piercing wool with needles of different diameters, as a result of which the fibers become dense, mixed up, and acquire a rigid structure. Needles can be thick and thin. Our master class involves the use of tools of different diameters. Start felting wool is better with thin needles, and in the final use thicker. 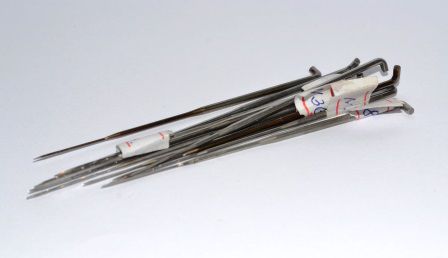 So, placing a wad of wool on a sponge you need to wiggle it with needles, giving the shape of an oval. This is the body of the future lamb.
 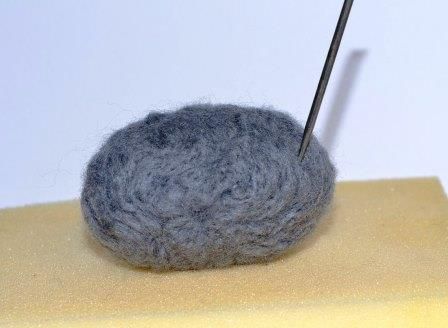 For the muzzle, we need a silk woolBrown color. The felting itself is no different from the above procedure. Next, the master class involves felting the ears. For them, as it is easy to guess, you need quite a bit of wool, the same color as a lamb's muzzle. Needles are best to take thin. Then you need to harness - yes, this is the term - the ears to the muzzle.
 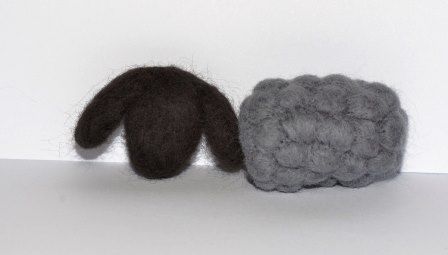 Ponytail is better to dump from brown wool. From the same color, make and legs, which need to connect the needles with the trunk, as well as the tail.
 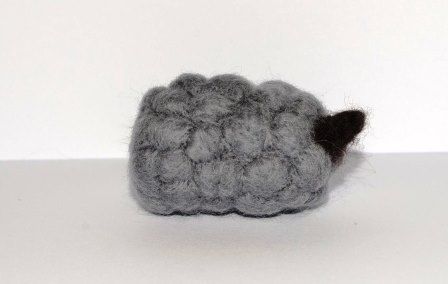 But from white wool need to poke eyes and a drop of black hair to make the pupils. Privalat eyes to the muzzle.
 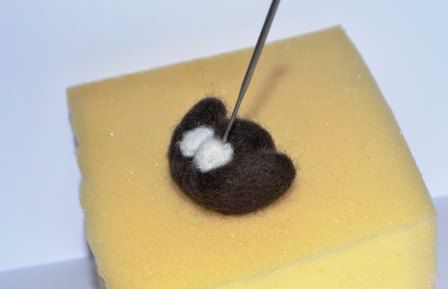 The muzzle with the rest of the body can be joined with glue. So it is more reliable.
Wet felling lamb
We will need:
- One color wool for lamb body
- Wool of a different color for lamb horns
- Silhouette of lamb cut from foam film
- Soap solution
- Pimpled film
- Beads for the eyes
Wool must be placed on the template, so that the fibers completely cover its contour.  Then you need to soak the workpiece with soap foam. Then once again wrap the pattern with wool, and again soak it. And so five or six layers.
  Then we begin directly wet felting -neatly three of our lamb with his hands through a pimply film, so that the woolens cling to each other and do not move. So the workpiece is compressed. We act carefully, we make sure that the lamb's body does not fade. When the flat soaped billet has acquired the necessary outlines, we make an incision in it and take out the template from the foamed film. We continue the felting: with three hands the lamb is about a pimply film, we put the hand inside and the three folds. We increase the incision on the back, we lapped the edges.
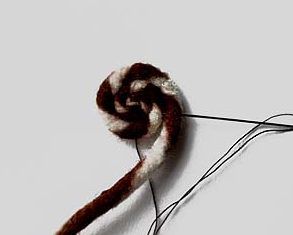
  We rinse the lamb from the soap and steam it off with an iron. Leave to dry. Now you need to make a lamb horn. We twist the flagella from the wool, watered with soap foam. We turn them into mutton curls, we sew them with threads. Sew the horns to the body lamb. And then glue or sew eye-beads. To make the lamb not flat, you can fill it upbody through a cut left from the pulling out of the template, with wool, but very neatly. IMPORTANT: To enrich the texture with wet felting, you can add thick threads over the wool, even in contrasting colors. Suppose, with the main black hair, add gray or brown thread. So the lamb will play different shades. So, the master class on dry and wet felting is finished. Have enough patience and, by the way, you can take another thimble. Successful needlework!
Comments
Related posts:
 Dry felting out of panda wool, master class / Toys with their own hands, patterns, video, MK
 How to weave an amigurumi frog crochet. Master Class. Video / Toys with own hands, patterns, video, MK
 Doll pumpkin master class, patterns without a seam on the face / Toys with their own hands, patterns, video, MK
 How to weave a team of beads of beads. Master Class. Video / Toys with own hands, patterns, video, MK
 How to make Evik dolls from fameirana. Master Class. Video / Toys with own hands, patterns, video, MK