Fillet net Empty and filled cells
Fillet net - simple and beautiful pattern FilletnayaA mesh is a crocheted cage alternating between loops and posts. The alternation of filled and empty cells is possible, and this is also a fillet net. A very neat pattern can come out with the use of sirloin knitting and, in particular, the sirloin mesh with empty and filled cells. This simple and very easy-to-carry drawing can be used absolutely for any thing. Today, we will look at knitting rows back and forth, but you can also knit a fillet net in a circle.
Fillet grid chessboard - universal pattern
And what is it versatile! Universality in ease of implementation, ease of calculation and visual appeal. Earlier we have already studied. Today we consider a kind of sirloin knitting - sirloin with alternating empty and filled cells. Moreover, empty and filled cells will alternate in staggered order. There are fillet nets where the filled cells are equal in size to empty. In our version, single crochets, forming the cells themselves, are not counted in the figure, so filled cells are made wider. Of course, according to the description, it is a bit difficult to understand, but we will definitely deal with this near the end of the lesson! ? If you are not familiar with the basis of loin knitting, I advise you to at least review. Well, if everything is clear, then proceed. The initial chain for the considered fillet grid should be a multiple of 3 + 1. 1. The initial loop on the hook 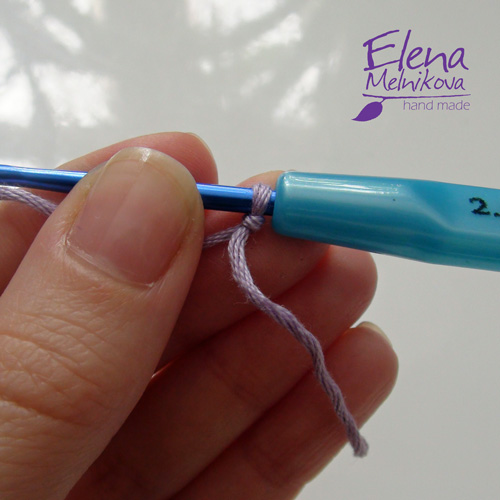 2. We carry out the chain we need. Do not forget that the number of loops should be divided into three, plus one loop for the last column. for the sample I gained 22 loops
  3. First row. Two air loops for the outermost pillar that forms the first empty cell of the pattern. If you use markers, then you can mark the second loop, because we will knit the last column of the second row into it
  4. Two air loops to form the first empty cage.
  five. Having missed a total of 7 chained air loops previously we do. 7 air loops are made up of: two loops on the upper wall of the cell, two loops on the first column with one nakida, one loop - the basis for the column, two loops is the lower wall of the cell
  6. In the next three air loops of the main chain, performs one pillar with one crochet. In total, there will be 4 columns with one single-edged reaching in a row
  7. Two air loops for the next empty cage.
  8. We skip the two loops of the main chain and execute a single crochet column
  9. Three columns with one double crochet into the next three air loops.
  10. Repeating steps 7-9, we reach the edge of the chain.
  In the same way as you and I started knitting withthe first empty cell, you can start the grid with the filled. If the number of loops was collected for an odd number of cells, you will end up on the same cell as you started. For example, I have 22 loops: (22 - 1) 3 = 7 7 is an odd number, so I started from an empty cell and stopped at the same - empty. And if I had 25 loops dialed, one more cell would be added accordingly: (25 -1) 3 = 8 8 is an even number and we would end on a filled cell. This calculation can also be used to calculate the required size of the product. Knitting the first row, we can determine how many centimeters the pair is occupied by an empty and filled cell. Based on this, calculate how many such pairs we need for item 11. Second row. Two air loops for lifting to the next row
  12. Since we execute the grid in a staggered manner, then now the extreme cell will be filled. To do this, we perform two columns with one nakida under the two air loops of the previous row
 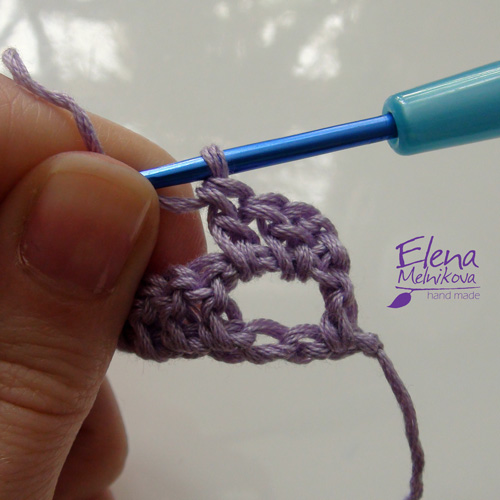 13. And the next column we run to the top of the first column of the previous row.
  14. Two air loops
  15. We skip two loops and a single crochet column to the top of the fourth column of the cell of the previous row.
  16. Two columns with one double crochet in the empty cell of the previous row
  17. Column with one nakida to the top of the first column of the cell of the previous row
 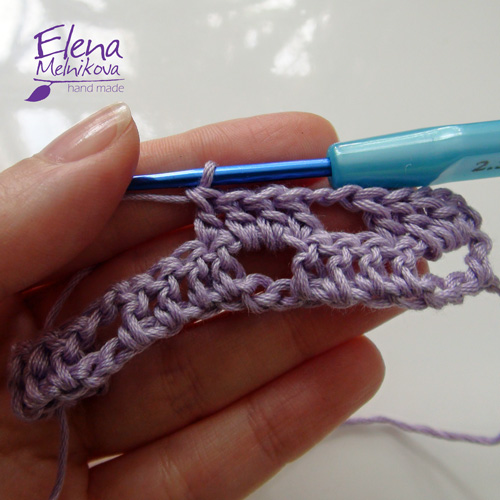 18. Thus, repeating the points we knit to the edge of the canvas. Over each empty cell of the previous row we got a filled cell of the current one. Conversely, above each filled - empty
  19. Third row. Two lift air loops
  20. Two air loops for an empty cage
  21. A column with one nap in the last column with one crochet filled cells of the previous row
  22. Further we execute the filled cage.
  23. In the same way, we are knitting the series to the end. As I promised, now you can note by example that empty cells turn out to be somewhat already filled. Equal cells will be covered in the following lessons.
  24. We carry out the fillet net to the size of the motive we need. I tied a square
  In the following lessons we will discuss with youadding and subtracting when knitting a filet of mesh. Thanks for attention! In the comments write what you are going to tie using a pattern! ? See you at the new classes! Do not forget to add a useful bookmark using the bookmarks buttons or social networks located below!