Flowers gardenia from papers by own hands: performance for scrapbooking. Master Class
Flowers of gardenia in scrapbooking Decoration in styleScrapbooking is the presence of bright and decorative elements. By the spring and summer holidays, our crafts and scrapbooking should be decorated with floral products. Therefore, I want to make something new and interesting. This master class tells how to make a gardenia flower from paper with your own hands using improvised tools. For work we will need:
Tools
- 3 large pieces of paper for flowers
- 4 small paper blanks
- Adhesive moment
- pads with ink
- A skewer made of wood, or a sword
- Scissors.
Making workpieces
 For harvesting, it is best to use the oldnewspaper or notebook. Also, you can process the paper before applying it for finishing, depending on your preferences. First, you need to walk around the edges of each of the blanks of the future flower using an ink pillow. Thus, the flower will be given a vintage style. In addition, the flowers will be like real flowers, because they will be darker at the edges. Next, we work with 3 larger paper blanks using a wooden sword. It is necessary to twist the petals from each side. After, using your fingers, we smooth the edges of the petals, but not completely. It is necessary that the flower fluttered slightly inward and had a volume. After, we take a paper stock with a small size and with the help of a stick we twist the petals, but using only one direction. Next, drip drop by drop of glue (in the center). We also apply glue on twisted sections. Next, add the petals and wait for the glue to grab the base.
 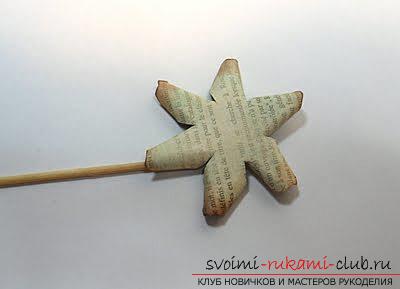 After, take the next workpiece and spinpetals on the same principle, as in the last time. The process with glue goes exactly the same. After, puts our first workpiece with a smaller size in the center of the sheet. It turns out a small version of the bud. After, add the petals, spread the glue and wait again until he grabs.
  After, we use the third workpiece, whichsmaller size. In it we twist petals like the previous ones. However, in this case, the glue is fixed only in the middle. Next, glue our ready bud to the base. After, take the last piece of small paper and twist the petals as well as with the large blanks.
Collect the flower
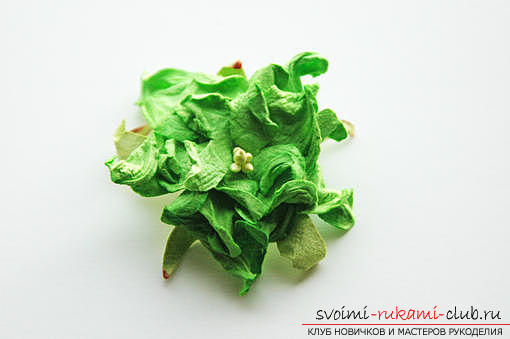
 Now we collect the flower. To do this, take two large blanks, in them to drip glue in the middle, and then glue them in such a way that the petals are shifted from one preform to the second. Then, we glue a third base of large sizes on the same principle. After, glue a small workpiece and glue the core of our finished flower. Job is done. Our beautiful version of the gardenia flower is ready for use on your scrapbooking idea! You can make a large number of similar sheetsand arrange them around your album, postcard or other product. It is noteworthy that this type of decorative product is excellent for vintage works. Thus, you can make several flowers of different colors, which you can use to decorate the desired product. Flowers gardenia in scrapbooking will resemble real flowers, and your artwork will come alive and will look more voluminous.
Comments
Related posts:
 Flowers from Foamiran with their own hands are a master class. MK from Foma.
 We make a daisy-quilling with our own hands, a master class with photos in the technique
 A master class of making jewelry by one's own hands is a hairpin with a flower from the fameirana.
 This detailed master class with photo and description will teach you how to make your own flowers from polymer clay for hair clips.
 The flowers of satin ribbons with their hands in master classes