Frame for a photo with a monkey, created by own hands from polymer clay, is very relevant on the eve of 2016.
 Materials and tools:
- baked polymeric clay brown, corporal, orange, yellow, green, light green, white and black;
- dry art pastel of pink and light green color;
- foil;
- strong adhesive;
- wooden frame for photography;
- a rolling pin for polymer clay;
- brush;
- needle;
- tool with a ball on the end;
- knife;
- sponge;
- mold for leaves (optional).
Stages of the work: 1. From the foil, form an oval for the body of the monkey and a round head of a suitable size.  2. Roll out clay of any color into the layer and glue it with foil parts. This layer of clay will help smooth out any irregularities. Now the brown clay rolled into a layer 2mm thick.
  3. Wrap the brown clay details. Cut any excess and smooth the slices with your fingers.
  4. Thinly roll out a piece of bodily plastics.
  5. With a knife with a sharp tip, cut out of it a detail that will be the muzzle of a monkey. Its shape can be made oval, round, pear-shaped.
  6. Place the muzzle on the front side of the head and smooth with your fingers. Dotsom with a large ball make two dimples in the upper part of the muzzle. The tummy can be left brown, or you can attach to it an oval cut from the body clay.
  7. Mix the solid clay and brown and form a small oval spout.
  8. Stick the nose to the muzzle. With a needle, toothpick or stack, make a monkey mouth. The form of the mouth depends on what expression of the muzzle you want to give. So, you can make a face with a big smile, make a mouth in the form of a round fossa or any other shape that you want.
  9. From white clay make two small ovals and place them in dimples for the eyes. Top with black ovals of even smaller size. To make your eyes look more alive, stick two very small white balls on the black pupils to make it look like glare.
  10. Blind two circles of solid clay (or light brown) and two similar circles of brown clay. Stick the body circles on top of the brown ones.
  11. Draw a small hole on the face of the ears to make it look like real ears.
  12. Attach the ear to the head on the side of the face and smooth it with a stack. Similarly, stick the other eye.
  13. To make palms and feet, form from the solid clay 4 ovals of a suitable size and flatten them. With a needle or a stack, make grooves on the edges of the ovals, it looks like fingers.
  14. Roll two brown sausages and place them so that their ends come up slightly on the palm of your hand. Stick the ends of the sausages to the palm and stack the smooth transition from brown to bodily.
  15. Make two small brown ovals and stick to the bottom of the trunk at the sides, these will be the hind legs.
  16. Stick your feet to the feet. Then attach the upper legs.
  17. In the lower part of the head with a needle, pierce the indentation. Do the same deepening in the upper end of the trunk. Insert a piece of hard wire or a thin toothpick into this cavity.
  18. Then, on top of the body, nibble your head. If the monkey on the photo frame will sit sideways, turn your head to the side.
  19. Rub a small piece of pink pastel and brush it on the cheeks of the monkey.
  20. Use a needle to draw a coat on the brown parts of the monkey's body. The back side of the back and head can not be processed, since the monkey will then be glued, and its rear side will not be visible.
  21. It remains to make a tail. Roll it out of brown clay in the form of a thin sausage. On it, too, make the hair a needle.
  22. Stick the tail to the monkey and try it on the frame, twist the tail so that it lies beautifully on the frame and snaps to it.
  23. Next, you need to make a few mandarins. One of them will be at the monkey in the hands, and the rest - on the frame itself. Roll balls of diameter about 1 cm from orange clay (determine the size of the mandarins, based on the size of your monkey and frame). Press the ball from all sides with a sponge so that its surface becomes slightly rough. And all the other balls are also processed.
  24. Stack the balls in grooves for green tails.
  25. In the recesses, put very small pieces of green clay and press down with a needle or a stack.
  26. Blind a pair of small leaves from a light green clay and make veins on them with a needle.
  27. Stick the leaves to one of the mandarins.
  28. Put the mandarin tree with the leaves in the palm of your hand and press it down so that the mandarin duck sticks well.
  29. Now you need to make some bananas. For them, make short sausages of yellow plastic, and make their ends narrower. Slightly press the sausages flat on the work surface.
  30. Bend the sausages in the shape of an arc.
  31. Take on a dry brush a little powdered light green pastel and paint it ends of bananas.
  32. Roll light and green plastic slender and long sausages, these will be lianas. Lay them on the frame on top or on the side, so they look beautiful.
  33. Blind little leaves for vines. They can be made with a needle (like on mandarin leaves) or with a special mold.
  34. Stick the needle carefully with the leaves to the vines.
  35. Form a strip of clay green. The size of the strip should be such that it can be placed on the underside of the frame in the form of grass. With a needle on the strip, make a lot of vertical grooves.
  36. Place the strip on the bottom of the frame. In the corner plant a monkey. Now the frame with decor and fruits should be baked.
  * Please note that baking woodenThe frame can only be used if there are no parts on it that can melt in the oven! Otherwise, you need to bake all the decor elements without a frame. 37. After baking, remove the decor from the frame. If necessary, paint the frame with acrylic paint in the desired color. Then glue the grass, monkey, liana and fruit to the frame onto a strong quick-drying or epoxy adhesive.
  38. Additionally, you can decorate the frame with beautiful beads or pebbles.
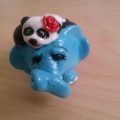
  It turned out to be such a fun and funny frame for photography.

Comments
Related posts:
 New Year monkey from polymer clay - lessons for gifts in 2016 with their own hands
 How to make an original bookmark with the symbol of 2016 "Monkey" of felt with your own hands? Step-by-step instructions and photos
 How to make a pendant or suspension from polymer clay with your own hands, master classes with photos
 We make a gradient of polymer clay with our own hands - a lesson and a master class with a photo
 Souvenir Tenderness from baked polymeric clay to Creative Competition 2016, gifts by own hands