Free master classes on modeling flowers and figurines from mastic, photo and description of work.
Molding, as a kind of creativity and needlework appearedeven in those times when ancient people traded in hunting for mammoths. Perhaps somehow after the rain, a man saw that his footprint, left on wet soil, dried up and kept his shape. A pliable and soft material - clay began to be used to strengthen the dishes. Then people learned to dry the clay by the fire and the first strong pottery appeared. In the modern world, stucco crafts are created not only from natural clay. Everyone knows that you can sculpt crafts from plasticine, dough, polymer clay and even gypsum. However, in recent years, more and more popular items are made from culinary mastic. They decorate various pastries, from small cakes to stacked cakes. You can even dazzle a beautiful and delicious bouquet for the bride. Culinary mastic is a very sweet plastic mass that freezes in the air. It produces surprisingly beautiful flowers, bows, cartoon characters that decorate the cake for the child's birthday or the image of the bride and groom for wedding baking. You can buy such material in the store in the finished form or make it at home. You can make gelatin, sugar and milk mastic at home with minimal costs. But you will firmly believe that in the composition of beautiful sweet flowers or other ornaments only natural ingredients, and eating even a large amount of such delicacy threatens only with excessive centimeters at the waist. Recipe 1. Gelatin. Cooks consider it the most demanding when creating. In the process of cooking, you need to "feel" it. It is necessary:
- Gelatine 10 g;
- Sugar powder 900 g;
- Water 180 g.
Mix gelatin with water and set aside for about60 minutes, then heat, using a water bath and cool. Next, while gelatin has not frozen, in a small part of the powdered powder, thoroughly mix the mass. After the stir spoon it becomes inconvenient to put on the work surface, sprinkled with powder from sugar and continue the kneading. Cooled mastic can become less plastic, then it can be slightly heated in a microwave oven. The finished material can be stored in a refrigerator for up to two weeks or in a freezer - up to two months, pre-wrapping the mastic in a film or putting it in a sealed container. If you have made some spare parts and have already dried them, then such crafts should be protected from moisture (mastic to it is very sensitive), keep tightly packed in a dry room. Another important point. Apply the mastic to a very flat and relatively dry surface. If you cover it with a cake, then on the upper cake it is necessary to apply an oil cream (wait until it freezes) or marzipan. They are less "wet" than, for example, sour cream or custard. Recipe 2. Sugar. It is necessary:
- Sweets marshmallow 50 g;
- Water 18 g;
- Sugar powder from 200 g.
Sweets and water send to the microwave at25 - 30 seconds. Melt the melted mass, adding dyes and powdered sugar. In the final version, the mass should stick to the hands a little. It is important not to pour excess powder. It is important that the powdered sugar is very shallow and uniform, otherwise the layers, when rolled out, can tear. Its required quantity will depend directly on the type of candy. In order to attach the florets or other decor elements molded to the cake, it is enough just to grease the place of connection with water, or the egg protein, into which a little sugar powder is mixed. Marshmallow is usually sold in several colors, they can be used to create immediately multi-colored mastic, or cut them into pieces (separately white, separately colored). Recipe 3. Milk. The easiest to make and use. It is necessary:
- Powdered milk;
- Powdered sugar;
- Sweetened condensed milk;
All three components are mixed in equal parts andknead to the state, as a softened plasticine mass. Mastic is ready for use. To prevent drying, the food film will help, and to reduce the excessive stickiness the addition of powdered sugar. It is important to remember that the mastic prepared for this recipe will have a light yellow tinge. Therefore, if you want perfectly snow-white roses for cake, then it is better to use gelatin or sugar. Below are the master classes for creating various crafts from culinary mastic. Sweet roses. 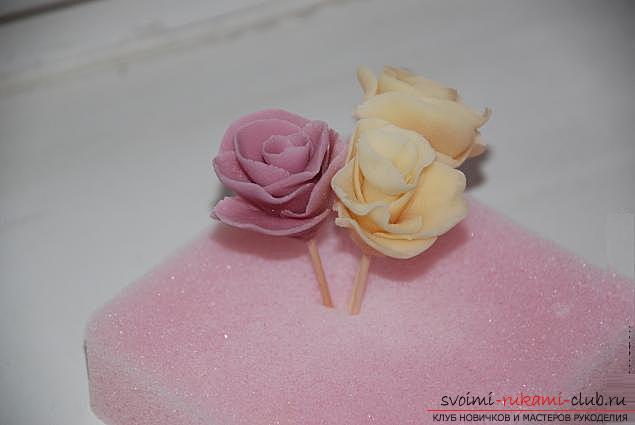 It will take:
- Mastic of those flowers, which must be rosettes;
- Powdered sugar;
- Rolling pin;
- Confectionery nozzles;
- Piece of foam rubber;
- Toothpicks;
- Stack with a ball;
- Saucer with water and a brush.
 Roll out the layer of mastic, pre-coating the working surface with a layer of powdered sugar. The thickness of the layer should be from 2 to 4 mm.
 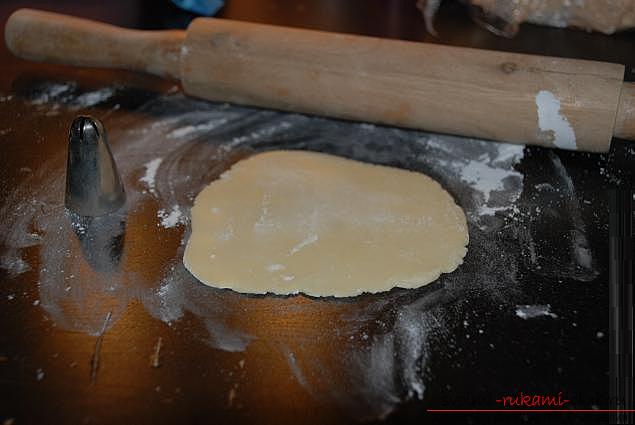 With the help of a confectionery nozzle (biscuit molds or other round molds), cut out the blanks under the petals. One flower will need an average of seven pieces.
 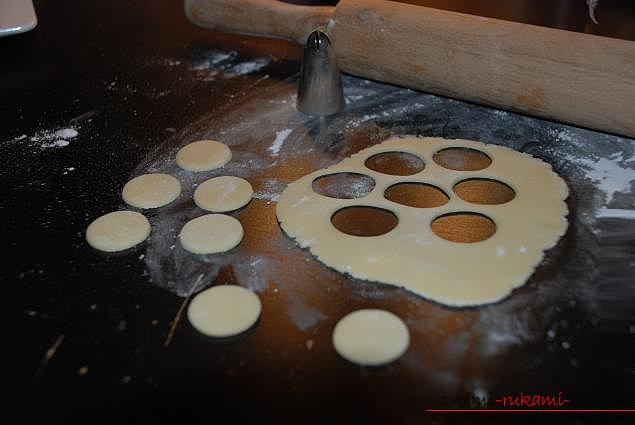 Now on the toothpick attach a little mastic - this will be the center of the rose, to which the petals will be attached. In form, it should resemble a roller or have a conical shape.
  Now start forming the petals themselves. To do this, on a flat piece of foam rubber (even a new sponge for washing dishes), put a round workpiece and start gently rolling it with a ball with a ball on the end. It is necessary to act very gently so as not to damage the mastic. Gradually the circle will acquire wavy edges and become very thin at the edges and slightly thicker in the middle.
  Similarly, roll out the rest of the blanks.
  Take a toothpick with mastic and wrap around it the first petal.
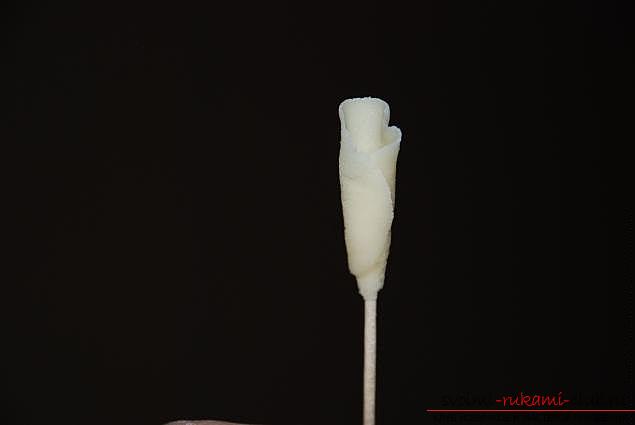 Similarly do with all the others, laying them out lap.
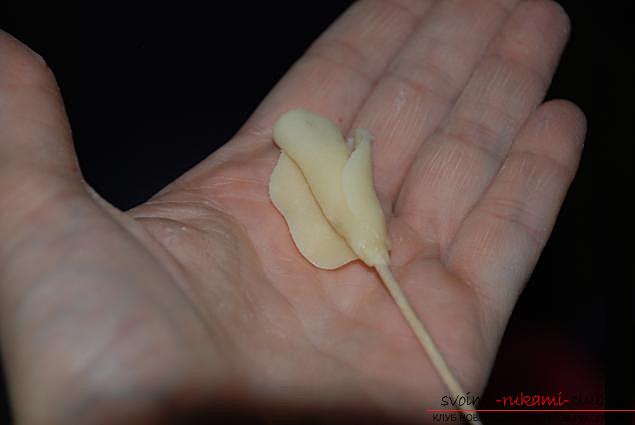
 When all the petals are already glued, hang the flowers (preferably upside down) until completely dry. Usually the next day they will be ready to decorate themselves with cakes.
 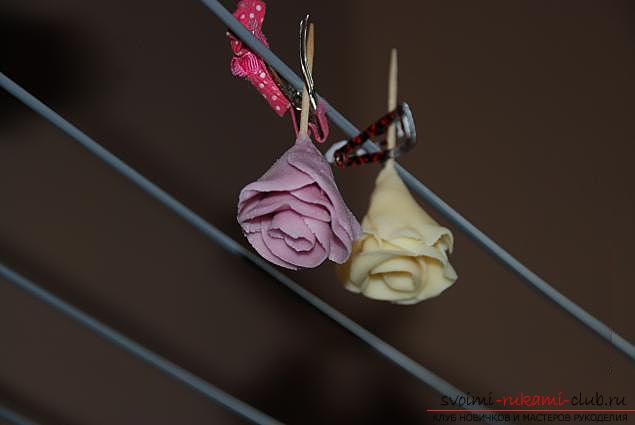 The next master class is dedicated to creating a cute and funny Panda. Such baby is perfect as a cake decoration for kids.
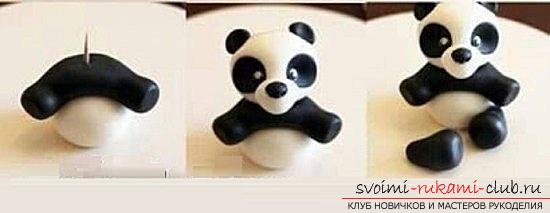
 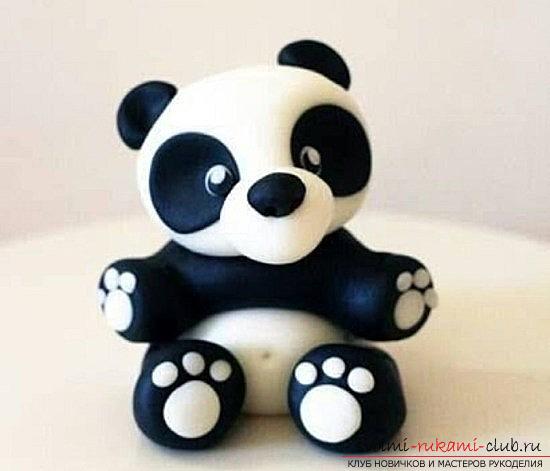 It will take:
- Mastic is white and black (ready-made);
- Starch;
- Stack with a ball;
- Toothpick.
From a white color roll the ball. It was the head of Panda. Use the ball on the stack and make two grooves for the eye sockets. Roll from the black material two small balls. 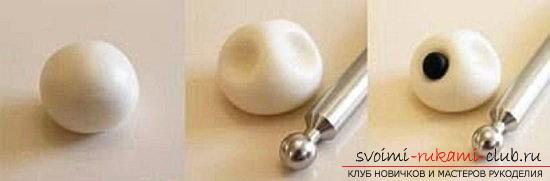 Arrange them in the eye grooves and smooth the stack in such a way as to fill the holes.
  Roll the white ball and place it betweeneye sockets. Slightly flatten. Roll a small (less than previous) ball of black mastic and attach it to the flattened ball. This is a spout. For the ears roll two balls of black mastic. Fingers to shape the ears. For the peephole roll two very small white balls and two even fewer black ones. Attach as in the photo.
 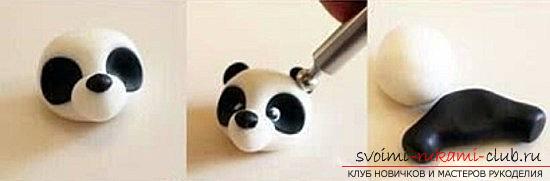 For the torso you will need a ball of white masticThe color is the same size as for the head. In order to make handles and shoulders, you need to roll a thick roller, similar to the rocker. Connect the torso ball with handles and pierce this structure with a toothpick. Its top should look out of the shoulders about 15 mm. At this end, plant a panda head. For the legs, form two droplets of black mastic droplets with a flat edge. Attach them to the workpiece and the panda is ready, it remains to dry it.
Comments
Related posts:
 Free master classes on modeling crafts from the test with step-by-step photos and job description
 Free schemes of weaving roses from beads, master classes with photo and description of work.
 Free master classes to create modular origami balls, step-by-step photos and description.
 Free master classes on weaving tiger and white lilies from beads with photo
 Lessons and master classes with a photo on the modeling of fruit beads and a whole mandarin.