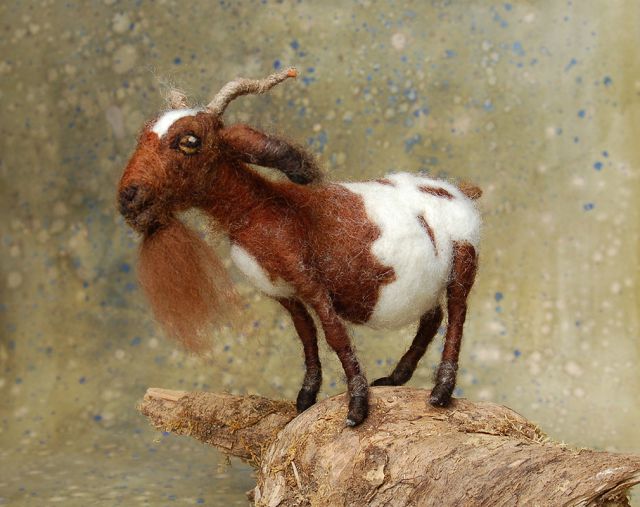
Goat from wool, dry felting, step by step video lessons / Toys with own hands, patterns, video, MK
Author master class: Sara RenzulliSee step-by-step video felting lessons of a goat. An ideal master class for beginners.
Lesson 1. Making a "skeleton"
To make a skeleton for a toy height about 13cm, take two pieces of aluminum wire 1.6 mm in length of 46 and 50 cm. From the shorter part we prepare the front part: head, neck and front legs. Fold the wire in half, twist it and at a distance of 8 cm bend. The second piece of wire is connected with the first workpiece and we twist the back and legs from it, not forgetting about the natural bends. If the legs come out of different lengths, it's easy to fix the pliers. Skeleton tightly wrapped with chenille wire.
Lesson 2. Wrap the skeleton with wool
We wrap around with skeletal white wool, starting with thinparts. Holding the thumb with the thumb at the starting point, wind it down the legs. Leave a hoof without wool, if you are thinking of making them a different color. We wrap the tail from the tip to the trunk, wrap the back, thoracic part and symmetrically thicken it, letting the hair over the shoulder, through the legs and back. Now you need to thicken the hips, periodically dumping the coat. We turn our heads from neck to nose.
Lesson 3. Form the shape of a goat
To form the abdomen, two strips are takenwool length of 60 cm, each of which is tied in the middle of a loose knot. Turn the knot alternately with the ends of the wool, so that one side of the workpiece becomes convex, and the other - flat. On the width of the chest, we lay the workpiece, wrapping the ends to the center. Billets are applied to the chest and sides of the abdomen, fix and smooth contours.
Lesson 4. We decorate the legs of a goat with a dark coat
It is important to properly wrap the goat's legs with the furfold. You need to do this without laying the wool on the bend itself, so that the thickening is natural. Bend your legs to an almost right angle and wrap them with dark hair until you get the right thickness. So that the wool does not slip off the hoof, make a couple of tight turns around it, wrap the wool down on the hoof and again make a tight curl. Fold the hooves and decorate them with the hair of the chosen color.
Lesson 5. Horns and Head
To make horns, wire 0 is suitable.6 mm with a fabric covering. Fold it in the middle, attach it to the top, head down, and firmly wrap up. Determine the length of the horns and trim the excess. Wrap the horns with wool: denser at the head, thinner at the ends. Loosen and give horns a shape. Strip a white wool wrap the neck of a goat and pass it through the horns criss-crosswise to symmetrically wrap the head. Strip two small round shapes and fasten them wherever the goat has eyes.
Lesson 6. We make a goat skin
If you want the goat's belly to be colored,start skins from it. Put the goat on your back, attach the coat to your stomach and knock it down. Wear a separate skin of wool of different shades, creating stains. Straighten the skin on the back and sides and pile tightly and evenly. Add the wool to the tail and make it fluffy.
Lesson 7. Making a Muzzle
Form a semi-circular shape for the tophead. The area of the nose and lips should be made darker and denser, and the part closer to the horns do not work, so that the transition at stalling was smooth. Billets wrap around the edges and dump, forming the lips. Separately make a chin, from which you begin to attach parts of the head, gradually giving them a shape. Smooth the transitions by working with a needle. Over the upper lip make the outline of the nose.
Lesson 8. Final finishing of the toy
Mark the needle with the needle for the eyes. From black wool, roll two small balls. Using a needle, tuck them into the grooves of the eyes, make pupils of golden and white wool. The ears are made of white wool with the addition of darker to the ends. Inside, you can add wool pink color. Attach the ears behind the horns, pile and smooth the back of the head. The final touch is the goat's beard. It can be made from alpaca: it looks very natural! Http: //www.sarafinafiberart.com/
Comments
Related posts:
 Dry felting out of panda wool, master class / Toys with their own hands, patterns, video, MK
 Cat, cat, kitten - dry felting out of wool, master classes / Toys with own hands, patterns, video, MK
 Dry felting - flowers made of wool. Master Class. Video / Toys with own hands, patterns, video, MK
 Flowers from wool - wet felting / Toys with their own hands, patterns, video, MK
 Felting out of wool: bullfinch, master class / Toys with their own hands, patterns, video, MK