
How to create a water lily from paper with your own hands? The answer is shocking.
Paper crafts are very easy to make. This is an interesting lesson for both grown-ups and children. Let's try to make a similar water lily:  First we will produce the flowers themselves, which will beonly 3. We need a landscape paper. It is not very dense as a Whatman and not too thin. To our flower was like a real water lily, we must make 3 flowers: 2 identical and 1 smaller. So, we draw on paper circles: two with a diameter of not more than 15 cm and one - about 7-8 cm. To create future petals, and there will be 12 of them in each flower, the circles must be equally divided into 12 parts, like a round cake. To do this, we first divide the circle exactly in half.
 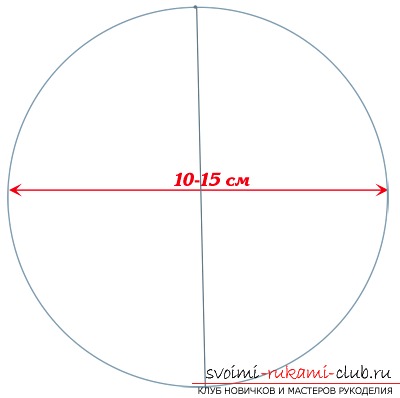 Then also in half, just across the first line, to get such a flat cross.
  Points in the intersection of segments with a circlewe connect to each other and get a square with the sides AB, BC, CD and DA Using the ruler, divide each side of the square by 3 identical parts, marking them with dashes
  Through the center of the circle and the opposite points of the sides of the square, we draw more lines
  As a result, we divided our circle into 12 identical parts, which will soon be petals. Now we draw another circle in the center of the first one, but it is 2 times smaller, so that this little wheel turns out.
  Take a pencil and draw petals here for this example:
  In the end, it should turn out to be such a sun, this is the future flower
 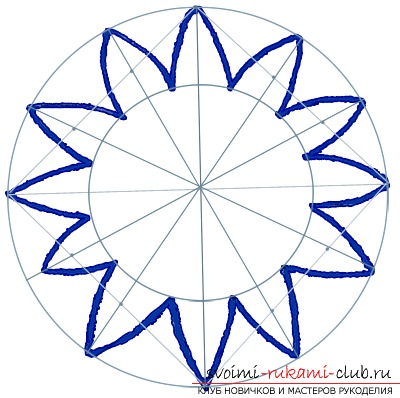 Now carefully cut it out and in the same waywe produce two more flowers, one of which should be smaller. Now we are laying aside a small flower, while for the other two we bend the resulting petals. Swipe on each petal 2-3 times, lightly pressing with scissors
  Dropping glue in the center of large flowers, glue allflowers among themselves so that the little one is on top. To prepare the middle of the paper cut a yellow strip 20cm in length and width of 8 cm Then, approximately every 0.5 cm, make cuts along the length of the strip to get a fringe.
  Now you need to roll the strip to the end of the pencil ina kind of spiral and lightly glue its end. After drying the glue with your hands, fan the incisions to give the fringe a three-dimensional appearance. Then remove from the pencil and paste it in the center of the upper flower.
  To cut out the leaves you do not need to draw an even circle. It is enough to cut out, something like two ovals, of green paper. And in each cut a simple triangle Now on the blue sheet of cardboard we glue the leaves, and on them the flower itself. OUR KUVSHINKA READY
Comments
Related posts:
 How to make a clove from paper with your own hands
 Origami. Bunny with your own hands.
 New Year's decor, Christmas trees made of paper with their own hands, how to make a Christmas tree of paper with their own hands.
 New Year's crafts, the creation of Christmas decorations from paper, the various creation of paper balls with their own hands, how to make a beautiful garland of paper with their own hands.
 Flowers with their own hands, how to make a flower from paper with their own hands, flowers from corrugated paper, tips, recommendations, step by step execution instruction.